


| Construction: Hand Rotary and Hand Percussion Methods |
A. The Hand Rotary Method
1. Overview of Method
This method of well sinking
has been commonly referred to as boring. Sometimes percussion techniques
are included under the general title of bored wells. Because
of the limited soil conditions in which simple rotary methods
are effective, it is often useful to have percussion tools
available. However, for clear explanation, simple rotary and percussion techniques
are discussed separately here.
Where sophisticated drilling methods
are available for well sinking, hand augering is used only
for taking soil samples at relatively shallow depths. It is
cheap and provides very accurate soil samples, but requires time
and effort and is limited to unconsolidated noncaving formations.
An auger, which functions as a drill bit, is
attached to the bottom of a length of drilling rod
and turned with the handle, which is attached to the
top of the drilling rod. (Fig. 12-1.)
The auger serves first to loosen soil at the bottom of
the hole and second to remove it. As the auger
is turned, the loosened soil accumulates in or on the
auger.
When the auger is full, it is
lifted to the surface and emptied and then returned to
the hole to continue sinking. Lengths of drilling rod are
added to the tool string as the hole is deepened.
It has been estimated that 70 to 80% of the
time required for this sinking method is taken up by
raising and lowering the tool string.
2. Advantages and Disadvantages
There are several advantages to this
method.
The equipment is
simple, light, portable and easy to make from available materials.
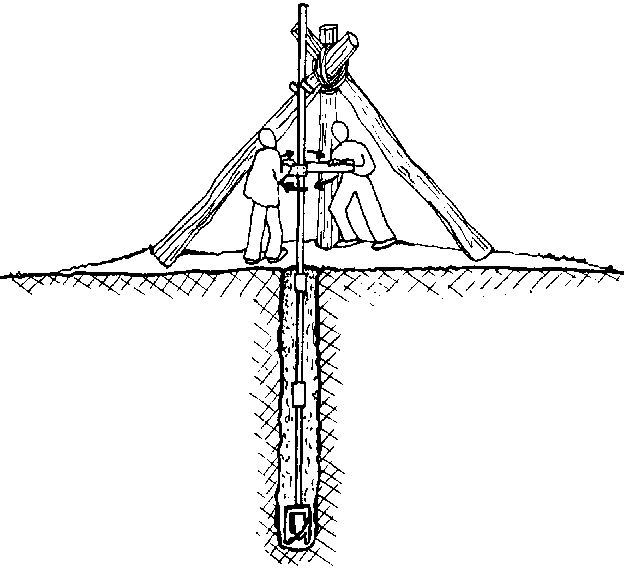
FIG. 12-1. HAND AUGERING
It provides excellent samples of soil layers penetrated for future reference.
The technique is simple and easily taught.
It is easily combined with simple percussion techniques to make the combination method suitable even where some rock exists.
It has, however, certain disadvantages.
It is limited to unconsolidated, non-caving ground formations.
Well depth is limited to 15 or 20 meters maximum because of the physical difficulty of operating a tool string any longer than that.
3. Equipment
Excavating equipment includes:
auger - An auger works at the bottom end of a tool string to excavate soil. There are two general types of augers each of which has variations which are suitable for use in different ground conditions:
a. cylindrical bucket type - different variations used for hand or power drive. (See Fig.12-2.)
b. open blade type - used mainly with power equipment (continuous spiral) although some are available with hand drive. (See Fig. 123.)
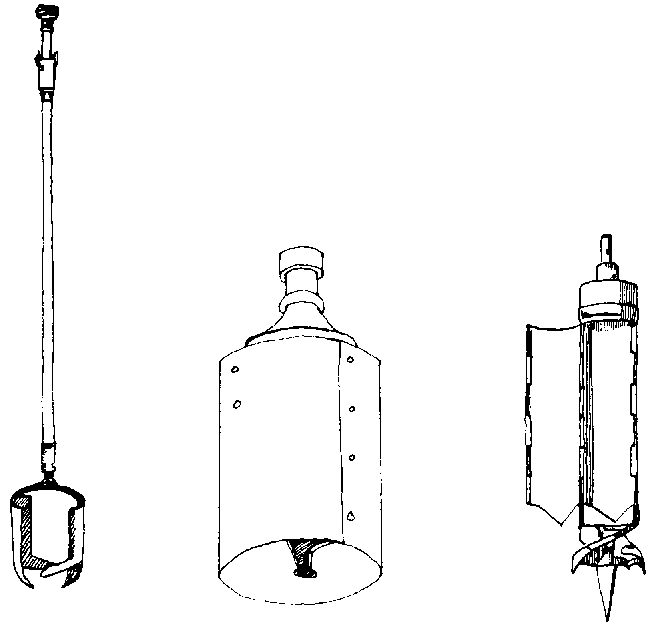
FIG. 12-2. BUCKET AUGERS
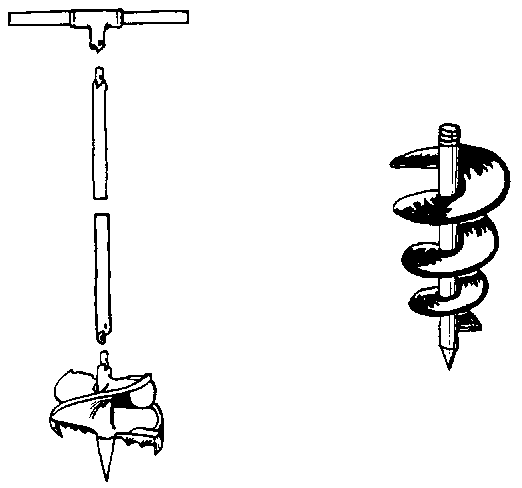
FIG. 12-3. OPEN BLADE AUGERS
drill shaft (drill stems, drill rod) - The drill shaft is made up of 1 to 5 meter sections which are connected together between the auger and the handle. It is most often fairly small diameter hollow metal pipe. This size and shape help to reduce the weight of the tool string as well as provide the appropriate motion and strength necessary to transmit the drilling motion from the handle to the bit. Because so much time is spent removing and lowering the bit, the shaft connections should be quick, easy, and sure. It is necessary that all of the equipment use the same type of drill shaft connection.
The following are examples of types of connections that have been used.
- Threaded pipe and coupling is probably the most frequently used connection because it is so readily available.
- Another connection involves slipping the two connecting ends of the drill shaft into a slightly larger piece of pipe and bolting them in place. Only one bolt needs to be removed to disconnect the two shaft sections. That can usually be easily done because it has been found that the bolts need only be finger tight. An alternative to using a regular nut and bolt could be to use a toggle type bolt.
Rock hammer - This is a percussion tool which can be dropped or thrown down the hole to chip or break rocks which are too large to be removed by the auger.
Sand bailer - This can be used to remove sand from loose caving formations.
Casing - Some type of casing must be installed in the well to reinforce the walls. In caving formations, a sand bailer can be operated inside the casing to sink the hold and the casing. The inside diameter of the casing will need to be slightly larger than the outside diameter of the sand bailer.
Tripod - This can hold a pulley to aid in lifting the tool string and also support the upper end of the drill stems when drilling through harder layers, such as laterite (see Glossary). The support is to hold drill stems plumb while drilling with extra weight on the stems to enable penetration of the hard formations.
Fishing tool - This is used for retrieving tools and equipment that have come disconnected from working pipe string or have dropped into the hole. (See Fig. 12-4.)
NOTE: A magnet can be a fishing too] for small items dropped into the hole.
Plumb bob and level - These may be used to check whether a hole is perfectly straight and vertical.
Handle - The handle attaches to the drill shaft enabling the auger to be turned by people at the ground surface. It can either be attached to the top end of drill stems to form a T or be a cross piece that clamps to the drill stem wherever it is needed.

FIG. 12-4.
4 The Sinking Process
Arrange and set up all tools, equipment and supplies; clear the area immediately around well site of all unnecessary tools. Set up and locate a tripod or headframe if it is necessary to provide support for the upper end of the drill stem. Locate it directly over the hole so that the drill stem will be plumb.
Assemble the auger, drill stems and handle.
Begin boring by forcing the auger blades down into the soil while turning the tool. Digging a 30 to 50 cm deep hole of sufficient diameter to allow introduction of the auger usually helps to get the drilling started.
Turn the bit until it is full of loosened soil. It is only necessary to turn the bit just enough to fill it. The number of turns required to fill the bit is determined by the soil hardness, and may be only two or three turns. Be careful with some augers not to screw them too tightly into the ground. In hard formations, it may be necessary to push down as well as turn the tool. (See Fig. 12-5.)
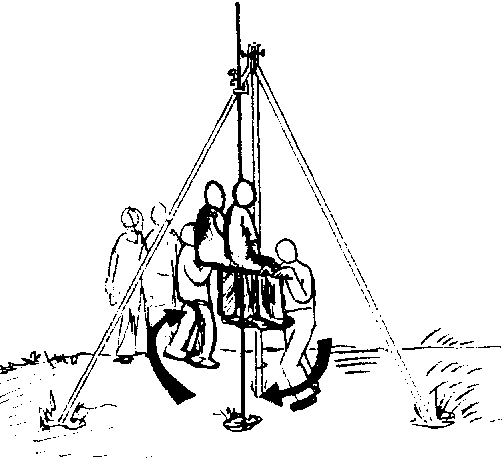
FIG. 12-5. ADDED WEIGHT NECESSARY TO PENETRATE HARD GROUND
Remove loosened soil from the hole. Lift the auger from the hole and empty the soil accumulated on or in it. By systematically depositing the components of the auger in short ridges, each containing the soil from 1/2 or 1 meter of well depth, you can keep a record of the soil layers penetrated. Keep the samples far enough away from the well so as not to hinder the well sinking operations.
Return the auger into the hole and continue sinking .
Continue turning the auger, removing the auger from hole when full, emptying and returning the auger to the hole to be turned more. As the hole is sunk deeper and deeper, more and more drill stem sections will need to be added.
Continue sinking the hole by the same process until a) you have reached a sufficient depth into the water table or b) you can no longer sink the hole any deeper by this process. If (a) is the case, see Chapter 15, p, 191. If (b) is the case, you were probably stopped for one of the following reasons: the auger encountered rock, the hole continues to cave in permitting you to go no deeper, or the tool string is not long enough to go further.
If the auger encounters rock you still have several options. Try to remove the entire rock from the hole with a ram's horn (spiral auger). (See Fig. 12-6.) This will work only if the rock is smaller than the hole.
Although a spiral auger is a piece of equipment listed in the literature for removing rocks from augered holes, field experience has found that percussion techniques work better. (See Hand Percussion, p. 155.) A percussion rock bit would be attached to a rope and dropped in the hole or attached to the end of the drill shafts just as the auger is. Abandon the hole and try some other place if you have no equipment to penetrate a rock layer or if it is too thick or hard to be penetrated by whatever tools you have.
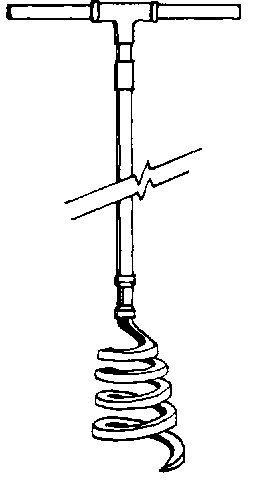
FIG. 12-6. SPIRAL AUGER
If the hole continues to cave in permitting you to go no deeper, you have two options. If you have hit water at the same time, see "Bottom Section." If the hole is still dry, however, you must evaluate your situation to decide whether you want to continue sinking this hole. The hole will usually be caving because the earth is loose sand. To go deeper you will need to sink a casing to hold the walls in place. Determine how much deeper you can go and whether it is worthwhile.
If the tool string is not long enough to go further, abandon this hole and try another location.
5. Time Saving Suggestions
Disconnect as few of the drill shaft connections as possible. Simply remove and replace shaft sections in lengths as long as you can comfortably handle.
Leave disconnected shaft lengths standing upright right next to the well. A scaffold could be built against which long shaft sections could be leaned while waiting to be reconnected and go back into the hole.
Use an auger with a long central cavity in which to accumulate drill cuttings.
Leave an opening in the auger which will enable the cuttings to be quickly and easily poked out.
B. The Hand Percussion Method
1. Introduction
This method has usually been classified as a variation or useful addition to hand augering. It makes use of the same methods that are used on a larger scale in cable-tool percussion drilling with large rigs.
The basis of this method is the up and down motion used to sink a hole. The tool string is lifted by an appropriate means and dropped, causing the bit at the bottom of the string to come into sudden, forceful contact with the bottom of the hole. The heavier the tool string, the harder it will strike the bottom of the hole.
It is usually useful to have several different bits suitable for varying ground formations. All of these bits are operated by dropping them onto the bottom of the hole. It will often be useful to turn the bit in the hole, either with a wrench or with a handle, that can be attached similar to an auger handle to make drilling easier and help ensure a round hole.
Cuttings can be removed from the hole in several different ways depending on the particular bit being used. Hard rock cuttings and very loose, caving material is usually removed with a bailer. (See Fig. 1210.) Non-caving soil can usually be packed into a hollow bit. (See Fig. 12-9.)
2. Advantages and Disadvantages
The hand percussion method is suitable for use in a wide range of ground conditions, and may be effective where an auger is not.
This method can be slow, especially in hard formations.
3. Equipment Overview
Cutting bits. There are several different kinds of bits that are commonly used depending on the characteristics of the formation being penetrated.
- A cutting bit is needed for hard formations. (See Figs. 12-7 and 12-8.) Heavy bits with sharp hard edges are used to smash and chip rock. The bit action cuts and mixes the drill cuttings with a small amount of water added to hole to form a paste which can be easily removed with the bailer (too much water will slow drilling). While a solid piece of regular steel can be used to make the rock bit, it is a good idea to face or fit the cutting edges of hard steel. This can be done by building up the tip with welding steel and grinding it down to the desired shape. The bit will require less frequent sharpening and will last longer. The bit can be worked either hanging by rope or cable, or connected to drill shafts.
Rope or cable will tend to wear and may break during the drilling process. If this happens, the bit will have to be "fished" from the hold. (p. 163.) Although rope wears faster, it does have one advantage over cable. When rope suddenly reaches the end of its fall, it gives a quick little turning motion to the bit which helps prevent the bit sticking in the hole. For the very heavy (80 kg) bits which are more effective in harder rock, rope or cable seems far more suitable than drill shafts. With an 80 kg bit, five to seven people are needed and they require frequent rests (every 50 to 100 strokes). The best action with a rock bit can be achieved with short (50 cm) rapid strokes.

FIG. 12-7. PERCUSSION BIT
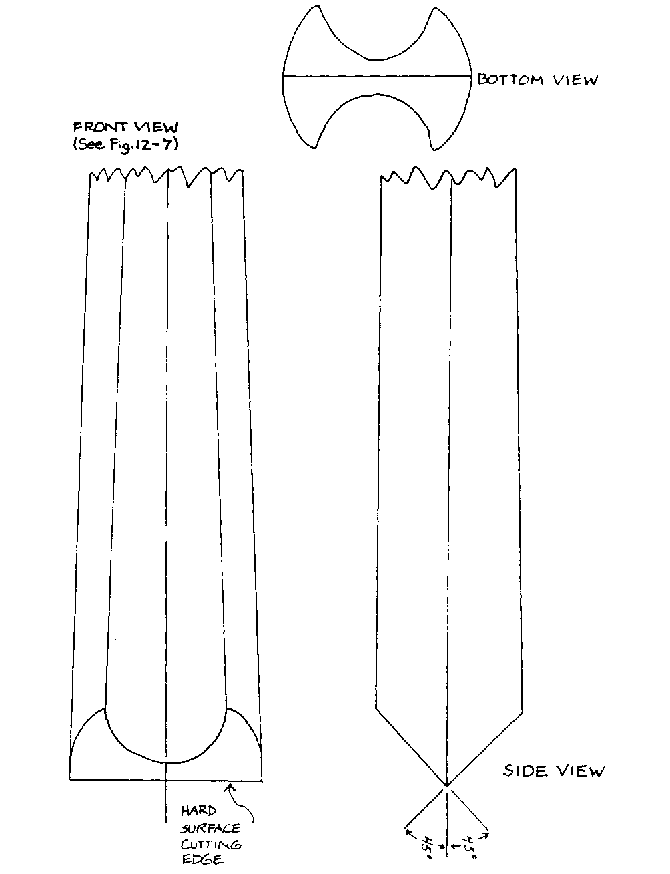
FIG. 12-9. DETAIL OF PERCUSSION BIT
- A hollow rod bit can be easily made locally from a piece of heavy metal pipe. (See Fig.129.) Galvanized iron pipe is sufficient. It can be made with either a sharpened straight bottom edge as in the figure or a jagged bottom edge. The straight edge is simply sharpened with a file while the jagged edge can be Cut with a hack saw. The opposite end of the bit should be fitted so that it can connect to a drill shaft or rope. It will probably be better with this type of bit to attach it to a drill shaft so that the bit can be forcibly turned or pushed down as necessary. It will be very useful to leave or cut a narrow slot almost the entire length of the bit so that drill cuttings that have been packed up into the bit can be removed by prying with a piece of re-rod or something similar.
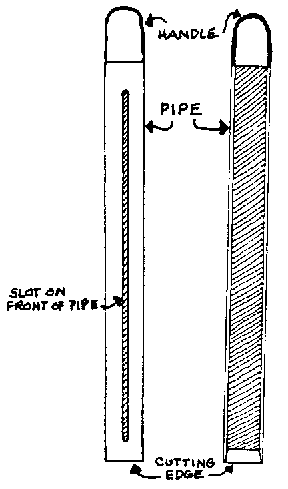
FIG. 12-9. HOLLOW ROD BIT
NOTE: If you reach rock, it is usually advisable to continue drilling for three to five days to get an idea of whether this is an isolated boulder; a thin, easily penetrable rock layer; or a virtually impenetrable thick rock layer. After about 50 cm penetration into rock, it is normally possible to identify a boulder, because a boulder will usually break up.

FIG. 12-10. BAILER
- A bailer is the most commonly used tool in loose soils. It is a long cylindrical tube with a valve in the bottom end which permits material to be forced up into the tube but will not permit it to fall back out (See Fig.12-10.) Bailers used with hand equipment are most often equipped with flap valves. The bailer is lowered to the bottom of the hole. Lift it 1 to 2 meters and drop it. The impact of the bailer on the bottom of the hole will force some of the loose soil up into the hollow core. Continue lifting and dropping until the bailer is full or until it has picked up as much of the loose material as it can. Experience will show how long to continue lifting and dropping the bailer to get the maximum usage. When the bailer is full, pull it up to the surface and empty it away from the well.
A bailer has several uses in different situations. It removes rock pieces loosened by rock bit; it removes sand in caving formations from inside the casing; it functions to remove loose material that cannot be packed or retain its shape.
Drill shaft. The shaft lengths connect the bit to the lifting apparatus. Connections between the rods need to be strong, to withstand constant lifting and dropping, and quick because of the frequent necessity to disconnect and reconnect rods when raising and lowering bit to empty it (see details on drill rod).
Turning handle. This is not necessary, but it can be useful to turn the tool string to facilitate sinking and help ensure a round hole.
Lifting apparatus. A lifting apparatus can be made from whatever materials are locally available.
"Fishing" tool. A fishing tool is useful for retrieving tools that have become disconnected in the hole.
Casing. Casing is necessary for permanent well construction and can be used to reinforce the hole when sinking through caving formations.
A plumb-bob or level is needed to check the verticality of the hole especially when the hole is started.
Hand tools. Very few hand tools are absolutely necessary although many will be found useful by those who know how to use them.
Rope is always useful for a variety of purposes.

FIG. 12-11. FISHING TOOL - WHICH CAN BE USED TO PICK UP BROKEN ROPE OR CABLE
4. The Sinking Process
Arrange and set up all tools, equipment and supplies. Clear the area immediately around the well. Locate a tripod or other lifting apparatus directly above hole site. It should be anchored well to prevent the legs moving when a heavy weight is supported by the tripod. The exact hole location can be found by hanging a plumb-bob from the drill shaft guide or from the lifting point of the tripod or frame. This will help ensure a vertical hole.
Dig a shallow starting hole before beginning the sinking process with tool string.
Assemble the tool string and set it in place. It is very useful at this point and also during the sinking process to have a guide for that part of the drill shaft which will extend above ground level. This will help to ensure that the hole is perfectly vertical, especially when starting the hole. However, do not depend on the shaft guide alone to ensure a plumb hole.
Frequently and carefully check to see that the tool string continues to be plumb, especially when the hole begins to guide the tools. At a depth of about 50 cm, the hole itself will probably have more of a guiding effect than any above-ground tool string guide.
Begin the sinking process by lifting and dropping the tool string; the lifting and dropping tools may be connected to a rope. The rope comes from the bit or tool string over a pulley and back to a solid post or tree around which it can be wrapped or tied at a convenient height so that workers can easily reach it. Workers can then raise the bit by lining up along the rope and pressing down. From there it is quickly released to allow the bit to fall in the hole. You can also use a rear car wheel as shown in Figs. 5-7 and 58.
5. Sinking Variations
There are three variations of this sinking process that can be used depending on the ground conditions encountered.
In hard, compacted formations, a club type bit has been found most effective. (See Fig.12-7.) When dropped, the bit smashes and chips the hard formation to break away small pieces at a time. As the bit continues to be lifted and dropped, the small drill cuttings will gradually accumulate in the hole until they prevent the bit from coming in contact with the bottom of the hole. The driller should continually watch the progress of the bit so that he can stop the drilling and remove the accumulated cuttings whenever the progress of the bit is slowed significantly. Determining when to stop and remove the cuttings is a matter of judgment and experience. After the bit has been lifted from the hole, the cuttings are removed by lowering a bailer into the hole and lifting and dropping it until it has accumulated as much of the cuttings as possible. Adding a small amount of water to the hole sometimes aids the bit in pulverizing rock and producing a slurry that can easily be removed by a bailer.
In loose, non-caving formations, a hollow rod bit can sometimes be used effectively. (See Fig. 12-9.)when this bit is dropped in this type of ground, it does two things: 1) the circular bottom edge of the bit cuts out a plug of material that it has sunk into and 2) this plug forces material already picked up in the hollow inner core of the bit farther up in the bit and packs it in so that it cannot fall out when the bit is lifted again. It is this packing of the loosened, cut-away material into the bit that allows the material to be removed from the hole by lifting the bit to the surface and prying out the packed in material.
Here are some comments and suggestions that may help. It may be necessary to add water to the hole to facilitate sinking because either too much or not enough soil is sticking to the bit. Rotating the bit in the hole is sometimes useful to loosen the bit after it has been dropped and to help maintain a round hole. Leaning the tool string against the rod support or tripod to empty the bit, as opposed to laying it down, saves time and energy. Where the handle is needed to turn the bit, it will be most useful if it can simply be clamped into the tool string wherever desired. This can be long hard work but a system of alternating work and rest periods for teams of workers has proved efficient.
As the bit fills with the loosened soil, it picks up less and less with each stroke until it becomes so packed that it can no longer loosen and pick up any soil. Because different soils pack differently, the bit may be as little as one third full when it must be removed and emptied. With experience, one quickly gains a feel for when the bit needs to be emptied.
In loose, caving formations like saturated sand, a bailer can be operated inside the casing to sink the hole as the casing is sunk or driven. (See Fig. 12-10.) The outside diameter of the bailer should be slightly less than the inside diameter of the casing being installed.
If the casing will sink by itself, the bailer is simply worked up and down inside the casing pipe to pick up loose ground material. As the bailer picks up the material from the bottom of the hole, the casing should sink under its own weight. (If the casing does not sink, it can be driven.) When the bailer fills up, it will need to be removed from the hole and emptied.
The casing can be driven at the same time that the bailer is being worked or it can be driven down about .5 m and then bailed. This particular process of driving and bailing is very commonly used to penetrate loose caving formations.
6. Problems in Sinking
If the bit becomes stuck in the bottom of the well, it may be freed by attaching to the rope or shaft a long pole which pivots over a rock or log next to the hole to lever up the bit. (See Fig. 14-10.)
Fishing - When a rope becomes worn, it may break, especially under the added strain of trying to retrieve a stuck bit. It may be possible to fit a hook onto the end of the drill shaft, hook the bit, and pull it up. A solid drill shaft is much easier to control and manuever in the hole than rope or cable.

