


| Construction: Driven and Jetted |
A. Introduction
The driven and jetted
sinking methods are different from the others in that they
can sink the entire casing and well screen into the
ground at the same time that the hole is being
excavated They are used primarily to sink the casing and
well screen into final position in holes that have already
been sunk down to the water table where the aquifer
is composed of loose, caving soil. They can also be
used to sink wells from the ground surface, although the
conditions which would allow them to be used economically are
very specific and relatively uncommon.
B. Driven
1. The method
Techniques used in the
sinking of driven wells are most commonly used not to
drive well points and casing from the ground surface as
the method describes but to drive casings down into place
and well points and attached casing in from the top
of the aquifer. It is a method that is used
primarily along with and as a part of other methods.

FIG. 14-1. CONTINUOUS SLOT DRIVE POINT
This is a single piece of wire wrapped around and welded to a supporting frame attached to a steel point at one end and to the connecting pipe at the other. A cross-section of a bamboo variation of this type of screen is shown in Figure 15-4.
Make use of these various techniques when caving conditions prohibit the excavation of the complete hole for later casing.
This well sinking method is most effectively used in conjunction with hand augering where the aquifer is loose sand or gravel and the soil above it is non-caving. Hand-augering is more effective and faster in non-caving formations through which it would be difficult to drive a well point. Driving is then used in the lower water-bearing formation which will not support a handaugered hole.
2. Advantages and Disadvantages
These wells are easily driven, pulled out and put down elsewhere. In time and money expended to reach water, driven wells may be cheapest.
The limitations of a driven well include the following:
Supplies are often unavailable. Drive points almost always have to be purchased because of the necessary high quality. Metal pipe and pumps are available in most countries, but not often in rural areas.
Drive points will not penetrate hard rock and will penetrate clay only with great difficulty.
A drive point can rarely be driven deeper than 15 meters.
3. Equipment
The following equipment is required for constructing driven wells:
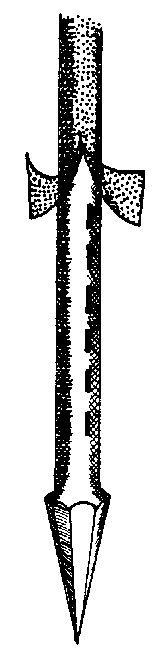
FIG. 14-3. BRASS-JACKED DRIVE POINT
A steel point attached to a pipe with holes in it, wrapped with a brass mesh preventing small soil particles from entering with the water.
Drive well point. These are well screens with sharp steel points on their bottom ends so that they can be easily pounded into the ground. Because of the stresses put on them while they are being driven, drive points are invariably made of strong metal. It is possible to make a well point from a piece of iron or steel pipe by cutting and bending one end into a point, but commercially manufactured well points can withstand much greater stress. Above the pointed tip, all well points have a length of well screen through which water will enter the well. (See Figs. 14-1 and 14-2.)
Metal pipe, Metal pipe is attached to the drive point and driven into the ground where it will act as the casing. Only metal pipe is strong enough to withstand the stresses put on it during the driving process.
Drive couplings. These are special couplings in which pipe ends actually meet. (Questions have come up about the usefulness of this type of coupling because when driven, the connection loosens somewhat and cannot be tightened again because pipe ends are flush with each other already.) (See Fig. 14-3.)
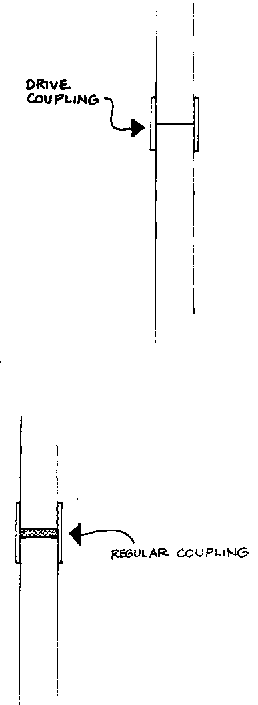
FIG. 14-3. PIPE COUPLINGS
Drive cap. This is installed On the pipe being driven to protect it. There are two kinds of drive caps: female drive caps (see Fig. 14-4a) which screw directly onto the threads or the top of the pipe and male drive caps (see Fig. 14-4b.) which screw into a drive coupling which screws onto the top of the pipe.
Drive weight. This will be used to strike drive cap to drive it into the ground.
Lifting device. This is an apparatus to lift drive weight to then let it fall on drive cap.
A plumb bob or level is needed to check that the pipe being driven is going straight down.
A water lifting device will be needed for final installation to allow people to get water from well.

FIG. 14-4. DRIVE CAPS ON TOOL STRINGS
4. Tools
Here are the major tools that are needed:
Two pipe wrenches are needed to tighten metal pipe sections together.
A pipe cutter or hack saw is needed to cut the metal pipe off at the desired level when it has been driven as far as desired.
A metal file is needed to remove rough or sharp edges from the pipe after it is cut. This is not absolutely necessary, but it is always a handy tool to have around.
Pipe threader. You will usually need to thread the metal pipe once it is cut so that you can attach the pump base plate to it. (Most commercial pumps have a screwed connection to the drop pipe.) Make sure that the pipe threader will work on the short section of pipe that is sticking out of the ground.
Pipe dope or sealer should be put on metal pipe threads to make them watertight before the pipe is screwed into a coupling.
5. Driving Methods and Equipment
Following are five different methods and the equipment that can be used to drive wells.
Use a sledge hammer to strike the drive cap directly. The equipment required includes a drive cap and a sledge hammer weighing 5-10 kilograms. Take care to hit the drive cap squarely because glancing blows may damage the pipe. Only a limited depth is possible because of the limited driving force. This method is physically very hard. (See Fig. 14-5.)
Use a sledge to strike a driver which fits over the drive cap. The equipment required includes the drive cap, a sledge hammer, and a driver. A driver helps prevent damage from glancing blows.
Use a weighted driver which fits over the drive cap. The driver is lifted and thrown or dropped to strike the drive cap. The equipment required includes a driver and drive cap. A driver can be fitted with handles to help in lifting and throwing, thus permitting two people to use it and enabling them to apply more force. (See Fig. 14-6.)
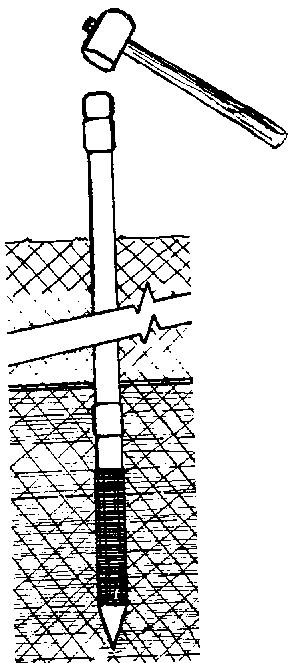
FIG. 14-5. SLEDGE HAMMER USED TO DRIVE WELL
Use a steel driving bar attached to a rope which is lowered into the pipe to strike directly on the driving point. (See Fig. 147.)The equipment required includes a driving bar, rope, tripod, and pulley. This is one of the safest methods of driving because it does cause it does not weaken the pipe.

FIG. 14-6. WEIGHTED DRIVER
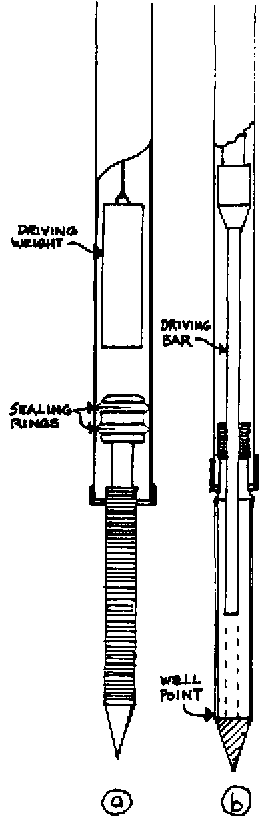
FIG. 14-7. STEEL DRIVING BAR ARRANGEMENT
(a) drive point can be driven down through the casing by a heavy weight which is lifted and dropped onto a reinforced head attached to the top of the drive point. The reinforced head shown here also has two sealing rings to seal it to the casing.
(b) This drive point is driven into place by a long heavy bar which, when dropped, strikes the back side of the steel point on the drive point. A special packing must then be wedged into place to seal the drive point to the casing.
A 15-20 kg driving weight is used to strike a) a drive cap or b) a drive clamp attached to the pipe. The equipment required includes a drive cap or drive clamp, a driving weight, rope, pulley(s), and a tripod. These are all variations of the basic idea that a guided heavy weight strikes an instrument on the pipe to drive it.
a. The driving weight can have a-bar extending down from it which slides through a hole in the drive cap. (See Fig. 14-8a.)
b. The driving weight can slide up and down the metal pipe to strike a set of drive clamps attached to pipe. (See Fig. 14-8b.)
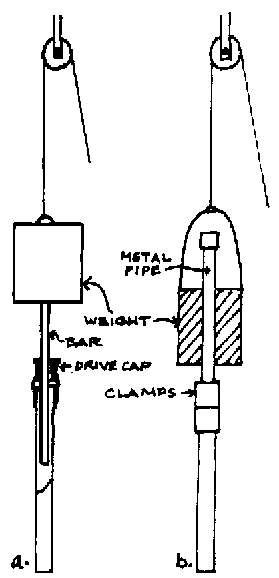
FIG. 14-8. HEAVY DRIVING WEIGHTS
6. The Sinking Process: From the Water Table
Here is a detailed description of the sinking process where a hole has already been sunk to the top of an aquifer from which it is desirable to draw water:
Before removing the initial hole sinking tools from well, it would be useful if possible to try to sink the tools some distance into the aquifer to get an idea how deep it is. Only attempt this if your initial sinking tools are such that once sunk into the aquifer you are able remove them.
Arrange and set up all tools, equipment and supplies. Make an effort to maintain an orderly well site as you proceed, to ensure the safety and convenience of further work.
Attach the well point and extensions if needed, to the first pipe length. Pipe joints must be made up carefully both to insure a watertight joint and to prevent thread breakage. Attach a coupling to the top end of the first pipe length. Attach a pipe clamp just below the coupling on the top end of first pipe length. Lower the assembled pipe and screen into the hole,setting both ends of the pipe clamp on raised flat surfaces, such as wooden blocks on either side of the hole.
Screw the coupling into one end of another pipe section and attach another pipe clamp below it as was done for first pipe section.
Screw this second pipe section into the coupling on top of first pipe section now in the hole.
Taking the weight of the pipe string on the pipe clamp on top of the second pipe section, lift the pipe string up just enough so that the first pipe clamp is not resting on the blocks.
Remove the first pipe clamp and lower the pipe string until the second pipe clamp rests on the blocks.
Continue adding pipe sections and lowering the pipe string until the well point rests on the bottom of the previously sunk hole.
Plumb the pipe and drive it into the aquifer. plumbing the pipe will be much easier than if driving had been started from the ground surface, but you must still be careful that the pipe string is being sunk plumb. To tighten the joint, give the uppermost pipe a fraction of a turn with each blow until it is permanently set.
Once you have driven the pipe as far as you can or want to into the water layer, you will need to develop the well. (See p. 202.)
Before the pump is installed and any surface platform work is done, the gap between the pipe and the sides of the hole must be filled. This can be done with any material pulled out of the well up to a point three meters below the ground surface. The top three meters should be sealed with either mortar or puddled clay to prevent surface contamination from entering the water source.
7. The Sinking Process From the Ground Surface
Driving the entire well from the ground surface is most commonly used for extracting water from sands, especially those underlying beds of intermittent streams, and making use of the natural filtering properties of sandy beds of perennial rivers. Here is a detailed description of the major activities involved in sinking from the ground surface:
Arrange and set up all tools, equipment and supplies. Clear the area immediately around the well site of all unnecessary tools. If a tripod is to be used, set it up and locate it so that the weight will be centered directly over hole. (It is easier to keep the pipe perfectly plumb if the weight is properly centered.)
Place the well point in place and begin to drive it (p. 178). It is a good idea to dig or auger a shallow (5080 cm) hole in which to start the well point. Especially at the beginning, pipe plumb must be frequently checked. Later, when several lengths of pipe have been sunk, the whole length will be supported by the ground and will require infrequent checks of plumb. A support for the upper end of the pipe will initially help to hold it plumb and may later assist in aligning new sections of pipe so they can be screwed into couplings.
Drive the pipe and add more pipe as needed. When the pipe has been driven so far that driving can no longer be accomplished, add another section of pipe.
- Remove the drive cap and screw a coupling in its place. Install a drive cap on top of the new pipe section. Screw the new pipe section into the coupling on top of the pipe set in ground. (See Fig. 14-9.)
- Where drive clamps are being used instead of a drive cap, a slightly different procedure is followed. To begin driving place clamps no more than 50 cm above ground on pipe (or at the bottom of a pipe section if the well screen sticks above the ground more than 50 cm). It is easier to keep the pipes plumb if the point of impact is closer to the ground surface. When the screen and pipe have been driven down to a point where the drive clamps almost touch the ground surface, move the clamps up 30 to SO cm. Reset them on the pipe and drive them down again. As more and more pipe is driven into the ground and the danger of driving the pipe string out of plumb decreases, the clamps can be moved. When the driving weight can no longer be raised far enough to provide sufficient striking force to drive the pipe string, a new length of pipe will need to be added. Screw a coupling onto the top of the pipe being driven and screw a new section of pipe into the top of the coupling. Make sure the weight can be raised above the coupling before the coupling is screwed on the pipe. You may want to slip new pipe through the driving weight before attaching it to the coupling.
To determine whether water has been reached, the plumb line can be lowered into the pipe. If the line comes up wet, you have hit water. By comparing the depth the line reaches to the known depth of the pipe, you can also get an idea about whether earth or sand has to any significant degree entered the screen.
You can also learn what kind of soil or formation you are driving through by the reactions of the pipe and driving weight when the pipe is struck by the weight.
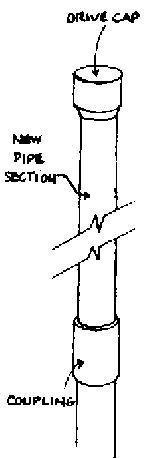
FIG. 14-9. INSTALLING NEW PIPE SECTION
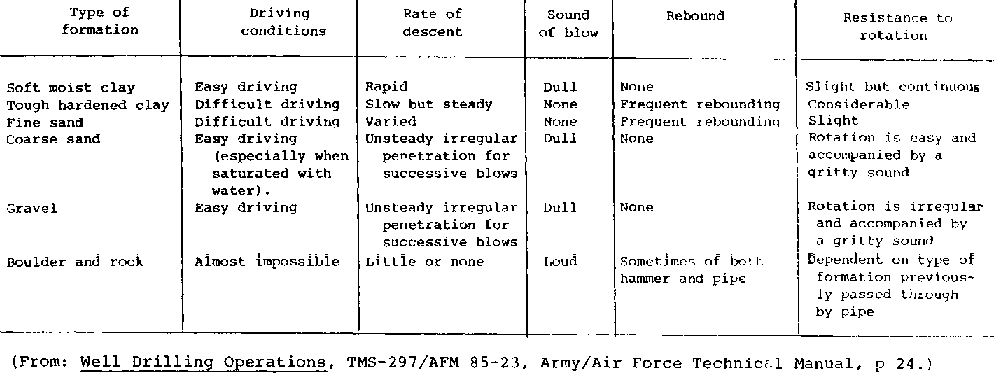
RELATION OF DRIVING TO SOIL CONDITIONS
When you reach water, drive the pipe as far into the water layer as possible. The bottom of the well point should just touch the top of the impermeable layer on top of which the water sits. To be useful and not put too much stress on the well screen, the aquifer should be deeper than the height of the well screen. (See Well Screens, p. 193.) If you can drive the point six or seven meters into an aquifer without reaching the bottom, you have assured a very large supply of water and there may be no point in driving any further.
If you don't reach water or have for some reason driven beyond the water bearing formation, you may want to lift the pipe string just a little or remove it completely from the hole. 1) You can sometimes lever the pipe up by using pipe clamps and crowbar or a stout stick. (See Fig. 14-10.) 2) You can use two jacks and pipe clamps to jack it out. (See Fig. 1411.) After it has been raised a few feet, the rest can be done by hand. Rotating the pipe Clockwise will assist its removal.
Once you have driven the pipe as far as you can or want to into the water layer, you will need to develop the well. (See p. 202.) You may wish to prepare the top end of the pipe for connection or use with the particular water lifting device you are using before developing the well.
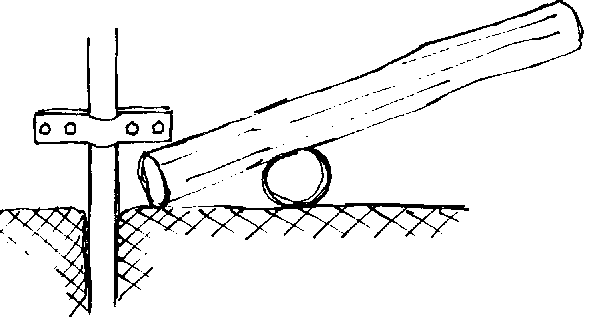
FIG. 14-10. LEVER PIPE UP
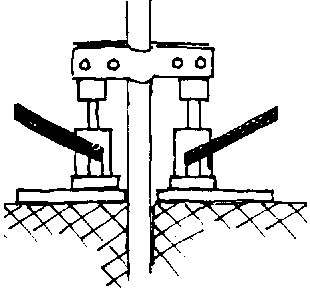
FIG. 14-11. JACK PIPE UP
C. Jetted
1. The method
Jetted wells are sunk through the action of a fluid under pressure directed to the bottom of the hole to loosen soil particles and carry them to the surface.
Variations of this technique have been used in many different wells construction situations. A major use is to wash the casing into a loose or slightly caving formation by pumping water down through the casing and out the open bottom of the casing or well screen. Wells continue to be jetted from the ground surface only in areas where rock is not likely to be found and the larger drilling equipment is not available or too expensive.
In jetted techniques, drilling fluid is pumped down through the hollow drill rod and out through a hole in the jetting bit. (See Fig. 11-2g.) The faster and more powerful the spray, the better cutting action it will have. After the fluid has been directed at the bottom of the hole, it flows back up the hole carrying with it the soil that has loosened from the bottom of the hole. Once the fluid reaches the top of the hole, it is channeled through a small ditch into a large settling pit. The fluid stands in the settling pit long enough to allow drill cuttings to settle out of the fluid, before it is pumped back down the drill rod.
The volume of the settling pit should be at least three times the volume of the hole being drilled. It should be relatively shallow (0.7-1.0 meter is usually sufficient) and about twice as long in the direction of flow as it is wide and deep. For example: a settling pit two meters long, one meter wide and one meter deep could be used when drilling a 10 cm diameter well 85 meters deep.
The drilling fluid is usually a mixture of clay and water. The clay is needed to make a fluid of such consistency that it will tend to reinforce the hole walls by forming a kind of "mud cake" along them. Fluid with too much clay and accumulated drill cuttings will be thick and difficult to pump. The thickness of the fluid may need to be adjusted during drilling by adding more water and/or removing some of the accumulated cuttings from the settling pit. Water alone will often act effectively as a drilling fluid, especially as it thickens after accumulating some of the finer drill cuttings.
2. Advantages and Disadvantages
Here are the major advantages of using this technique:
Loose, caving formations are easily penetrated.
Few people are needed to operate the equipment.
The major disadvantages are:
The method requires more special equipment than others.
A large quantity of water is required for drilling.
Hard clay and boulders may slow and stop drilling.
3. Equipment
Jetting bit: A shortened percussion type bit with water passages is helpful in loosening material at bottom of the hole. (See Fig. 14-12.)
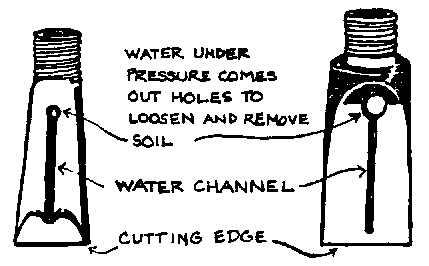
FIG. 14-12. JETTING BITS
Drill rod: Hollow drill rod is necessary to transmit the drilling fluid to the bottom of the hole. The smaller the diameter of the rod the lighter it will be.
Swivel hose connection to top of drill rod: It is not absolutely necessary to have a swivel connection although some type of connection is needed through which fluid can be pumped into and down the drill rod. A swivel connection allows the tool string to be turned during jetting, thus helping to assure a straight, plumb hole and helping to loosen soil at the bottom of the hole.
Flexible hose; This is needed to connect the pump with the connection on the top of the drill rod, allowing fluid to be pumped through the drill rod. A length is also needed between the pump and the setting pit from where the fluid is pumped.
Pump: A pump is needed to move the drilling fluid through the drill rod and out the bit, where it can loosen and remove soil from the bottom of the hole. Large capacity hand pumps have been successfully used although motor pumps are easier and provide better jetting action. Diaphragm pumps are probably best suited to this kind of work because of their ability to move relatively large soil particles without damaging the pump.
Tripod or other overhead support: Some type of overhead support is needed from which the tool string can be suspended and lifted or lowered when necessary.
Hand tools: A number of hand tools can be used to connect and disconnect hoses and drill rod when necessary. Pipe wrenches, screwdrivers, and regular wrenches may be particularly handy, although shovels, rope and pulley will also be needed.
4. Sinking Process
Arrange and set up all tools, equipment and supplies. Leave the area around the well clear of materials that do not have to be there. Set up the overhead tool string support and locate it directly over the proposed site. (See Fig. 14-13.)
Dig out a settling pit as needed for the hole diameter and expected depth. A shallow channel should connect the settling pit and the hole so that drilling fluid coming up out of the hole will flow into the settling pit.
Start the hole by digging as far as possible with a shovel or post-hole digger.
Fill the settling pit and hole with drilling fluid or water.
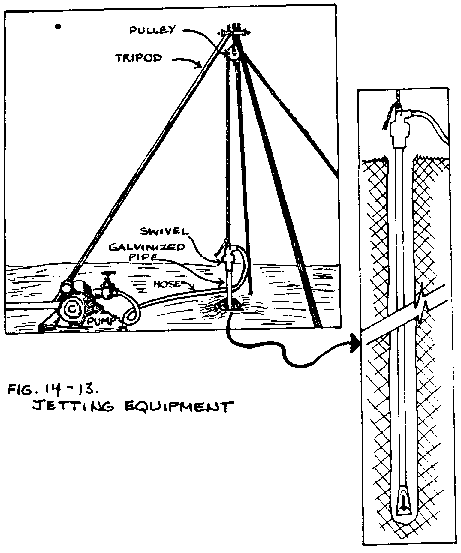
FIG. 14-13. JETTING EQUIPMENT
Assemble the tool string and suspend it from the overhead support. Attach the hoses between the drill rod and the pump and between the pump and the settling pit.
Start the pump to begin the drilling operation. Begin by pumping slowly to allow time to carefully plumb the tool string as it sinks the first meter or two. As the drilling proceeds, more pressure may be necessary to get the needed cutting action with the heavier drilling fluid. A slight up and down percussion action may help to speed the drilling.
Add more drill rod when necessary as the hole is deepened. The fluid circulation will have to be stopped to permit another length of drill rod to be added into the tool string. It may then be difficult to get the fluid circulation started again because the heavier soil particles tend to settle in the hole, clogging the bottom. Where the aquifer depth is known, it is possible to avoid this problem by assembling the entire casing and open bottom well screen above the hole, supported by a large scaffolding, so that it can all be sunk in one continuous operation.
It may be necessary to add more fluid and clean some of the accumulated cuttings from the settling pit at some point during the drilling process so that drilling can proceed effectively.
When a good water-bearing layer is reached, there is usually a noticable drop in the drilling fluid level and often a significant increase in the speed with which the hole is being sunk. The hole should be sunk as far as possible into the aquifer.
Because the jetting operation tends to reinforce the hole walls with the drilling fluid, it may be possible to pull the drilling tools completely out of the well and then set the assembled casing and well screen into the bottom of the hole. Keep an accurate record of the depths at which water was first reached and where the drilling was stopped so that you can determine how much well screen should be installed and whether the casing and well screen have been lowered to the actual bottom of the hole. If the complete casing cannot be lowered into place it will have to be driven or washed down. You will want to jet the well to its final depth. It is possible that the well may begin to cave in as the tools are being pulled out, but if it has been jetted to the final depth, it will be much easier to drive or wash the casing and well screen into place than if the well has not been completely sunk.