


| The Bottom Section |
A. Introduction
The bottom section of
a small diameter well usually consists of part of the
casing pipe and a well screen which acts as the
intake section. (See Fig. B.) In order for the well
screen to function effectively, the aquifer material that surrounds the
screen must be rearranged to allow as much water as
possible to flow through it. This rearranging process is known
as development.
For wells that are sunk into
solid rock, the intake section could simply be the open
bottom of the casing pipe but this is not a
normal occurrence in relatively shallow wells.
The intake
section or well screen is a continuation of the casing
in that it reinforces the walls to keep the hole
open. Simple screens can be made by making holes in
the casing. However, commercially available well screens may incorporate useful
features that cannot be obtained from homemade screens. (See Well
Screen, p. 193.)
B. Considerations in the Construction
of the Bottom Section
There are several considerations
to bear in mind before beginning work on the bottom
section:
choosing the appropriate
screen. One must consider the cost, material, local manufacture, opening
size, diameter, length, and strength;
properly placing
the screen in the water bearing layer so that it
can produce as much water as necessary;
developing the aquifer material surrounding the screen to obtain the
most efficient production.
C. Construction
Procedure Outline
In general, there are only two
steps involved in the construction of the bottom section:
setting the screen in the
desired place in the hole;
developing the well.
Both of these steps
must be done carefully and precisely in order to make
full use of the rest of the work that has
gone and will go into building the well. The amount
of water that can be drawn from the well is
almost completely controlled by how this section is built. Here
are the activities involved in the two steps:
1. Set the screen in its designated place in the
hole. Two general procedures can be followed, depending on the
size of the well screen in relation to the casing
pipe.
a. A pipe-size screen is attached directly
to the bottom of the casing pipe and lowered into
place in the hole. Usually the hole has been at
least partially sunk and the screen and casing have penetrated
to the desired depth by being driven or washed down.
Where drilling fluid has been used in the sinking process,
it may reinforce the hole enough to prevent its caving,
thus permitting the screen and casing to be simply lowered
into place.
b. A telescoping-size screen is lowered
into Place through casing.
1) The most popular
professional method is for the hole to be drilled to
the desired depth and cased. The screen is then set
in place on the bottom of the hole inside the
casing and then the casing is pulled up to expose
the screen. A special packing piece is next wedged into
place between the screen and the casing to prevent the
entry of unwanted aquifer material.
2) The screen
can also be washed down into the aquifer from the
bottom of the permanently placed casing.
NOTE: Telescoping
screens into place may be difficult with locally made materials
because of the difficulty of sealing the screen to the
casing pipe once both have been set in their permanent
places. Normally this is done with a special packing piece
that is wedged into place.
2. Develop the
Well
This is the process of using any
one of a number of tools or methods to quickly
move water in and out of the well screen, thereby
removing the fine particles from the aquifer in the vicinity
of the screen. It usually requires an average of 6
to 10 hours to complete.
D. Materials and Equipment
The following types of materials and equipment
will be required for construction of the bottom section:
Sinking equipment: The different sinking
methods and ground conditions in which they are appropriate have
been covered in detail in "Middle Section, Sinking Methods." Because
people do not have to work in this kind of
well in order to sink it, sinking methods need not
change between the middle and bottom sections. The only difference
between the two is that ground conditions beneath the water
table are liable to be loose and caving.
Well screen intake section: This refers to any portion
of the casing that has holes in it which are
intended to allow water to enter the well. (See section
E on Well Screens, below.)
Developing the
well: For the equipment necessary to develop the well, see
the section on Development, p. 202.
E. Well Screens
A well screen is
a special section of casing with holes in it which
is placed in the water bearing layer to allow water
to enter the well. It should be strong enough to
withstand stress while it is being installed as well as
caving pressure in the hole. It should be made of
material appropriate to the chemical and bacteriological characteristics of the
local ground water, neither easily corroding nor rotting. The greater
the open area of holes contained in the screen, the
more efficiently it will work by letting in more water.
Well screens can either be commercially or locally
made. The cost of commercially made screens and the time
required for delivery to the well site usually make them
unsuitable for isolated wells whose object is to supply only
a few thousand liters of water per day to the
local inhabitants. However, commercially manufactured screens offer advantages in quality.
They can often be more easily installed and provide more
water of better quality for a longer time than locally
made screens. (See Fig. 15-1.)
Locally made screens
are usually produced from the casing materials that will be
used in the normal small diameter well sinking operation. There
are some limitations concerning which materials can be used in
various kinds of ground formations, but an appropriate solution can
almost always be found. The cost of a locally made
screen will simply be the cost of putting holes in
a section of casing which has already been purchased for
installation in the well. Perhaps their biggest disadvantage is the
difficulty of producing the small opening sizes which may be
necessary in fine sands. (See Fig. 15-2.)
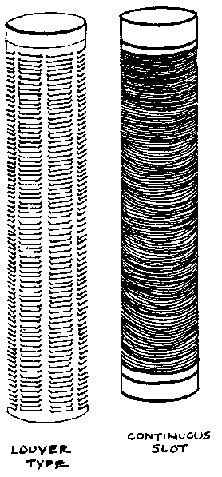
FIG. 15-1. MANUFACTURED SCREENS
A new method has been developed which would enable the local manufacture of continuous slot well screens out of specially made plastic pipe. This pipe is extruded to provide lengthwise reinforcing ridges along its inside surface. A lathe equipped with a high speed grinder on which the grinding wheel is replaced by a small circular saw the desired slot width is used to cut a continuous slot. For more information see the article by Sternberg (Sternberg 1978) cited in the bibliography.
Manufacturers will provide well screen information on request. However, because shipping and cost considerations may prohibit the use of commercially produced well screen, the remainder of the discussion will relate to locally producable screens.
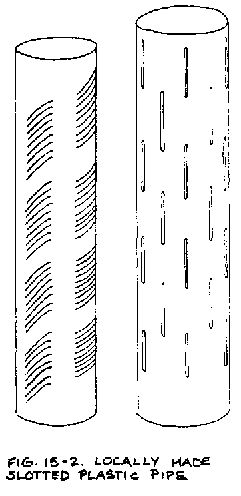
FIG. 15-2. LOCALLY MADE SLOTTED PLASTIC PIPE
F. Design
Designing the bottom section of a small diameter well involves deciding 1) what the screen will be made of, 2) how long it will be, 3) what the diameter of the screen should be, 4) how big the openings are, 5) the opening shape, 6) the arrangement of the openings, and 7) exactly where this will be placed in the water-bearing formation.
In sinking with locally available hand powered equipment, certain limitations will influence how you design the bottom section.
1. Screen Material
Materials that are suitable for use as casing can all be modified for use as well screens by making holes in them.
Commonly used materials such as steel or galvanized steel are suitable and often available, and can be driven into place where necessary. The quality of the water should be carefully checked for the possibility of corrosion or incrustation. Note that galvanized steel is only coated on the outside, so that once holes are made in it is no longer protected from rusting. This is a serious consideration because well life spans have been as little as three months in areas where steel casing was used in highly corrosive water.
Plastic such as PVC and ABS is very useful for screen production where driving is not necessary. Or, alternately, the casing and the screen can be bailed down under constant downward pressure. Holes are easily cut into plastic, the material is so lightweight that it may be possible to lower it by hand. It will not corrode and is usually significantly cheaper than steel.
Clay is another possibility. Clay pipe locally made and fired should be made with socket and joint fittings to enable certain location and prevent unwanted surface water entry. They are most successfully used where the hole is completed all the way to the bottom before the screen and casing installation. (See Fig. 15-3.)

FIG. 15-3. CLAY PIPE CASING AND SCREEN
Wood has been used in some temporary wells. In these cases, long straight sections of tree trunks have been used for casing and for screens. If you must for some reason use wood, cut the screen openings lengthwise with the grain for greater strength.
Bamboo, where it is available, has been used for casing and screens in wells whose life expectancy is only a few years. With the inner sections punched out, it can be made into a servicable pipe. Screens can be made in two ways. Long pieces of bamboo can be split lengthwise, arranged around circular spacers and wrapped with rope, (See Fig. 15.4) or narrow lengthwise slits can be cut with a circular saw in a solid piece of bamboo. As the bamboo gets wet, these slits will become smaller, an advantage in a well screen.
All of the materials mentioned above have some limitation which makes them inappropriate in certain situations. Steel is easily corroded. Plastic will deform under too much stress. Clay is easily broken. Bamboo and wood will rot and taint the water. some materials, such as stainless steel, can be used in almost any situation but they are usually expensive.
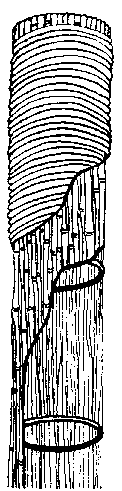
FIG. 15-4. BAMBOO WELL SCREEN
2. Screen Length
Most small capacity well screens are between one and three meters long. The determining factor is the amount of open area the area of all the holes added together) that will permit water to enter. Two or three meters of locally made well screen will usually be sufficient while one meter of commercially produced continuous slot well screen is more than sufficient for use with a hand pump.
To check whether your screen is long enough:
Determine the total amount of hole space in the screen. Assuming the holes are all approximately the same size and shape, you can figure out the area of one hole and multiply that figure by the number of holes.
Next, estimate the maximum short-term demand for water. To do that, answer the question: How fast can someone possibly remove water from the well? That will be expressed in liters per minute or gallons per minute.
Divide the first figure by the second figure. The screen should have at least 5.5 cm2 for each liter of water per minute, or 3.23 in2 for each gallon per minute, that can be taken from the well. These are absolute minimum figures. A greater area will be much better for well screens made of locally available materials.
3. Screen Diameter
When the screen is made of the same material as the casing, it will be the same diameter as the casing. It is simply a normal section of casing with holes.
It would be possible to make the screen a larger or smaller diameter than the casing and still firmly attach it to the casing by using reducing couplings or bushings, but there appears to be no advantage in doing so. If increasing the diameter would increase the amount of water that would flow into the well, it might be useful, but the increase in water flow with an increased diameter is so small as to make it insignificant.
4. Opening Size
This is probably the most difficult technical aspect to deal with because it is often just not possible to make your own screen openings as small as they should be.
Ideally, the openings should be big enough to allow the smaller particles of the surrounding soil through and yet hold out the larger soil particles.
5. Opening Shape
Generally the most effective opening shape is a long thin slit, easily made with a saw. This provides the greatest amount of open area in a small space and is not easily clogged. Small round or square holes, on the other hand, are more easily clogged and require more construction time. Depth and cross-sectional shape can also be important but can only be effectively dealt with in commercially manufactured screens. (See Fig. 15-5.)
6. Arrangement of Openings
Make and arrange the screen holes both to maintain material strength and also to permit the greatest flow of water.
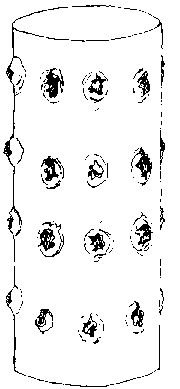
FIG. 15-5. PUNCTURED METAL CASING USED AS WELL SCREEN
7. Location of the Screen in a Water Bearing Formation
Ideally, the screen should rest on the bottom of the water bearing layer and extend up from there. Often, however, it is not possible to sink the well that deep with hand powered equipment. In that case, the screen should be placed as far into the water bearing layer as possible. Some well construction specialists suggest that 6 to 7 meters is deep enough beneath the water table to assure adequate year-round yield. However, this will vary depending on several factors that are not easy to evaluate, such as aquifer permeability and surface recharge. (See Glossary.)
In some cases, the aquifer will be made up of layers of different kinds of soil. If sufficiently deep into the aquifer, the coarsest layer will produce the most water and, therefore, that should be where the screen is set.
G. Installation of Well Screen
There are two different general techniques for setting the screen in place in the hole. In the first, the screen is attached to the bottom of the casing and lowered into place with casing. In the second, the screen is telescoped through a casing that is already in place. Telescoping screens into place is a difficult procedure to complete successfully with only locally available materials. (See Fig. 15-6.)
Here are four possible approaches to setting a well screen and casing in place.
1. The casing and the screen can be lowered into a hole that is already sunk to the finish depth in the aquifer. This is only possible where the hole will stay open long enough to allow the screen and casing to be lowered into place, i.e., non-caving formations or where drilling mud has been used. In cases where minor caving will occur, it may be possible to drill the hole a little deeper than necessary so that caving material will accumulate below the level of the screen and not interfere with its installation. Where this will not work, another method of screen and casing installation must be used. Any appropriate casing material can be used because no particular strain is put on the casing while lowering it into place. With sections of clay pipe, for example, where one end fits inside the end of the next sections, the sections can even be lowered and placed one at a time. (See Fig. 15-7.)
2. The casing and the bottom screen can be sunk into their final position by operating a bailer inside the casing and screen to remove soil and allow the casing co sink. This method can be used to loosen caving soils which will not permit the hole to remain open. It is also employed in harder clay type soils although it will quickly reach a point where the casing will no longer sink because of too much friction with the surrounding ground material. It is useful where the casing is made of a material such as plastic that cannot be driven but can be helped along by adding weight to the top of the casing. When the desired depth is reached, the open screen bottom must be plugged. (See Fig. 15-8.)
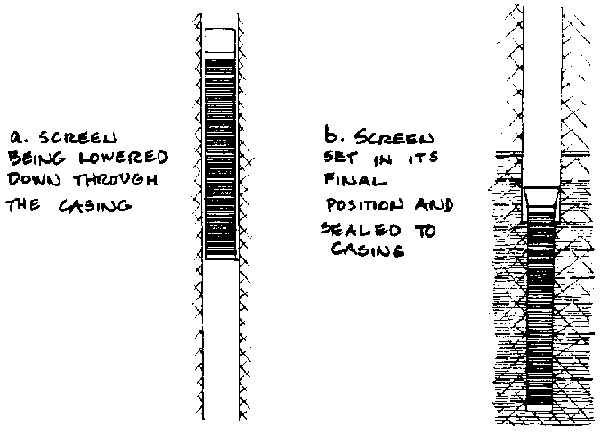
FIG. 15-6. TELESCOPING SCREEN
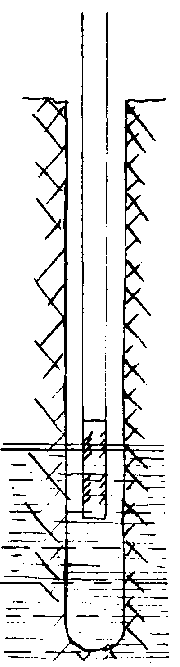
FIG. 15-7. SCREEN AND CASING LOWERED INTO COMPLETED
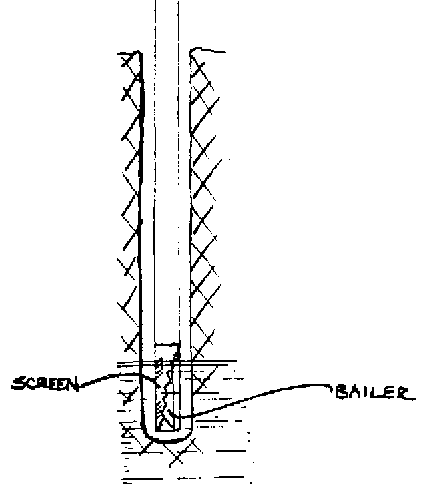
FIG. 15-8. SCREEN AND CASING BAILED DOWN
3. The casinq and the screen can be driven into final position by any of the previously outlined driving techniques (See p. 178.) This method can be used in any unconsolidated formation whether it is caving or not, but is more useful in caving formations. In this method, an open bottom screen is alternately driven and bailed out as in the previous technique, but because the casing can be driven, it is not as likely to become jammed in the hole in harder layers. A hard casing and screening material must be used that will not easily deform when struck. When the desired depth is reached, the open screen bottom must be plugged. (See Fig. 15-9.)
4. Where pumps are available, the casing and screen may be washed in by pumping water down through the casing and out the bottom of the screen where it will pick up and carry soil particles back up to the surface between the casing and the hole walls. Some water will go out the screen openings but most will go out the bottom. This method can be used only where the casing is a continuous waterproof string. (See Fig. 15-10.)
FIG. 15-9. SCREEN AND CASING DRIVEN INTO PLACE
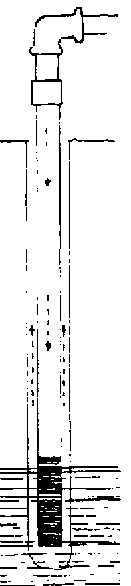
FIG. 15-10. SCREEN AND CASING WASHED DOWN
H. Development
1. Basic Features
To develop a well is to remove the very small soil particles from the water-bearing formation which immediately surrounds the well screen. This increases the yield of the well and forms a graded filter around the screen. The filter prevents the entry of small soil particles which could eventually clog the well or damage the pumping mechanism.
A well can be developed once the screen and casing are in their permanent positions in the hole. By using the tools and methods described below, water is forced in and out of holes in the well screen. This in and out water motion tends to loosen the adjacent soil and carry with it through the screen openings all particles which are small enough to fit through them. Only the largest soil particles are left, deposited next to the outside of the screen. Farther from the screen, the predominant soil particles become smaller and smaller. (See Fig. 10-5.) When development is complete, a graded soil filter surrounds the screen, which both prevents the entry of small soil particles into the well and allows the water to flow as freely as possible toward the screen. This is possible because there are gradually more open spaces for the water to flow through as it gets closer to the screen.
The time required for development depends on the nature of the water bearing layer, the opening size of the well screen as related to aquifer particle size,and the type of equipment and degree of development desired.
2. Methods
a. Overpumping
This is probably the simplest method of removing the "fines" from the water-bearing formations. The well is pumped at a faster rate than normal until no more fine aquifer particles are removed with the water. While this does not really agitate the soil enough to create a real filter around the screen, overpumping is a useful technique. If a well will support overpumping, it should certainly operate at a capacity less than that with no problems.
It is strongly recommended that if a well is to be developed by overpumping, a separate pump should be used for the development process. Fine soil particles to be removed during development can cause an abnormally high rate of wear on the pump resulting in early pump failure.
b. Backwashing
This, too, is a relatively simple method of development which requires a water lifting device and a container in which water can be stored and then from which it will be allowed to flow easily back into the well. This involves pumping water to the surface and then letting it flow back into the well many times. The process provides a back and forth motion that can more effectively develop a water-bearing formation than overpumping. However, in many cases, the motion may not be strong enough to obtain maximum development.
Backwashing is more difficult to accomplish than might be expected. The water lifting device used to pull water to the surface may have to be completely removed from the hole to permit water to flow back down. Water will not flow back down a pump riser pipe because there is a foot valve at the bottom designed to prevent that. It must then flow down between the pump pipe and the casing. An exception is a turbine pump which will pump water without a foot valve, but these are expensive. Note, however, that even a little backwashing is better than none.
c. Surging
Surging is the most common method of well development. It involves forcefully moving water back and forth, in and out of the well screen, to remove the fine soil particles. The surging action is caused by a tool being lowered into the well casing to some depth beneath the water level where it is then moved up and down, causing the water to move back and forth. The closer the tool seals to the well casing, the more forceful the surging action can be.
There are a variety of tools that have been used to give this surging action.
Bailer: If an open bottom screen is sunk into the water-bearing layer by bailing, the bailer's up and down motion also causes a surging action which will develop the area around the screen. The heavier the bailer is, the better it is, because it then has more force to push water back out of the screen. A bailer may operate more effectively for this purpose if it has accumulated soil, making it heavier and in some cases preventing water from coming up through the casing. A bailer can also be used to develop a formation once the well screen is already in place. Because bailers cannot form tight seals with the inside casing walls, they do not usually develop a formation as well as a surge block. (See below.)
Swab: A swab is simply a series of rags carefully tied around a pipe and built up until they will fill the casing pipe. This is then lowered down into the water and operated in much the same way as a bailer.
Surge block: A surge block is basically a flat seal that closely fits the casing interior and is operated like a plunger beneath the water level. Because it seals closely to the casing, it has a very direct positive action on the movement in the well. There are two basic types of surge plungers, solid and valve type. Both can be easily made from fairly readily available local materials. (See Fig. 15-11.)
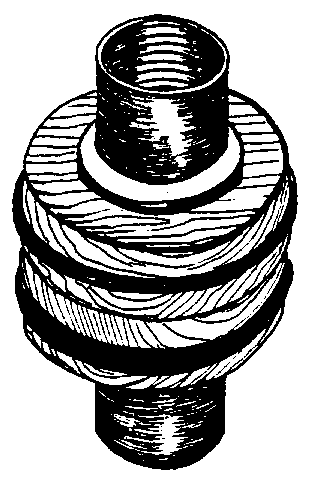
FIG. 15-11. SOLID TYPE SURGE PLUNGER
A valve type surge plunger is made the same way as a solid type plunger but with two additions. Before assembly, several holes are drilled through the wood pieces and the sealing rings in such a way that they will all line up when the plunger is assembled. During the assembly a flexible sealing flap, with the same diameter as the wood, is added between the top wood piece and the metal washer. This acts as a flap valve over the holes that have been drilled through the rest of the plunger. (See Fig. 15-12.)
The action on the down stroke of a valve type plunger is milder than that of a solid plunger because some water will pass up through the holes in the plunger and may possibly be pumped to the surface by the up and down plunger action if the plunger seals well with the casing.
Surging Operation
Arrange and install necessary tools and equipment in an appropriate place. A plunger or swab will need to be beneath the water level.
Apply an up and down motion, repeatedly raising and dropping the plunger 60 to 100 cm. The plunger should drop rapidly on the downstroke either as a result of being forced down or because of the weight of the connecting shaft.
Surge for several minutes, then remove the plunger and use a bailer or sand pump to remove the accumulated fine particles. Be careful not to surge too long. If you do, the screen will fill up with so much fine material that only the upper portion of the screen can be developed.
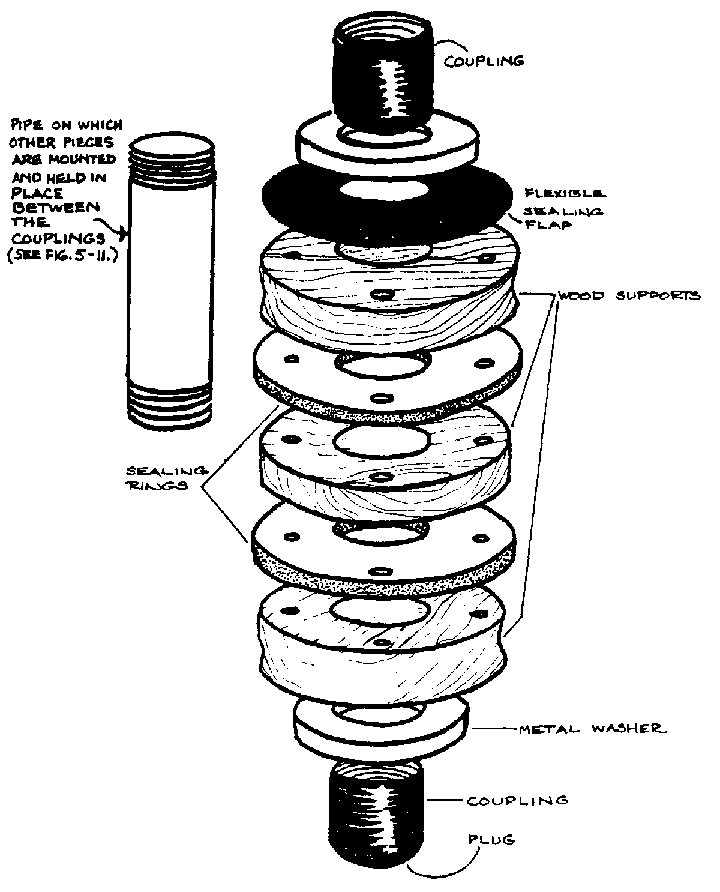
FIG. 15-12. EXPLODED VIEW OF VALVE TYPE SURGE PLUNGER
A solid type surge plunger can be made from the same materials. Leave out the flexible sealing flap and do not drill holes through the wood supports and sealing rings.
Continue surging and bailing until no more fine particles are removed with the water. The up and down motion of the plunger should at first be relatively slow and continue that way until the amount of fine material drawn into the well begins to decrease. The speed should then be gradually increased and each surging session should become longer and longer.
Exactly how long and how fast surging takes place will depend on how much material is being brought into the well, the ease with which it is brought up, and the kind of equipment you have.
Adding some kind of weight to the plunger or the connecting shaft will probably make it easier to work for a longer period of time, especially if you can use a rope and pulley to lift and then drop it in the well. If you can add some weight it is best to add it as close above the plunger as possible.
NOTE: It is a good idea to make the operating shaft long enough so that if it is dropped down into the well some of the shaft will still stick up above the casing to help in its removal.