

| Construction of Ferro-Cement Reservoirs |


| Construction of Ferro-Cement Reservoirs |
Repairing a ferro-cement tank is easy but should not encourage slipshod work. If the structure is finished and cured as described, then no leaks are likely to occur. Small leaks which create only a wet stain need not be attended to, since they will close after some time. Only leaks where water flows out have to be repaired.
The major problem is not the repair work as such, but the fact that leaks usually cannot be identified until the reservoir is filled. As indicated earlier, the value of the water which is then wasted should be considered. As mentioned, curing after the structure is finished as well as while it is still under construction is just as important as the quality of craftsmanship and material. But, to make it entirely clear, no reservoir -and this applies to the bricktank as well -should ever become entirely dry. Only cement structures which never dry off remain waterproof in the long term. This means that, after the curing period ends, a reservoir has to be flied with water. If as is the case in Botswana there are long periods without rain, or even a drought, a reservoir cannot be kept without water until rain eventually occurs. Thus it is advisable to fill the cistern with borehole water. This will not only preserve the structure, making curing unnecessary, but also furnish immediate evidence of any leaks. If there is no rainfall some days after the structure is finished, and the necessary amount of borehole water is not available, a minimum filling of 100 mm is a must. Since reservoirs might be built in remote areas with almost no access to water and the likelihood of rainfall doubtful, the minimum fill must be provided. In addition, especially in hot arid climates, the structure must be covered on all sides with plastic foil in such a way that the moisture of the mortar cannot evaporate. This means the plastic sheets must be tied up with overlaps so that the wind cannot blow them away. If a leak appears when the tank is eventually filled with rainwater, it is more appropriate to consume the water than drain it to repair the leak. Two different methods of sealing an already filled reservoir from the outside can be tried, provided the material needed is available. However, there is no guarantee that these methods, or rather tricks, will seal the tank, but since they do not affect professional repair, they might be tried if large amounts of water are at risk.
Rapid setting cement
If it is possible to obtain a few kgs of this cement, make a simple test before you buy it. Take a clean tin, pour in some clean water, and add some cement slowly, stirring it with a stick. When the water/cement mixture becomes plastic, take some of it in your hand and mould it. This cement must become very warm in your hand and by the time the heat disappears it must harden instantly. If this test fails to produce the required result, you have either got the wrong cement or the material is overdated, or has become moist, losing its property, and cannot be used. If the test is successful, buy the amount you estimate you will need. At the tank leak start to enlarge the hole where the water is running out. The hole should at least be 10 mm large and just touching the reinforcement. While you enlarge the hole, more water will flow out. Therefore you should make all preparations in advance, having all tools and material at hand. The best way to do the job is with two people. One prepares the hole for sealing, the other prepares the material. As you have experienced during the test, there is a very short time span during which the cement is still plastic. This is the right time when the cement has to be forced into the hole. Experience has shown that the best tools for this job are a screwdriver used as a chisel, a light hammer, and a piece of timber a little bit smaller than the hole. With the chisel shape the hole like a swallow-tail, if possible, pressing the cement into the hole at the right moment using your thumb. Take the timber piece and the hammer at the last moment before the cement sets and press the plug in by hammering the timber. This trick is likely to work if the leak is not big and some tests are first made to find out the cement's exact setting time. A:ll that is required for this repair work is fast action.
Sodium silicate
This is a water-clear viscous liquid. It can be tried to seal leaks if the water flows out without pressure. Prepare the base for the job using sandpaper to achieve a slightly rough surface of the cement wall. Open the bottle or container with sodium silicate only when you have completed preparations, since this chemical hardens on contact with the air. Use a spatula or a thin metal sheet to apply it, using the same technique as described for the nil coat. The sodium silicate should cover an area slightly larger than the leak. This method has often been used with much success.
Even if the two methods for sealing the tank from the outside remain unsuccessful, they have not done any harm to the structure and do not influence the professional repair work required for ferro-cement structures, since the rapid setting cement or the sodium silicate can be chipped off together with the-original cement mortar.
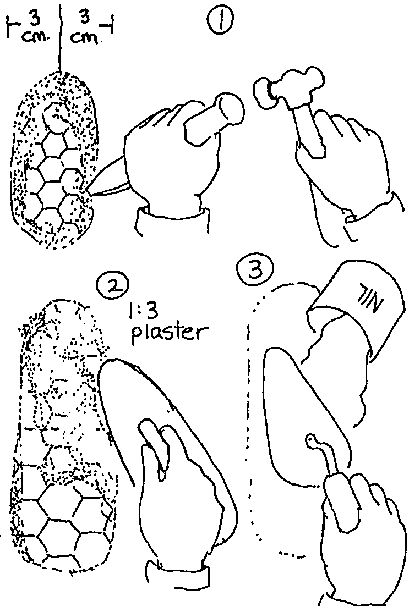
The repair work requires the same attention to the quality of material and mixing as the construction work. If the sand which was used for construction is not available, or if the source of sand is unknown since the repair work only becomes necessary years later, material must be tested in accordance with Chapter 3. It is again important to sift the sand through gauze wire mesh (mosquito wire mesh). Mixture should be three parts sand with one part cement. There is a considerable risk of creating a new leak since different mixtures result in different expansion of this material. This might lead to the patch cracking away and leaking at the edges. It has therefore also to be stressed that the original construction work should follow strictly the advice given. It can sometimes be observed that the amount of cement is increased to be on the safe side. This is unnecessary and can result in repair problems since after some years there will be nobody who remembers the original mixture. Repair of ferro-cement tanks should not be done using other than normal Portland cement. We can only warn against the use of e.g. rapid setting cement, since the property of this material differs greatly from the original Portland cement, as shown in the example above. Different expansion also creates problems likely to result in new leaks if the mortar for repair is wet. Although the usually small patches can be filled with mortar containing more water than the original material, this seal will not last since the material will shrink and by doing so will most likely result in another leak. Small leaks should be opened by using a chisel and hammer, chipping the mortar around the leak, down to the chicken wire. This must be done from inside the reservoir. It can happen that the leak inside the tank is not visible at the wall. In this case hammer a nail through the wall from the outside. This has to be done rather carefully, knocking the nail with short hammer movements. Use a thin 2 1/2 inch nail. Where the nail appears inside is not necessarily the point of leakage. In all those cases where this method has to be used, the surrounding area with a diameter of 150 mm should be chipped away. This job must be done carefully so that no cracks develop on the outside, since this part of the wall will remain untouched. The nail should be pulled out again.
Preparations to be made for the patch differ depending on whether the tank is in use, meaning water is purposely drained, or there is a minumum of water left and/or the leak occurs in an upper part of the wall where the ferro-cement is rather dry. If the area of repair is dry' it is necessary to wet it by splashing it with water. This procedure has to be repeated several times from inside and outside until an area of at least half a square metre is really damp. Only then should the moist mortar be filled in with a trowel and the surface smoothed (trowel finish). The mortar must be stiff or it will drop at the top, creating a new leak. If a nail was used to find the location, the hole should be filled from the outside at the same time. It is important to protect the outside repair area of the tank from the sun. If possible a piece of plastic should be tied to the patch from the outside. If this is not possible the outside area has to be splashed with a lot of water every two hours, and the inside two times a day. This curing must be continued for weeks, unless the reservoir can be filled, although applying the nil coat on the patch should be done the next day, Fig. 5.48.

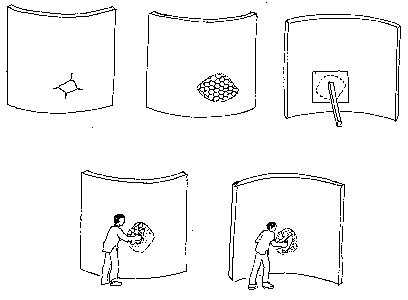
Larger repairs require the same technique in principle. Because of the nature of the structure, such repairs are seldom and become necessary either immediately after the tank is filled for the first time (in which case they are the result of shoddy workmanship), or they are created by external force, for example if a car bumps the tank. If major damage has to be repaired, the area should be cleared of all material inside and outside of the wall by careful chipping and without damage to the reinforcement. If the reinforcement was damaged by external force, a larger area has to be cleared to make it possible to patch the reinforcement. If this is welded reinforcement mesh and is bent inside without a break, do not try to rebend. This will further damage the wall. If it is broken it can be rebent into position and tightly tied together using binding wire and pliers. The area then has to be cleared of all damaged chicken wire and a patch of two layers must be tied to the reinforcement mesh. If the external force has damaged the coiled fence wire, this should be rebent too. A serious problem occurs only if this damage is close to the bottom. However, in these cases too a repair should be attempted, since there is a good chance that the tank can still be used. Before plastering can start, the surrounding area must be splashed with water as described above.

Repair of large holes where all material has been removed from inside and outside must be performed using the same technique as originally used. That means, if the structure has been built on a mould, it is necessary to shutter the hole from the inside and to apply two coats of plaster from the outside. Cure each coat or cover the area with plastic. If the tank was built without a mould, the plastering to the damage should be done from inside using a shutter outside. Apply the nil coat after one day. Curing the patch for a long period is unnecessary if the reservoir can be filled above the repaired part again after two or three days. After all, this is the best way. Again if small leaks appear they usually close over, Fig. 5.50.


