


| The Middle Section: Overview of Lining Techniques |
A. Introduction
The middle section of the well is the first part to be built. It
involves digging and lining the hole from the ground surface to the water table.
B. Lining: Purposes
The lining is a circular wall made of a
strong, permanent material placed or built adjacent to the walls of the hole.
The lining has three purposes:
it retains the walls
after completion; it keeps the hole from caving in;
it acts as a seal to prevent polluted
surface water from entering the well;
it serves as foundation and support for the well top.
Wells should be lined if possible.
Without linings, wells are subject to damaging cave-ins.
Only in hard rock formations are linings not necessary because
rock is not liable to cave-in. Linings should be built
of permanent materials which will not rot, decay or otherwise
lose their strength in a relatively short period of time.
In some places wells are lined, meter by
meter, only down to a depth of about 3 meters.
From there down the walls are left unlined. Such a
limited lining reinforces what is normally the most unstable part
of the well. If caving in is not a problem,
this amount of wall reinforcement may enable the development of
a semi-permanent water source. It requires a minimum amount of
materials but is not really suitable for development as a sanitary water source.
It would be tempting to
think of this kind of well as an appropriate temporary
solution which could later be easily up-graded to meet the
need for a permanent sanitary water source. However, consider that
although the partlylined well meets the current water needs, it
may be difficult to motivate local inhabitants to donate time
and money to later improve a source that already meets their felt needs.
Lining: Methods
There are two basic methods of lining a hand-dug well.
Dig and line
The hole or a portion of the hole is first dug and then lined. This is a
very flexible method and is therefore suitable for use in many different ground conditions.
Sink lining
Pre-made lining sections are put in place and sunk by digging soil out
from inside the bottom lining section. This method is used
primarily in loose, dry sands where dig-and-line methods will not
work because hole walls cave in too quickly.(Fig. 7-1)
1. Dig and Line
This method,which has been traditionally used for well sinking in all parts of
the world,has many variations that make it suitable for many
different construction materials and ground conditions.
In this method the hole is always dug first and then lined.
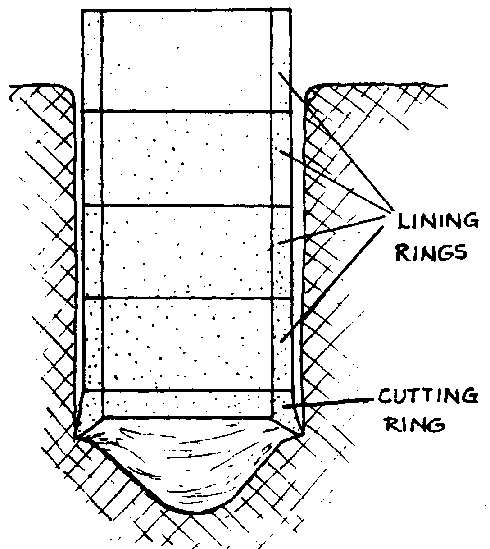
FIG. 7-1.
Commonly used variations of this method are:
dig-a-meter, pour-a-meter (see Fig. 7-2);
dig-and-line-in-short-sections(see Fig. 7-3);
dig a hole to water and line;
dig a hole as far into water as possible and line.
The advantages of a dig-and-line method are that:
it enables you to dig as deep as you can before committing expensive materials to lining the hole;
it is capable of penetrating anything except hard rock (hard rock can sometimes even be penetrated for short distances);
the lining can be built in place in the well or built on the surface and lowered into the completed hole;
the lining curbs (see p. 69) can be built in to increase lining stability.
Its disadvantages include:
possible dangers from cave-ins if the hole is dug too far without lining;
requiring more work in Athe well than "sink-lining."
2. Sink Lining (Caissoning)
This method is most suitable for use in loose fluid soils.
The lining is assembled at the surface before it is sunk. It can be made of pre-cast reinforced concrete rings which are set in place at the ground surface one by one as the others are sunk, or brick or circular rock walls which are built up at the surface layer by layer as the column sinks.
The lining is sunk by workers standing inside the lining column and digging out soil. As more supporting soil is removed the lining will gradually sink under its own weight.
The sinking proceeds by digging out soil until the top of the lining sinks almost to ground level and adding another lining section, digging and sinking that section to the ground level, and so on until the lining is sunk as far into the water as possible.
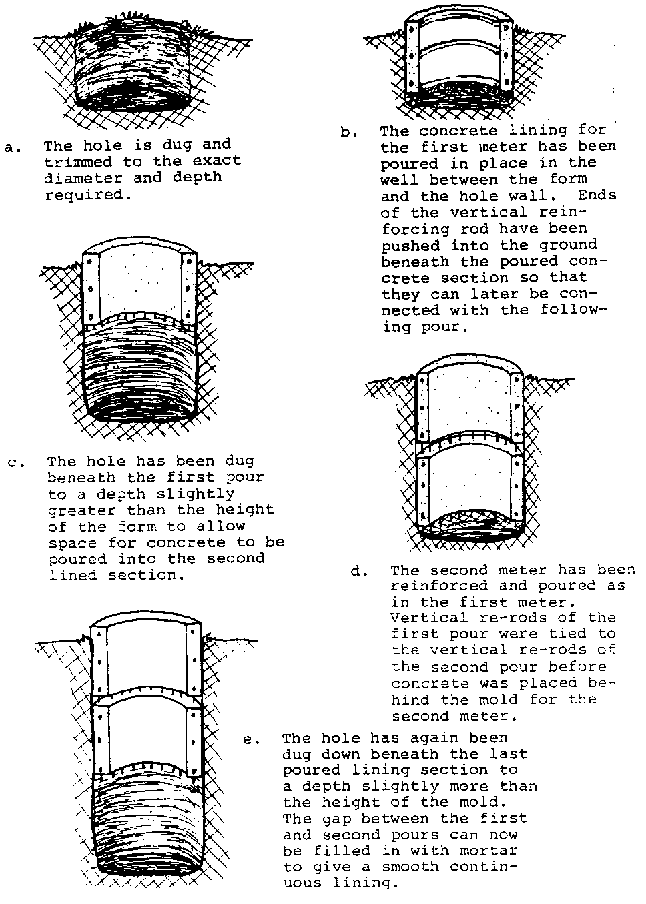
FIG. 7-2. DIG-A-METER, POUR-A-METER
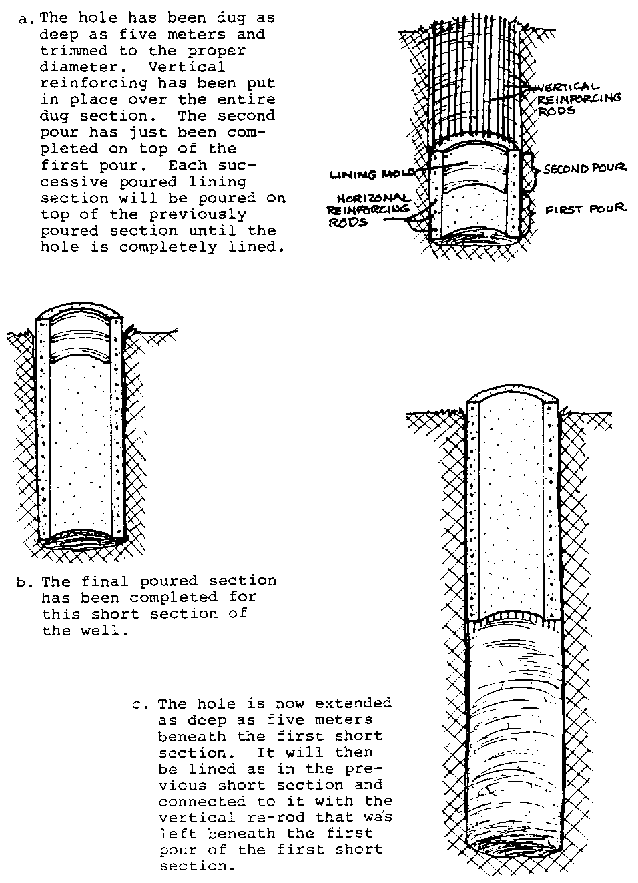
FIG. 7-3. DIG-AND-LINE-IN-SHORT-SECTIONS
As a well sinking method to be used from the ground surface,it is useful for shallow wells and those wells with larger than normal diameters where the ground in free from boulders and other huge obstructions.
This method has these advantages:
the equipment is simpler than that required for dig and line;
a headframe is not essential;
not as much re-rod is required;
most construction work is carried out on the surface;
advance preparation of lining can significantly speed the sinking process.
The disadvantages include the following:
it is difficult to keep shaft vertical;
boulders or even large stones in the ground can cause the column to tilt;
the stability of the completed lining depends entirely on the friction between the lining and the hole wall and since this is irregular, stresses are set up which may cause slipping, jamming or opening construction joints;
as the depth of the well increases, a tendency develops for sections to "hang", causing tension failure, or to buckle or crush under the weight of the column of rings;
the aquifer may become contaminated by seepage from the surface down the outside of the lining ring because it is not sufficiently form-fitted to the hole wall.
D. The Curb
The curb is an elbowshaped cut made in the wall that is poured full of concrete and acts as an anchor to prevent the lining from sliding down through the ground. The bottom of the cut is flat, 40 cm into the wall, and the top is cut 40 cm higher than the bottom cut, and allows concrete to flow to all parts of the curb. The rerod should be attached to each vertical(as shown in Fig. 74). It will obviously take more concrete for a pour that includes a curb.
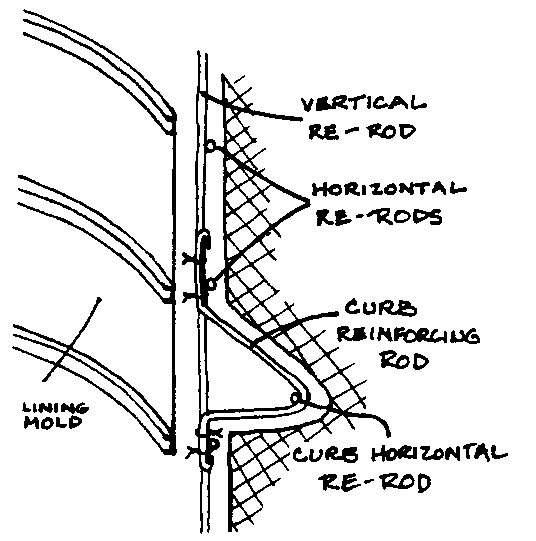
FIG. 7-4. LINING CURB
There is no commonly accepted standard regarding a recommended distance between curbs. In fact, some sources question whether they are even necessary where a concrete lining is poured in place. Other sources recommend curbs every 5 meters to 10 meters. It is recommended here that curbs be installed every 10 meters.
It is always a good idea to install a curb at or near the bottom of the middle section lining, just above the water table.
E. Cast-in-Place Versus Pre-Cast
1. Definitions
Cast-in-Place
The lining is built in place right up against the walls of the hole.
Pre-Cast
Sections of the lining are built above ground and later lowered or sunk into place in the well.
2. Decide Whether to Pre-Cast or Cast in Place
The decision to pre-cast or cast in-place the middle section lining usually depends on such factors as size of the project, lining materials, equipment available, ground conditions, and personal preference.
Generally, a lining that is built in place is better than one that is built ahead of time and then installed in the well. By building it in place, especially if using reinforced concrete or mortar, the lining conforms to the walls better, providing greater adhesion, stability, and sealing, as well as preventing the entry of contaminated surface water.
|
Cast-in-Place |
Pre-Cast |
|
• generally preferable - strong, waterproof, permanent; |
• e forms helpful but not required; |
|
• bonds well with ex- cavation walls; |
• pre-made concrete sections available. |
|
• limited working space |
• provides more time in the well and space to build a stronger lining; |
|
• may not bond well with the hole wall; | |
|
• requires heavy lowering equipment. |
To prevent tools and materials from being accidentally knocked into the well and the possible collapse of the looser surface soil into the well you may wish to install a lining in the top meter of the well as soon as it is dug. This can be either a temporary or permanent lining depending on what materials you have available and the lining method you plan to use.
When in place, this lining should reach at least 10 cm above the ground surface to prevent tools, materials, and other articles from falling into the well.
An inside lining mold can be used as a temporary lining. (See Fig. 7-5.) There must be enough room for people and supplies to move in and out of the hole. The mold should be carefully packed in place to prevent it from slipping down while the hole is being excavated beneath it. Remember that, once in place, this temporary lining cannot be moved until the construction is complete. It is, therefore, necessary to plan on making or purchasing this in addition to all lining molds needed for the construction of the permanent lining.
If you build a permanent lining, pour it in place possibly with an anchor above ground.
As you sink the well beyond this top support, taper the inside hole walls out to the desired hole diameter about 30-40cm below bottom of top support. This will help support it while digging continues below it.
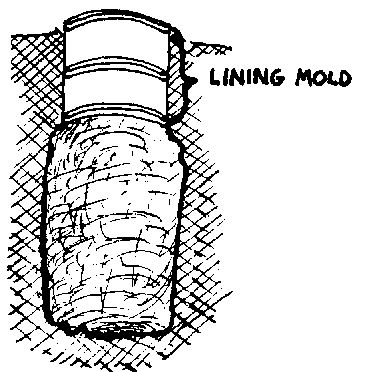
FIG. 7-5 LINING MOLD AS TEMPORARY LINING
If you decide not to put a top support in you should make some effort to ensure that workers in the well are safe from ground surface collapse and accidental entry of anything into the well. For example, four boards may be laid in a square around the hole and used to accomplish this.
Such a construction will help to distribute weight near the edge of the hole and act as a constant reminder to well workers and others to be careful.
Many wells have been dug without the use of any measures to prevent accidents except to warn everyone about the consequences. Well workers will all be sensitive to the need for safety but local villagers often are not.
In some cases wells projects have established rules that no one, including village elders and children, can come within 2 meters of the well until it is completed. This may be hard to enforce but is nevertheless a very useful procedure.
NOTE: Hole diameter and lining thickness: As a general rule the lining thickness should be about 1/20 of the hole diameter but never less than 7 cm.
Finish well diameter = interior lining form diameter = 9/10 hole diameter (for wells w/hole diem. 2 1.40m)
F. Lining: Materials
The availability of material. largely determines how you line the well. Here are the most frequently used lining materials in order of preference.
This order is generally applicable to most locales although there may be minor changes due to limitations of geological conditions. Such limitations are almost always due to the fact that soil conditions will not permit you to dig down to the water table without first reinforcing the walls. The installation of temporary reinforcing is sometimes an appropriate solution, but that involves a large added expense for temporary lining which is beyond the scope of this manual.
Reinforced concrete
This is probably the best material now commonly available for large-diameter well lining. When properly cured it is very strong. Depending on its ingredients it can be virtually waterproof or quite porous. Re-rod is available in most countries, although it is sometimes difficult to transport to the well site. Concrete can be precast into appropriately sized sections and then lowered into the hole or it can be poured and cured in place inside the well. Depending on what other equipment and materials are available for use with it, it is the most adaptable material for many of the situations which may be encountered in wells construction.
Reinforced mortar
This material has all the same advantages and uses as reinforced concrete. The difference is that only sand is added to cement to make mortar while sand and gravel are added to cement to make concrete. Gravel acts as a stretcher to make the concrete go further so mortar is more expensive for the same volume of final product. Mortar is a more "workable" mixture and in some cases may be more suitable than concrete.
Concrete
Concrete without re-rod is not as strong as reinforced concrete.
Mortar
This has the same qualities as concrete but is more expensive.
Brick
Brick should be solid rather than hollow. It is best suited for digging to the water table and then lining the complete well. It can be used to line in short sections although it is difficult to support a lined section while digging beneath it. Mortared brick makes a strong lining but does not adhere very well to the hole wall.
Rock
Rock is very similar to brick in that it is best suited for lining a hole that has been completely dug. Mortared rock walls can be quite strong although because of their irregular shapes and strengths they will often contain weak spots and be subject to cracking.
Unmortared rock walls can also be very strong if built properly, but require proper materials and a degree of expertise which cannot be adequately covered in this manual.
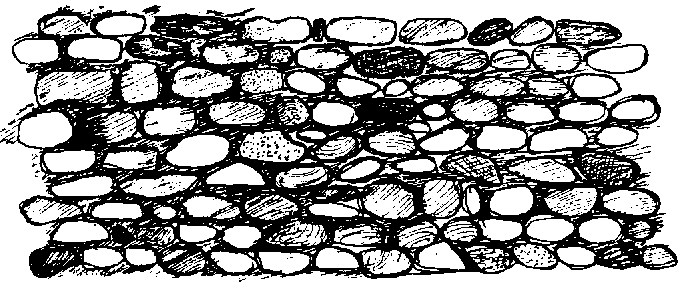
FIG. 7-6. ROCK WALL
Timber (wood)
The only advantages of wood are that it has been generally available, moderately strong and cheap. In many areas of the world wood is no longer generally available or cheap, and its disadvantages are such as to prevent any serious consideration of wood as a lining material for a permanent potable water source. It is liable to rot, taint the water and harbor insects. It is impossible to make the lining watertight and so prevent re-entry of contaminated surface water.
G. Possible Digging/Lining Methods for Each Material
1. Reinforced concrete cast in place:
Dig to water and line;
Dig-a-meter, pour-a-meter;
Dig and line in short sections.
2. Reinforced concrete pre-cast:
This requires heavier capacity lowering equipment.
Dig to water and line;
Sink lining.
3. Reinforced mortar thrown in place:
Dig to water and line;
Dig-a-meter, pour-a-meter;
Dig and line short sections.
4. Reinforced mortar pre-cast:
Dig to water and line;
Sink lining.
5. Unreinforced concrete or mortar cast in place:
This has very little tensile strength.
Dig to water and line;
Dig-a-meter, pour-a-meter;
Dig and line in short sections.
6. Unreinforced concrete or mortar pre-cast:
Its low tensile strength makes lowering it into the well difficult,
Dig to water and line;
Sink lining.
7. Brick or rock:
These materials also have relatively low tensile strength:
Sink lining (on cutting ring);
Dig to water and line;
Dig and line in short sections with anchoring curbs.
8. Wood (timber or split bamboo):
Employ verticals with horizontal supports all anchored to walls;
Use any sinking method but try to avoid the use of wood in the first place, for reasons discussed above.
NOTE: Efficient use of cement
Cement is probably the most expensive material of all so it should be used as efficiently as possible.
Of all cement compounds, reinforced concrete requires the least amount of cement per volume of building material (either mortar or concrete) produced.
On one wells construction project where 50 cm rock walls were built, 15 cm reirforced concrete was tried instead.
The results were a 1/3 reduction in cement used, walls were more waterproof, and the construction time was significantly reduced. The initial cost was greater because of the need for forming materials, but forms can be re-used. By prorating the cost of forms over a number of wells and figuring the reduced labor costs the total cost of each well went down about 25%.

