


| Digging |
A. Introduction
Hand dug wells are
sunk working down inside the hole to loosen the sub-soil
which is then lifted to ground level and dumped. How
one actually digs and then lifts out the loose dirt
and rock depends largely on personal preference, based on the
available equipment and safety procedures one wishes to follow.
B. Tools
The tools you need depend
on the soil conditions. Shovels, pick* mining bars, hoes, jack
hammers, and hands have all been used. Anything that will
loosen the dirt and rock so that you can then
load it into containers and haul it to the surface will work.
NOTE: By shortening the normally long
handles of shovels in particular, you can reduce the possibility
of injuries and make them easier to use in the
confined space at the bottom of a well.
C. Digging
Digging a hole that reaches water
and becomes a well is slightly different from just digging
a hole. Pay attention to the diameter of the hole,
how smooth and even the walls are, and whether the hole is straight up and down.
Many people have found it convenient to follow these steps when using
a sinking technique where the hole is first dug, and lined afterward.
Dig down and remove a layer from 10 to 40cm thick that
comes to within 5 or 10cm of the desired diameter (see Fig. 6-1b);
Continue removing layers of
soil until you have reached a depth of about a meter (see Fig. 6-1c);
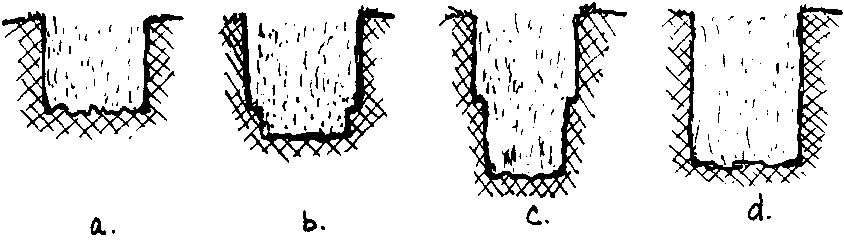
FIG. 6-1. STEPS TO DIGGING THE HOLE
Now go back and trim out this section to the desired diameter, making sure that the hole walls continue to be plumb (see Fig. 6-ld);
Continue this process, which may be broken up by periods of lining the hole, until you reach the desired depth of the hole.
While digging a well, you are likely to encounter several different types of soils which range between very loose and very hard. It can be difficult to sink a hole into either extreme. Digging in loose, dry sand can present some serious problems because of its tendency to fall back in. Dry sand acts like a very thick liquid. Unless you can stop the sand from continually flowing back, your well will end up V-shaped but even wider at the top than the hole is deep. In such a situation you can sometimes stop the sand by digging 10 to 15 cm and then splashing a mixture of cement and water on the wall. This will dry in minutes to form a thin hard layer. If that fails, pour 200 liters of water into the hole before digging the next meter. This saturates the sand to make it more stable. If this fails, you should consider sinking the lining through the sand.
D. Hard Rock
Digging down and reaching a hard rock layer above an aquifer is one of the most discouraging things that can happen to a well digger, who must then either fry to continue sinking the well into and through the rock layer by whatever means possible, or abandon the hole and try again someplace else.
In order to proceed correctly you need to research and analyze existing information on water a:cessibi]ity and rock layers. Often there will be only minim documentation available. Wells project workers may have to reach conclusions on the basis of incomplete information. Here is a series of questions, the answers to which will assist well workers in developing such information:
Has this or a similar rock layer been encountered before in other attempts to sink wells?
Where were the wells attempted?
At what depth was rock encountered?
Is this a situation that local people know about?
Is this a general long slope of the ground surface in a certain direction?
What do you think happens to this rock layer in that direction?
Is there another source of water that could be further developed to supply additional water?
How important is it that these people have a well to supply them with water?
E. Plumb
An object is plumb if it is straight up and down (perfectly vertical). Wells should be as plumb as possible for convenience and to avoid many other possible complications. This is particularly important in sinking pre-cast lining sections. Structurally, a well that is plumb is generally stronger than one that is not.
Plumb can be checked with simply a string with a weight tied to the bottom of it (see Fig. 6-2). Plumb-bobs can be purchased commercially and are relatively cheap. For convenience sake it may be useful to purchase one, especially if there is a sliding piece for the top which is exactly the same width as the plumb-bob itself so that you can easily get exact measures.

FIG. 6-2. PLUMB-BOB BEING USED TO CHECK PLUMB OH HOLE
F. Diameter
It will be necessary to regularly check the diameter of the well for many reasons. The hole you dig should have the exact diameter that you have designed for it.
If the hole diameter is lest than planned, the precast lining may not fit or poured concrete walls, will be thin and weak. This can be easily fixed by trimming the hole to the desired diameter.
If, on the other hand, you have dug the hole too wide, it probably won't affect the final condition of the well, but you will have spent unnecessary extra time digging and it will take more time, and perhaps materials, to fill the well back in to the desired diameter. Excessive width is especially serious when pouring concrete walls in place in the well. The diameter of the forms is set and filling in behind them will require a great deal more concrete.
G. Methods of Checking the Diameter
1. Drop Bar
Preparation
Bend 6mm re-rod into a circle which conforms to desired circumference of the well.
Continue bending the re-rod around a second time to make double bar and tie the two together.
Check roundness by rotating a straight bar the same length as the diameter within the circle drop bar.
During Digging
Dig one meter and be careful not to displace the drop bar or excessively dig outward at the wall. After you have dug one meter, you are ready to use the dropbar.
For right-handers, place your left hand lightly on the bar. Hold the trowel sideways under your left forearm. Using the upper back corner of the trowel, work towards your body and scrape away the dirt below the bar.
Work along the circumference, scraping away just enough dirt to allow the bar to drop. Continue in this manner, working around the hole until the bar is at the bottom of the hole.(see Fig. 6-3.)
If you constantly look at the bar and keep it level, the bore of the well will be straight and consistent.
If you now plan to pour the lining in the well, dig a bit with the trowel until the bar is below the floor of the first dig and cover it with sand.
Do not smooth the wall.
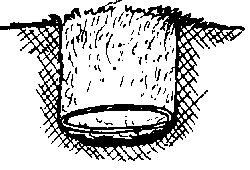
FIG. 6-3
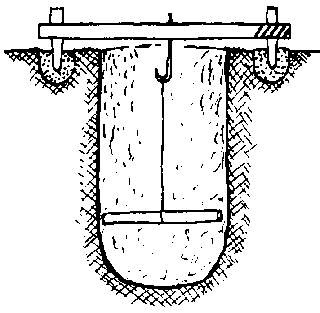
FIG. 6-4
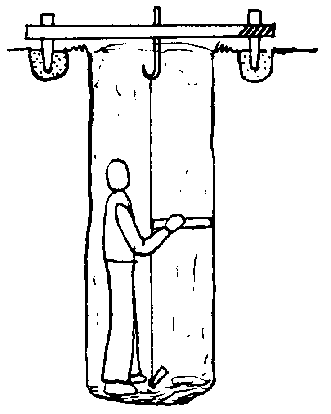
FIG. 6-5
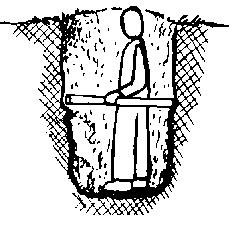
FIG. 6-6
2. Other Methods
This next method can be used to check both the diameter and plumb and can also be used to center forms used in the well.
This method involves hanging a measuring bar from the center of a centering board which fits across the top of the well and is located by a stake on either side of the well.(See Fig. 6-4.)
Dig anchoring holes for re-rod stakes, one on either side of the location of the well and about 30cm back from what will be the edge of the hole.
Cement stakes in place and place tops of both stakes through holes already drilled in centering board before the cement sets, to exactly locate stakes.
Locate a hook or hole in the center of the board
Draw a circle of the desired hole size in the ground centered at the hook. This exactly locates the hole to be dug.
As each meter is dug, hang the measuring bar from a line board over the hook. The bar should pivot freely, just touching the edge of the hole with both ends to indicated that the hole is both plumb and the proper size.
A variation of this would be to use a plumb-bob to locate the center and gauge the radius of the well from there. (See Fig. 6-5) Hang a plumb-bob from the hook to locate the center of the hole.
With a re-rod measuring piece cut to the exact radius of the hole, check the diameter as shown in Fig. 6-5. The measuring piece should just fit between the plumbline and the wall.
A person could also stand in the hole with a rod which is the exact diameter as the hole in order to trim the hole down to the desired size. (See Fig. 6-6.)