


| Construction of the Bottom Section |
A. Introduction
This chapter provides detailed
information to assist wells workers to construct the bottom section
of the well. Describing the unique features of that section,
it also raises such special concerns as the choice of
sinking/ lining methods, selection of materials, keeping water out of
the well to allow diggers to dig deeper, and facilitating water entry.
The bottom section is that portion
of a well below the water table. Its purpose is
to allow as much water as possible to enter the
well while blocking fine soil particles from the surrounding aquifer.
This is accomplished by digging a hole and extending an
appropriate lining as far beneath the water table into the aquifer as possible.
As the bottom section is
being sunk, using whatever method, water will have to be
removed to allow continued sinking. This can be done by
simply filling the buckets normally used to remove excavated material
and emptying them at the ground surface, or by using
a pump. Pumps are generally easier to use because they
allow water to be removed from the well faster; a
well can be dug deeper than if buckets were used.
This will be especially important if the bottom section is
being constructed when the water table is above its lowest
level and the well is being finished at any other
time than the end of the dry season. (See Fig. 91.)
The construction of the bottom section consists
or the same two operations,digging and lining,as the middle section.
However, because water is entering the well while the digging
is proceeding and the lining is being installed, the whole
process becomes more complicated.
These two situations will
limit your ability to dig deeper:
water flowing into the well
As you begin to get into the water
layer there will probably be little water entering the well.
As you go further down,water will enter the well faster
until 1) it is coming in so fast that you
can no longer remove enough of it to be able
to continue digging or 2) you reach the bottom of
the water bearing layer. If you reach the bottom of
the water bearing layer you will have to evaluate whether
the supply of water is sufficient for the needs of
the local users. Again there are two possibilities: a) the
water flows very slowly,or b) this is an isolated small
pocket of water that is limited and will be quickly used up.
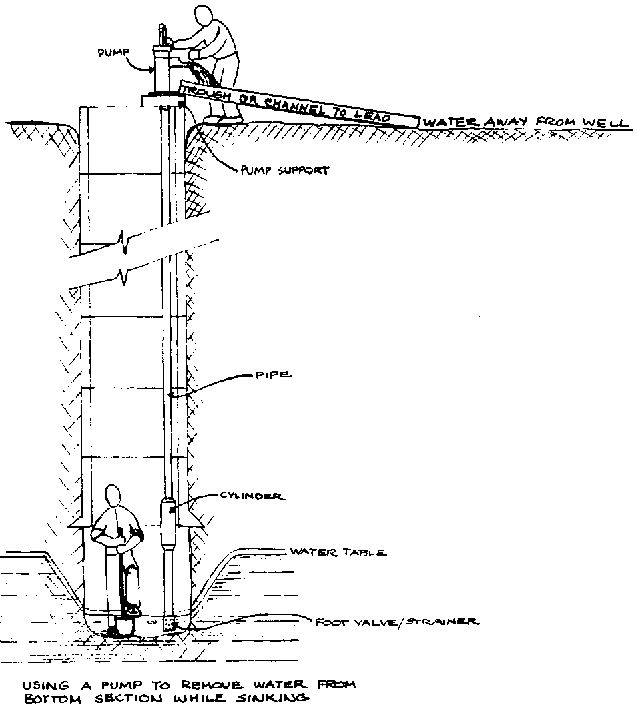
FIG. 9-1. USING A PUMP TO REMOVE WATER FROM BOTTOM SECTION WHILE SINKING
In a), the well will always have water in it but there may be very little and people's water consumption may be limited. It might be possible to dig other wells which could each supply a limited amount of water but which combined with the rest would allow for an increase in water consumption.
In b), the decision will have to be made whether to try to continue sinking this well or start another well in a different location.
walls collapsing as you dig
This is likely to be a problem in all wells, but it will be much more serious in wells which reach aquifers composed of loose, usually sandy soil. The deeper the hole is sunk into the aquifer, the more serious the problem will become. The collapsing of the walls is caused mainly by the flow of water coming into the well. The water, as it flows into the well, exerts pressure on the aquifer particles around which it must pass. The faster the water enters the well, the more pressure it exerts and therefore the more likely the walls are to collapse. By sinking the bottom section lining ring into place, the possible hindrance and danger of collapsing hole walls can be prevented. (See Fig. 9-2.)
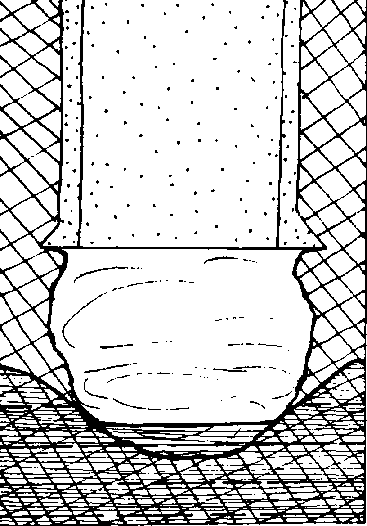
FIG. 9-2. HOLE WALLS COLLAPSING IN BOTTOM SECTION
B. Sinking/Lining Methods
1. Sink Lining
To sink the lining into the bottom section the rings must be made just small enough to fit inside the middle section lining. When using reinforced concrete a different set of forms from those used for the middle section lining will be needed. A well can probably be sunk a little deeper using this method rather than others,because it allows workers to spend all their time removing soil and water from the bottom of the hole,thus deepening it.
2. Dig-to-Bottom-and-Line
This method is limited to sites where ground conditions permit digging below the water table. This can only be done where aquifers are made up of relatively consolidated material and is not recommended where the aquifer consists of loose materials that tend to cave-in.
NOTE: Wells have been sunk into loose, unconsolidated aquifers by using temporary lining to reinforce the walls and prevent cave-ins. In most cases today time and money that would before have been spent on temporary lining can now be more usefully and safely spent working with permanent cement linings installed as the hole is dug either by sinking the lining or digging and lining in short sections.
3. Dig-and-Line-Short-Sections
It may be possible in slightly caving formations to dig and line several short 1/2 m sections before reaching a point where water enters the hole fast enough to slowly erode the earth walls or wash away wet concrete or mortar from inside a form. At this point the fining can no longer be built in complete rings but will have to be continued by completing each 1/2 meter ring in several sections one at a time. The use of quick drying cement will significantly aid this work.
Some have used this technique because it requires less preparation than sinking a lining which requires pre-casting lining rings. It requires less equipment and may produce a structurally superior well,although the structural continuity achieved here may not be of significant advantage in the overall functioning of a well. On the other hand, for shallow wells that reach a limited supply of water, expenditure in time and money on a more elaborate well structure probably will not be worthwhile. Also, the actual work required is somewhat complicated, requiring well diggers to perform various tasks simultaneously and with great competence.
C. Water Entry
The bottom section should tee constructed so that the water comes in through the bottom, and perhaps lining, depending on the bottom lining procedure and the ground conditions. (See Fig. 9-3.)
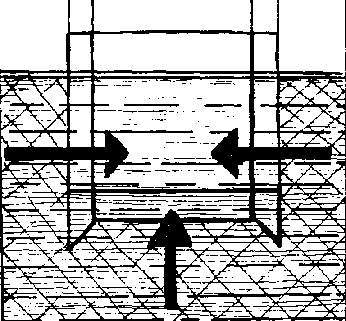
FIG. 9-3. WATER ENTRY INTO BOTTOM SECTION
|
Lining Procedure: |
Water entry through: |
|
sink lining |
bottom, and perhaps lining |
|
dig-to-bottom-and-line |
bottom, and perhaps lining |
| dig-and-line-short-sections |
bottom |
It is best to construct the bottom section so that water will come through the lining as well as the bottom. The more area you have open for water to enter the faster the well will recharge and the less strain there will be on those areas where water comes through. However, an impermeable lining is recommended where the aquifer is likely to be very fine sand that will clog or come through even porous concrete.
1. Water Entry through Lining
There are two methods used predominantly for constructing lining sections that will permit water to flow through. In both cases it is better to construct the lining sections on the surface where their construction can be more easily controlled before they are sunk into the bottom.
a. Leave holes in lining sections
1) Concrete
Forms should have holes through which you can stick re-rod to make the holes in the concrete,
Holes should be sloped up and to the middle to prevent aquifer particles from entering the well. The holes could be perfectly horizontal where aquifer particles are larger than the holes.
Holes can also be poked in the bottom of the well, although this has rarely been attempted.
2) Brick or Pock
Dig to the bottom of the well and stack unmortared brick or rock. The open spaces between the stacked brick or rock allow water to enter.
Many successful wells have traditionally been built this way but it can be difficult to do, is sometimes dangerous, and cannot usually penetrate an aquifer as far as other lining methods.
b. Use porous concrete (cement and gravel with little or no sand)
Use porous concrete to make lining rings. Simply substitute porous concrete for regular concrete when casting lining sections. Some have suggested using regular concrete for 10 cm of top and bottom edges to strengthen these. Porous concrete is not as strong as regular.
Use porous concrete to make blocks which can be set on a cutting ring and sunk or built up from the bottom.
2. Water Entry through the Bottom
The bottom of the well should normally permit water to come up through it. However, in unconsolidated (loose) aquifers the water will tend to carry particles of the aquifer along with it up into the well to completely fill and clog it.
Where the well is sunk into a relatively consolidated (firm) aquifer, water coming in through the bottom tends to act similarly but the aquifer particles are usually too big and heavy to be moved by water. In both cases it is advisable to put a filter or plug across the bottom of the hole.
When the aquifer is composed of very fine sand, this sand tends to act as a liquid and follow the water up through the bottom filter. The filter, if properly constructed, will prevent the sand from doing this but must, at the same time, be able to withstand the pressure of the sand and water. Rather than coming up through the filter the sand and water can possibly exert sufficient pressure to push the whole filter layer up into the well and clog it. This is admittedly an extreme case but one that must be carefully guarded against.
D. Construction of the Bottom Section
1. Sink Lining Method
Lining Rings:
are manufactured on the ground surface for later sinking into the bottom section of the well;
should allow for water to enter the well, as discussed previously;
should have the capacity to be firmly attached together;
should have an outside diameter 10cm less than the inside diameter of the lined middle section of the well;
can be very heavy and awkward to move and so may require a special lowering device;
are most commonly made of reinforced concrete or mortar which should be cured at least 3 days after pouring before being lowered into the well (see Cement Appendix, p. 221.)
are usually set on a cutting ring which can also be poured at the ground surface although it will require a different form.
NOTE: A cutting ring may not be a necessity in loose sandy aquifers but is useful. The cutting edge could also be cast on to the bottom lining ring. A flat edge will tend to be caught more easily, preventing further sinking~as opposed to a cutting edge which will tend to cut through loose material and funnel it toward the center for easier removal from the well. (See Fig. 9-4.)
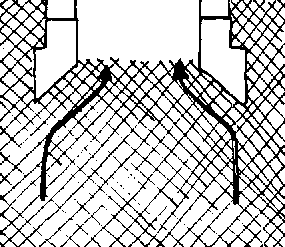
FIG. 9-4. CUTTING RING EFFECT
b. Construction Procedure
1) The general construction procedure to be fallowed when all materials are assembled and ready for use is as follows.
stack several (usually 2 to 4) lining rings on top of a cutting ring which has been centered and levelled in the bottom of the hole.
This initial column should be 2 to 3 meters high whether it is composed of 1/2 met:er high rings or 1 meter high rings. If holes have beer made in the rings to allow water entry. make sure that the holes slant up toward the middle of the hole. Firmly attach rings together by whatever means you have chosen.
Unstable ground can make the initial leveling/ plumbing of rings very difficult. Where you can anticipate this, place a layer of gravel on the bottom before lowering the cutting ring into the hole.
after the lining rings have been stacked on the cutting ring in the hole, well diggers will fill in the space between the lining and the middle section lining with gravel. (See Fig. 9-5.) Instead, some have placed several boards vertically in the" space to act as a guide to help the column sink straight. (See Fig. 9-6.) Gravel is easier and better to use because it will tend to fill in around the rings as they are sunk, filling up any voids that might be created by over-pumping. Gravel is also a convenient filler that is normally used to fill that space once the bottom section is sunk.
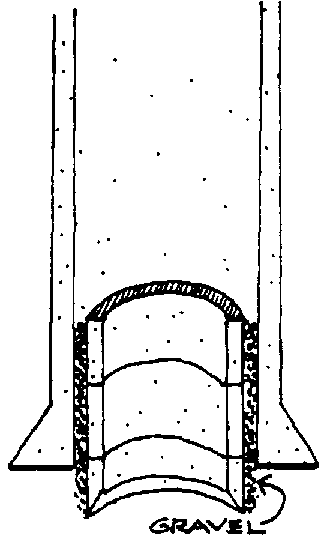
FIG. 9-5. GRAVEL USED TO GUIDE SINKING RINGS
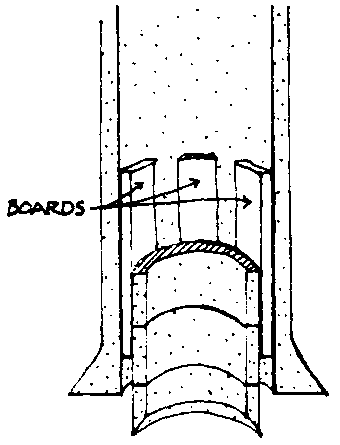
FIG. 9-6. BOARDS USED TO GUIDE SINKING RINGS
Remove soil and water from inside the cutting ring thus causing the column to sink. Begin digging in the middle and gradually work out to the edges of the column being careful to remove soil evenly so as not to encourage the column to sink out of alignment with the rest of the hole. (See Fig. 9-7.)
Add more rings as necessary as the column sinks. It is always necessary to have some overlap of the sinking column and the middle section, and helpful to have up to 2 meters of overlap to provide extra weight which will aid sinking and help to guide the column down.
Plan to add more rings when it won't interrupt the sinking process. If it requires many people to lower the rings, lower as many as you need in one or two sessions to avoid the need to regather and reinstruct a large group of people.
Continue digging and sinking until water can no longer be removed from the hole fast enough to allow further sinking. This will occur when well workers are digging in as much as 1 meter of water. Remember,the farther this column is sunk into the water bearing layer without going beyond it, the more water will be available from that well. In commonly-found loose sand aquifers, the column of rings is usually sunk between 2 and 4 meters beneath the bottom of the middle section lining. In more consolidated aquifers, where water generally enters the well more slowly, a greater depth can and should be reached.
When sinking is stopped it is necessary to have some overlap between the respective linings of the middle and bottom sections. If the well has been completed in other than the end of the dry season, it may be useful to leave several extra ring sections stacked up into the middle section lining. If necessary, the well can then be easily deepened at the end of the dry season when the water table is at its lowest level. This will help to provide a permanent supply of water.
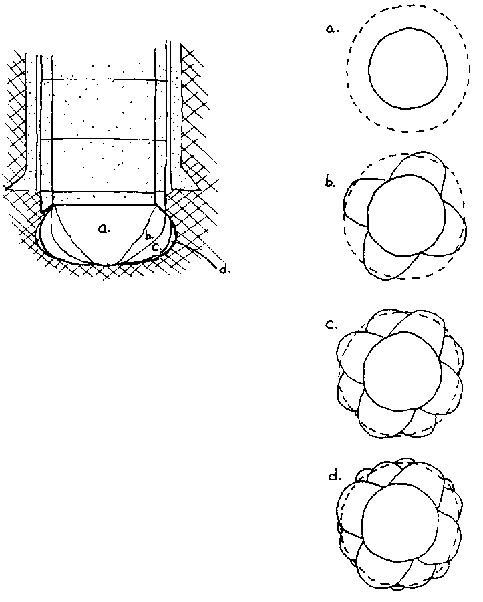
FIG. 9-7.
Digging steps while sinking lining
a. Dig a cone-shaped hole down to a convenient depth.
b. At four evenly spaced points in this cone-shaped hole, widen the hole so that it reaches the width of the cutting ring.
c. Widen the hole at four more places between the areas already widened.
d. Continue enlarging and widening the hole until the column of rings sinks.
2. Dig-to-Bottom-and-Line
It is likely that this method will only be considered when:
The middle section of the well has been dug but not lined because there is little danger of soil collapse. (A temporary lining could be used to reinforce the section or help prevent caving.)
The water beating soil is firm enough to permit digging and removing water without great danger of collapse.
Under these conditions an open hole can be dug down into the aquifer. Even so, digging beneath the water table must be done very carefully and can only reach a limited depth because of the increased danger of cave-ins and collapse as the hole reaches deeper and deeper into the aquifer. The hole should be dug as deep as is safely possible.
In the traditional well, the lining is begun by stacking rounded stones to a 'neighs of between .5 and 1m. (See Fig.98.) A rock or brick masonry wall is then built on top of the loose rock wall. Alternately, pre-cast rings can be lowered in place or the lining could possibly be poured in place. If, however, one has the equipment and supplies to cast concrete walls,it is usually possible to sink the lining into place. This is much safer and can reach a greater depth where there is any danger of cave-ins. Whatever lining method is used is then continued up to the ground surface and the top section of the well constructed.
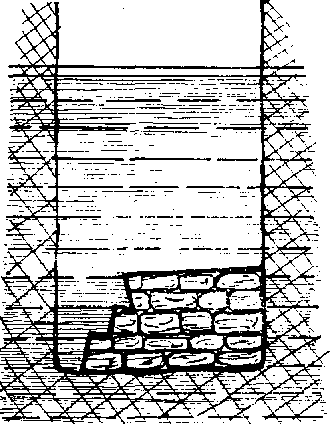
FIG. 9-8. TRADITIONAL WELL BOTTOM
3. Dig-and-Line-Short Sections
This particular method of digging into the water table is a variation of the "dig-a-meter, pour-a-meter" method sometimes used to line the middle section. The bottom section is dug and lined, usually 1/2 meter at a time. As the aquifer is penetrated increasing amounts of water will enter the well as the depth increases. Eventually a depth will be reached where the water is coming into the well so fast that 1) it will wash away the mortar or concrete before it has a chance to set, or 2) it will wash the walls in before there is time to set a form, re-rod, and pour. From this point, use the following procedure to extend the well as far into the aquifer as possible.
Make sure that the vertical re-rods extend beneath the bottom of the last pour so that the subsequent sections can be attached to the existing lining.
Dig in the center of the hole to form an inverted cone which is about 40 cm deep and sloped out to the bottom of the previous plastered section. (See Fig. 9-9a.) This tapered hole keeps sand from washing out from behind the sections already lined.
Quickly dig a short section on one side down to about 30 cm. (See Fig. 9-9b.)
Roughly plumb and smooth the newly dug short section.
Throw handfuls of dry quick-setting cement mix onto the moist slowly collapsing sand.
Moisten small quantities of the mix and quickly plaster the short section. The mortar should set (in about 5 minutes) before the water flow causes it to collapse. (See Fig. 9-9c.)
Continue digging and plastering short sections 30 cm deep around the hole until one complete 30 cm deep section is plastered. (See Fig. 9-9d.)
Place re-rod; leave extensions below plaster limit for connection to next pour.
NOTE: A quick-setting mortar mix consists of 1 part quicksetting cement, 2 parts ordinary cement, and 1 part sand.
Plaster over re-rod with same quick-setting mix.
Continue digging and plastering short sections until 1) the water flowing into the well prevents further plastering, or 2) you have reached the desired depth into the water table. Do not leave any re-rod exposed to water. If necessary bend it up and plaster, or cut it off and plaster.
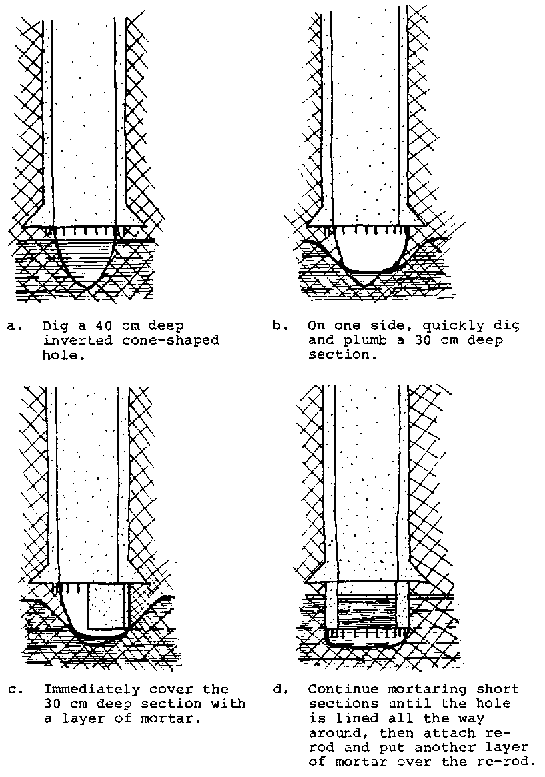
FIG. 9-9. DIG AND LINE BOTTOM SECTION
NOTE: Special bricks may be made for covering places where water is coming through the sand too quickly to permit plastering. These bricks are made outside the well by spreading a 1 1/2 cm. layer of mortar on a flat surface, and then cutting it into 15 cm.x 15 cm. squares with the edge of trowel before the mortar dries. Whenever a spot is found where the water flow is so rapid that it erodes even the rapid setting mix, one of these square mortar bricks can be used as a stopper. Throw dry cement mix freely on the place where the water is entering and slap a flat brick over it. Hold the brick in place until the cement sets. It can then be plastered over in the same manner as the rest of the short section being lined.
E. Bottom Plug or Filter
Most hand dug wells need a filter over the bottom of the well that will allow only water and no fine particles of soil to enter the well. It is especially critical where the aquifer is very fine sand. Only where wells are sunk into hard rock is this not a consideration.
There are two different materials that can be used separately or together: a gravel filter or a porous concrete plug.
1. Gravel Filter
A layer of gravel across the bottom of the well can serve as the filter.
A minimum depth of 20 cm is suggested. The filter can be made more effective by using 2 or more different sizes of gravel in separate layers with the smallest size gravel on the bottom and the largest size gravel on top.
2. Concrete Plug
a. This is a slab of porous concrete which fits closely to the inside diameter of the bottom lining. The slab can be cast in sections on the surface and later lowered and placed in the well. It is placed in the well on top of a shallow (10 - 15 cm) layer of gravel.
The slab should be made porous either by making holes in a regular concrete slab or using a concrete mixture with very little sand as described in the Cement Appendix. It can easily be cast on the surface digging a mold out of the ground.
b. Making a bottom plug with the ground as the form
Choose a fairly flat section of ground that can be dug and will hold its shape.
Draw a circle with a diameter a few centimeters less than the inside diameter of the bottom section.
Dig out the circle to a depth of 6 cm and make the bottom surface fairly even and square with the sides. (See Fig. 9-10.)
Put a divider across the center of the circle so that you will then pour two halves of the slab which can be more easily lowered and placed. The divider should be at least 6 cm high and be made from some suitable form material. (Alternately where a divider is not available or appropriate, two circles can be drawn but then only half of each dug out to form the two halves of the slab.) (See Fig. 9-10.)
Place re-rod in each half of the form. Leave handles or lowering hooks. When using 10 mm re-rod it can be placed 20 cm apart or with 8 mm re-rod leave 15 cm between re-rods.
Pour concrete - either standard or porous mix. If using non-porous concrete, make holes through the slab with a piece of re-rod when the concrete begins to set.
Cure for about a week.
Place in well on 10 to 15 cm of gravel.
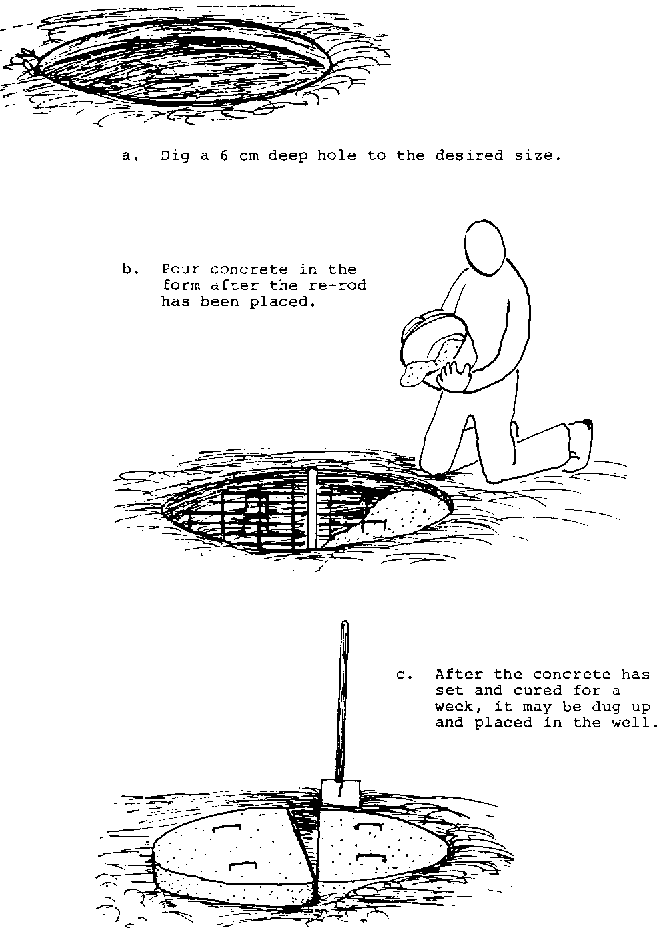
FIG. 9-10. CASTING THE BOTTOM PLUG