

| Leveling and Plumbing the Mold |
When you check the level of the mold
you also take a measure of whether or not the
sides of the mold are perfectly plumb. If they are
perfectly plumb the shaft will go straight down. A well
does not have to have a shaft that goes straight
down; it could just as easily curve or go down
at an angle. Plumb is easy to measure, however, and
there are many reasons why it is desirable to keep
the well plumb.
1) A plumb well shaft
and lining is a stronger structure than one that is
not plumb.
2) Sinking the hole straight down
requires less excavation work than an angled or a curved
hole.
3) Fewer materials are required to construct
a lining that will support the well.
4)
If a pump is to be installed, the pipe that
reaches to water should be perfectly plumb. If it is
not plumb, there will be greater stress on the pipe
and pumping components will wear out much sooner than they
should.
1. Tools
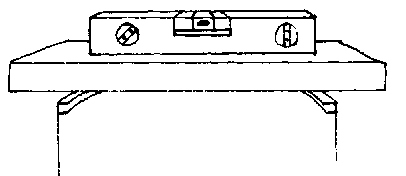
Use a commercial
level (see Fig. V-3 ) or a clear plastic hose
with water in it. (See Fig. V-4.)
For
the purpose of demonstration, level the interior lining mold in
the well with a commercial level (spirit level, or water
level). The normal ordinary level has a clear glass or
plastic tube which is slightly curved and full of liquid
with one air bubble; there will also be two marks
on the tube, one on either side of the center
of the tube. To read the level set it, with
the tube side up, on whatever you want to check;
the object will be level when the air bubble in
the tube is exactly centered between the two marks on
the tube. (See Fig. V-1.)

FIG. V-1. BUBBLE BETWEEM TWO MARKS INDICATING LEVEL OBJECT
If the object is not level the bubble will be off-center toward the side which is highest. (See Fig. V-2.)

FIG. V-2. BUBBLE ON HIGHER SIDE OF UN-LEVEL OBJECT
2. Care of the level
Levels are sensitive and exact instruments which arrive adjusted from the factory. Great care should be taken never to drop a level or otherwise damage its edges. Many levels also come with insets for checking verticality (plumb) and 45° angles, (See Fig. V-3.)

FIG. V-3. COMMERCIALLY MANUFACTURED LEVEL
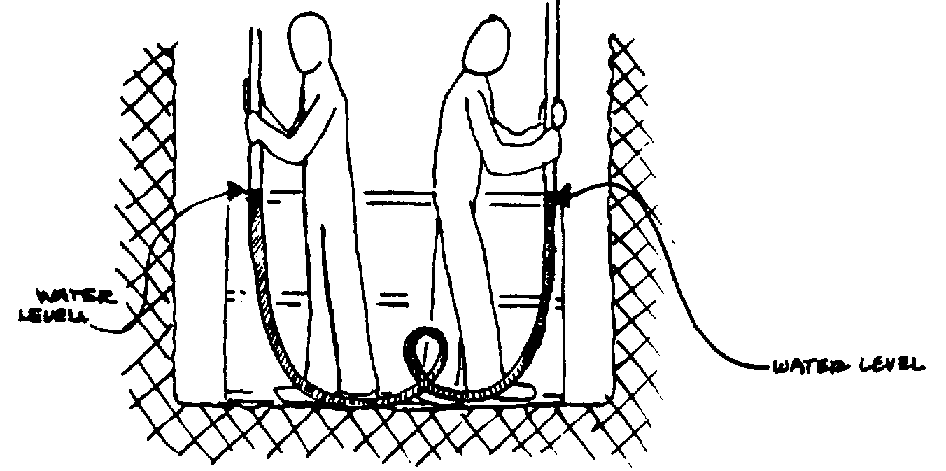
If a level is not commercially available, you can easily make your own level with a clear plastic hose and water. (See Fig. V-4.)

FIG. V-4. CLEAR HOSE AND WATER USED AS LEVEL
If the surface of the water in the hose is even with the edge of the mold on one side, then when the edge of mold on the opposite side of the hole is even with the surface of the water in the other end of the hose, the mold is level in that direction.
Water in two ends of the same tube will always be at the same height no matter what the tube does between the two ends.
NOTE: If the diameter of the clear plastic hose is small, a "meniscus" (U-shaped surface due to capillary action) may form. All level readings should be made at the same point of the meniscus, preferably at the center.
3. Checking the level of a horizontal object
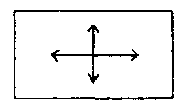
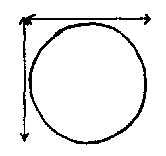
Always check the level in two opposite directions before declaring that an object is level.
For a flat plate, see Fig. V-5.

FIG. V-5. LEVEL CHECKED IN TWO DIRECTIONS ON FLAT SURFACE
For a lining mold, see Fig. V-6.

FIG. V-6. LEVEL CHECKED IN TWO DIRECTIONS ON LINING MOLD
To check two objects not connected with each other, find a straight object (a board, a shaft etc.) that can be laid down between the two objects to be laid two objects to be leveled. (See Fig. V-7.)

FIG. V-7. USING A STRAIGHT BOARD TO CHECK LEVEL ACROSS MOLD
Check the straightness of the board by looking along its edges from one end.

