


| Cement |
A. Introduction to Cement
Cement is
one of the most useful materials in wells construction. It
can easily be mixed with sand and water to make
mortar or with gravel, sand and water to make concrete.
Both mortar and concrete are among the strongest and most
durable materials used for all types of construction around the
world. Mortar is normally used as the bonding agent between
bricks or rocks while concrete is normally reinforced with steel
bars and molded to the desired size and shape.
For well work, mortar or concrete is usually the
best material for the lining, headwall, platform and cover of
dug wells,and the platform and seal around the top three
meters of casing in drilled wells.
Cement is
available in almost every country in the world and sand
and gravel are usually available locally. Occasionally it will be
difficult to get cement for wells construction either because there
are other higher priority demands for the cement or because
it just costs too much. It is impossible here to
say how or even whether cement can be obtained in
such a circumstance.
Of the two cement compounds,
mortar and concrete, concrete is the stronger. This is because
the rock that makes up the gravel itself is stronger
than the concrete and so contributes to its strength. Sometimes
the two can be used interchangeably where lack of materials
or working conditions demand it. Remember that concrete is the
stronger product and should be used where possible.
NOTE: The rest of the discussion in this appendix will
deal specifically with concrete. The same procedures can and should
be followed if mortar is used instead.
B.Ingredients of Concrete
Concrete is made from cement,
sand, gravel and water. These ingredients are combined in certain
proportions to achieve the desired strength. The amount of water
used to mix these ingredients is by far the most
important factor in determining the final strength of the concrete.
Use the least amount of water that will still give
you a workable mix. Sand and gravel, which are sometimes
referred to as fine and coarse aggregate respectively, should be
clean and properly graded. Cement and water form a paste
which, when mixed, acts as a glue to bind the
aggregates together in a strong hard mass.
1. Proportions:
There are four
major ingredients in concrete: cement, sand, gravel, water.
Dry ingredients are normally mixed in certain proportions and
then water is added. Proportions are expressed as follows: 1:2:4,
which means that to one part cement you add two
parts sand and four parts gravel. A "part" usually refers
to a unit of volume. Example: A 1:2:4 concrete mix
could be obtained by mixing 1 bucket full of cement
with 2 buckets of sand and 4 buckets of gravel.
Proportions are almost always expressed as cement:
sand:gravel, and they are usually labelled that way.
There are many minor variations in the proportions used
for mixing concrete. The most commonly used are 1:2:4, 1:2:3,
1:2.5:5. For our purposes all work equally well.
NOTE: A 1:2:4 mix will go a
little farther than the 1:2:3 mix and allows a little
more room for using not the best sand or gravel
than a 1:2.5:5 mix.
Normal range for amount of water used to mix each
50 kg bag of cement is between 20 liters and
30 liters (94 lb. bag of cement is between 4.5
gal. and 7 gal.)
The water-tightness of
concrete depends primarily on the water-cement ratio and the length
of moist curing. This is similar to concrete strength in
that less water and longer moist curing promote watertightness.
2. Choice of ingredients
cement: The descriptions and properties given
here are specifically of Portland cement. This is the type
most commonly used and what we think of when we
say cement.
When used, it
should be dry, powdery and free of lumps. When storing
cement try to avoid all possible contact with moisture. Store
it away from exterior walls, off damp floors, and stacked
close together to reduce air circulation. If it could be
kept completely dry it could be stored indefinately. Even exposed
to air it will gradually draw moisture, thus limiting even
the covered storage time to between 6 months and 1
year depending on conditions.
water: In general, water fit for drinking is suitable for
mixing concrete. Impurities in the water may affect concrete, setting
time, strength, shrinkage or promote corrosion of reinforcement.
aggregates: Fine and coarse aggregates together occupy 60 to
80% of concrete volume.
- fine aggregate: Sand should range in size from less than
.25 mm to 6.3 mm. Sand from sea shores, dunes
or river banks is usually too fine for normal mixes.
(You can sometimes scrape about 30 cm of fine surface
sand off and find coarser, more suitable sand beneath it.)
- large aggregate: Within the recommended size limits
mentioned later, the larger the gravel you use the stronger
and more economical the concrete will be.
The larger the size of the gravel
the less water and cement will be required to get
the same strength concrete.
The maximum gravel
size should not exceed
- one-fifth the minimum dimension of the member;
- three-fourths the clear space between reinforcing bars or between reinforcement
and forms. (Optimum aggregate size in many situations is about 2.0 cm.)
The shape and surface texture of
aggregates affect properties of freshly mixed concrete more than they
affect hardened concrete. Rough textured or flat and elongated particles
require more water to produce workable concrete than do rounded
or cubical aggregates and more water reduces the final strength
of the concrete.
It is extremely important to
have the gravel and sand clean. Silt, clay, or bits
of organic matter in even low concentrations will ruin concrete.
A very simple test for cleanliness makes use of a
clear wide-mouth jar. Fill the jar about half full of
the sand and small aggregate to be tested, and cover
with water. Shake the mixture vigorously, and then allow it
to stand for three hours. In almost every case there
will be a distinct line dividing the fine sand suitable
for concrete and that which is too fine. If the
very fine material amounts to more than 10% of the
suitable material, then the concrete made from it will be
weak.
This means that other fine material should
be sought, or the available material should be washed to
remove the material that is too fine. This can be
done by putting the sand (and gravel if necessary) in
some container such as a drum. Cover the aggregate with
water, stir thoroughly, and let stand for a minute, and
pour off the liquid. One or two such treatments will
remove most of the very fine material and organic matter.
Another point to consider in the selection of
aggre-gate is its strength. About the only simple test is
to break some of the stones with a hammer. If
the effort required to break the majority of aggregate stones
is greater than the effort required to break a similar
sized piece of concrete, then the aggregate will make strong
concrete. If the stone breaks easily, then you can expect
that the concrete made of these stones will only be
as strong as the stones themselves.
In very
dry climates several precautions must be taken. If the sand
is perfectly dry, it packs into a smaller space. If
you put 20 buckets of bone dry sand in a
pile and stirred in two buckets of water, you could
carry away about 27 buckets of damp sand. If your
sand is completely dry, add some water to it or
else measure by weight instead of volume. The surface of
the curing concrete should be kept damp. This is because
water evaporating from the surface will remove some of the
water needed to make it cure properly. Cover the concrete
with building paper, burlap, straw, or anything that will hold
moisture and keep the direct sun and wind from the
concrete surface. Keep the concrete moist by sprinkling as often
as necessary; this may be as often as three times
per day. After the first week of curing, it is
not necessary to keep the surface damp continuously.
3. Making Quick-Setting Concrete
To
produce quick-setting concrete with high initial strength, calcium chloride can
be added to the mixture.
This will not
affect the estimation of materials needed because the calcium chloride
will be dissolved in the water used to mix the
concrete.
Quick-setting cement is often useful for example,
when repeated castings are needed from the same mold. A
concrete mixture which contains calcium chloride as an accelerator will
set about twice as fast as a mixture which does
not. The mixed batch must be put into the forms
faster, but since quick-setting batches are usually small, this is
not a problem. Calcium chloride does not lessen the strength
of fully-cured concrete.
No more than 1 kg
(2 pounds) of calcium chloride should be used per sack
of cement. It should be used only if it is
in its original containers, which should be moisture-proof bags or
sacks or air-tight steel drums.
The best way
to add the calcium chloride is to mix up a
solution containing 1/2kg per liter (1 pound per quart) of
water. Use this solution as part of the mixing water
at a ratio of 2 liters (2 quarts) per sack
of cement.
4. Estimating quantities of materials needed
1. Calculate the volume of concrete needed.
2. Multiply the volume of concrete needed by 3/2
(1.5) to get the total volume of dry loose material
needed. The cement and sand do little to add to
the volume of the concrete because they fill in the
air spaces between the gravel.
3. Add 10%
(1/10) for losses due to handling.
4. Add
the numbers in the volumetric proportion that you will use
to get a relative total. This will allow you later
to compute fractions of the total needed for each ingredient.
(1:2:3=6)
5, Determine the amount of cement needed
by multiplying the volume of dry material needed (from step
2) by the proportional amount of the total mix (amount
cement needed) = 1/6 x (volume dry materials).
6. Divide by the unit volume per bag, 33.2 liters
per 50 kg bag cement or 1 cubic foot per
94 lb. bag cement. When figuring the number of cement
bags round up to nearest whole number.
NOTE:
This calculation, even with the 10% addition for handling losses,
rarely leaves any extra concrete, particularly for small jobs requiring
less than 5 hand mixed bags of cement.
Here is an example:
the volume of a cylinder = Pr2h =(3.1416)(radius)2(height)=(3.1416)(radius)(radius)(height)
the volume of concrete needed to build the lining
and platform of the pictured well could be computed as
follows (See Fig. IV-1).
- the volume of the lining and headwall would be the
volume of the 20.8m high cylinder with a 0.7m radius
minus the volume of the 20.8m high cylinder with a
0.6m radius.
- V = [P(.7)2(20.8)-[ P(.6)2(20.8)]
= [(3.1416)(.49)(20.8)] - [(3.1416)(.36)(20.8)]
= 32.0-23.5
= 8.5m3
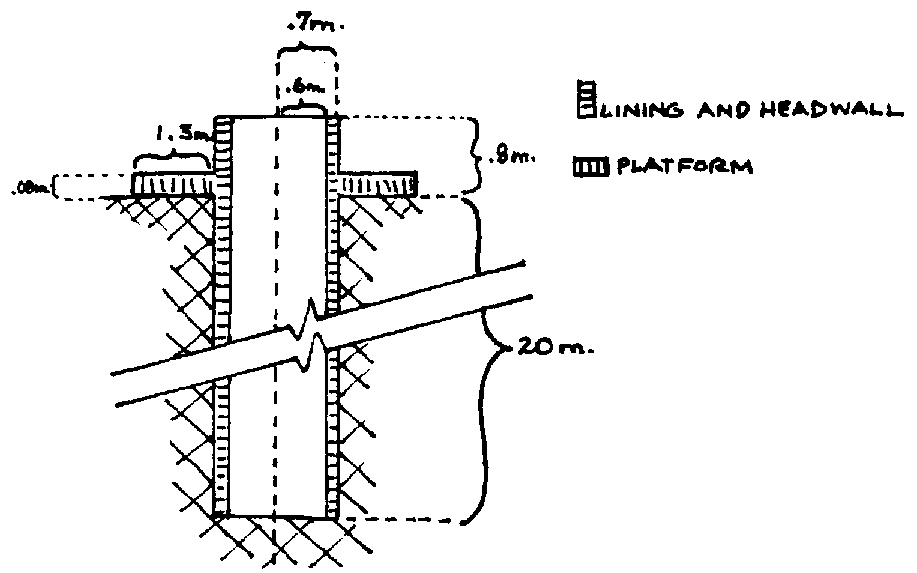
FIG. IV-1. CROSS SECTION OF TYPICAL WELL FOR CALCULATION OF CONCRETE NEEDS
- the volume of the platform would be the volume of the .08m high cylinder with a 2m radius minus the volume of the .08m high cylinder with a .7m radius.
- V = [(3.1416)(2)2(.08)] - [(3.1416)(.7)2(.08)]
[(3.1416)(4)(.08)] - [(3.1416)(.49)(.08)]
= 1 - 0.1 = 0.9 m3
Following the steps outlined above the volume of materials necessary to construct the well would be computed as follows:
1. total volume = 8.5 + .9 = 9.4 m�
2. (9.4)(1.5) = 14.1 m� dry material estimated
3. 14.1 x 1.1 = 15.5 m� dry material necessary because of losses in transport.
4. 1:2:4 cement:sand:gravel 1+2+4=7
5. 15.5 x 1/7 = 2.2 m� cement
15.5 x 2/7 = 4.4 m� sand
15.5 x 4.7 = 8.9 m� gravel
6. 2.2 m� cement = 2,200 liters (1.) of cement
2,200 1. cement 33.2 1. per 50 kg bag cement = 66.26 bags of cement
67 bags of cement will be needed.
C. Construction with Concrete
1. Outline of Concrete Work
build form;
place rerod;
mix concrete;
pour concrete;
finish surface;
cure concrete;
remove forms.
2. Interior Well Forms
a. Introduction
An interior well form or mold is circular with a smooth exterior surface which will form the inside surface of the lining. This form can be used either on the surface with other forms to make lining rings or in the well to form a lining that is poured in place. (See Fig. IV-2.)
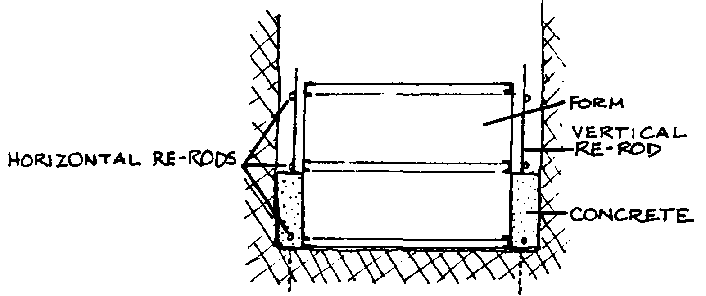
FIG. IV-2. INTERIOR LINING FORM
Freshly mixed concrete is heavy and plastic. Forms for holding it in place until it hardens must be well braced and should have a smooth inside surface. Cracks, knots, or other imperfections in the forms may be permanently reproduced in the concrete surface.
Forms should be easy to fill with concrete and easy to remove once the concrete has hardened. Be sure that the fasteners used to hold the form together are both accessible and easy to unfasten.
NOTE: When using nails to hold a wood form together, do not drive them all the way in. Leave them sticking up just enough so that they can easily be pulled when necessary to remove the form.
b. Materials for Forms
The following materials are used to construct interior forms:
steel: forms made of steel range in height from 1/2 m to 1 m. They are heavy, awkward, and expensive but last for a long time.
sheet metal: with a simple triangular interior support, forms made of sheet metal have proved to be successful. They are lighter and more maneuverable than steel forms but are not as strong and durable.
wood: this material is commonly used because it is lightweight and strong. It must be carefully bent, waterproofed, and reinforced.
By using boards as wide as possible, form construction will be easier and quicker. It will also reduce the number of lines on the concrete surface that form at the junction of two boards. Plywood is excellent, especially if it has a special high density overlay surface. This allows for a smoother concrete finish, easier form removal and less wear on the forms.
If unsurfaced wood is used for forms, oil or grease the inside surface to make removal of the forms easier and to prevent the wood from drawing too much water from the concrete. Do not oil or grease the wood if the concrete surface will be painted or stuccoed.
earth: Any earth that can be dug into and still hold its shape can also be used as a form. Carefully dig out the desired shape and fill it with concrete. Once the concrete has set and cured it can be dug up and used where needed. A new form will have to be dug out for each piece of concrete poured. (See Figs. 8-12 and 9-10.)
other materials: Plastics and fiberglass are a so occasionally used and continue to be experimented with as form materials. Fiberglass is much lighter than steel and, if taken proper care of, should last for a long time. Its cost and availability in developing nations seem to be the only factors limiting more widespread trials.
3. Concrete Reinforcement
Reinforcing concrete will allow much greater loads to be carried. Design of reinforced concrete structures that are large or must carry high loads can become too complicated for a person without special training.
Concrete alone has great compression strength but little tension strength. Concrete is very difficult to squeeze (compression), but breaks relatively easily when stretched (put in tension). Reinforcing steel has exactly the opposite properties; it is strong in tension and weak in compression. Combining the two results in a material (reinforced concrete) which is strong in both compression and tension and therefore useful in a large number of situations.
Concrete is best reinforced with specially made steel rods which can be imbedded in the concrete. Bamboo has also been used to reinforce concrete with some success although it is liable to deteriorate in time.
Reinforced concrete sections should be at least 7.5 cm thick and 10 cm is much better.
The reinforcing rod (rerod) usually comes in long sections of a given diameter.
The range of different diameter sizes commonly manufactured is usually measured in millimeters; for example, 4 mm, 6 mm, 8 mm, 10 mm, and 12 mm.
Exactly how much rerod is needed in a particular pour will depend on the load it will have to support. For most concrete work, including everything discussed in this manual, rerod should take up 0.5% to 1% of the cross-sectional area.
Reinforcing rods should also have clean surfaces free of loose scale and rust. Rods in poor condition should be brushed thoroughly with a stiff wire brush.
When placing rerod in a form before the concrete is poured it should be located:
- at least 2.5 cm from the form everywhere.
- in a plane approximately two-thirds of the way into the thickness of the pour from the side which will have a weight or force pressing on the concrete. (See Fig. IV-3.)
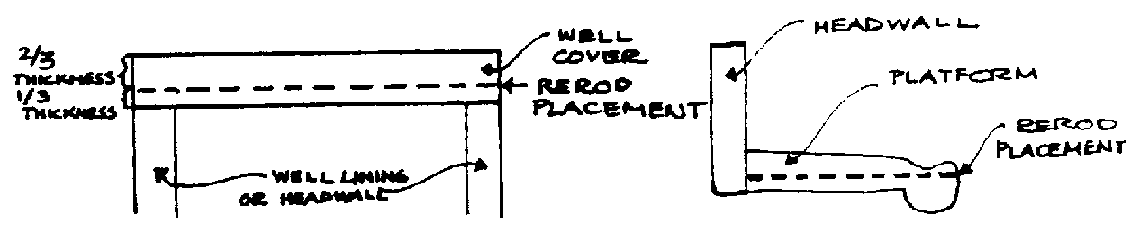
FIG. IV-3. REINFORCING ROD PLACEMENT (ALSO SEE FIGS. 8-3 AND 8-5 FOR REROD PLACEMENT IN LINING)
- in a grid so that there is never more than 3 times the final concrete thickness between adjacent rods.
- no closer than 3 cm to a parallel rod.
Rerod strength is approximately additive according to cross-sectional area. Four 4 mm rods will be about as strong as one 8 mm rod. The crosssectional area of four 4 mm rods equals the crosssectional area of one 8 mm rod.
The rod should be arranged in an evenly spaced grid-type pattern with more and/or thicker rod along the longest dimension of the pour.
All intersections where rods cross should be tied with thin wire.
When tying one rod on to another to increase the length of the rods, they should overlap 20 times the diameter of the rod and be tied twice with wire. (See Fig. IV-4.)
|
Rod size |
Overlap |
|
6 mm |
12 cm = 120 mm |
|
8 mm |
16 cm = 160 |
|
10 mm |
20 cm = 200 |
|
12 mm |
24 cm = 240 |
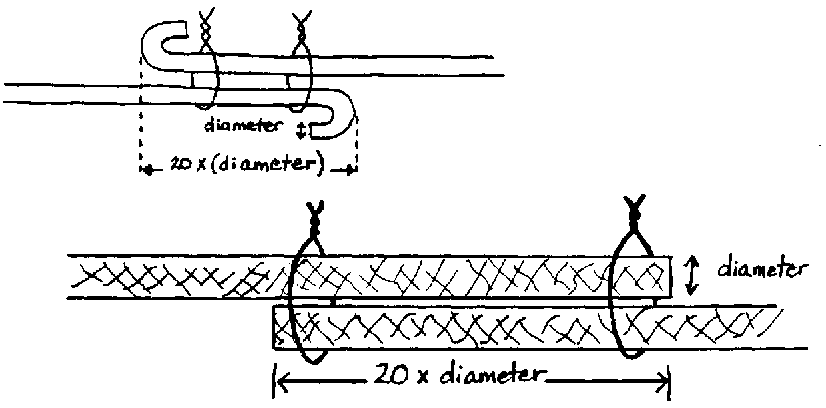
FIG. IV-4. REROD OVERLAP
Larger sizes of rod often have raised patterns on them which are designed to allow them to be held firmly in place by the concrete. Smaller sizes of rod are generally smooth. When using smooth rod always make a small hook at the end of each piece that will be in the concrete. Without the hook, temperature changes may eventually loosen the concrete from the rod thereby losing much of its reinforcing effect.
Rerod should be carefully prepared so that the rod is straight and square where it should be. Sloppy rod work will result in weaker concrete and wastes rod.
For particularly strong pieces or where small irregular shapes are being formed, the rerod can be put together in a cage-like arrangement. Use small rod for the cross-sections and larger rod for the length. This system is used to reinforce pieces like a cutting ring, with its irregular shape, or perhaps a well cover,which may have many people standing on it at one time.
Where possible, it is usually best to assemble rerod inside the form so that it will fit exactly.
The proper distance from the bottom of the pour in a slab can be achieved by setting the rod on a few small stones before the concrete is poured or simply pulling the rerod grid a couple of centimeters up into the concrete after some concrete has been spread over the whole pour.
4. Mixing Concrete BY Machine or By Hand
a. Mixing by Machine
Concrete must be thoroughly mixed to yield the strongest product. For machine mix, allow 5 or 6 minutes after all the materials are in the drum. First, put about 10% of the mixing water in the drum. Then add water uniformly with the dry _ materials, leaving another 10% to be added after the dry materials are in the drum.
b. Mixing by Hand
On many self-help projects, the amount of concrete needed may be small or it may be difficult to get a mechanical mixer. Concrete can be mixed by hand; if a few precautions are taken, it can be as strong as concrete mixed in a machine.
The first requirement for mixing by hand is a mixing area which is both clean and watertight. This can be a wood and metal mixing trough (Fig. IV-5) or a simple round concrete floor (Fig. IV-6).
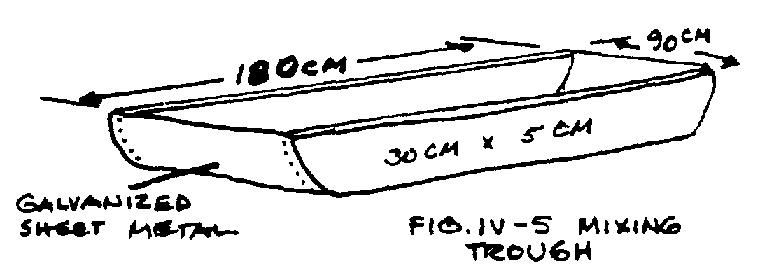
FIG. IV-5. MIXING TROUGH
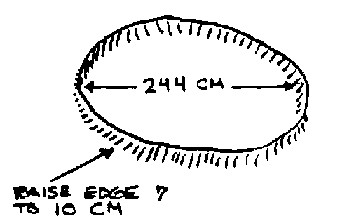
FIG. IV-6. MIXING PLATFORM
Use the following procedure:
1) Spread the fine aggregate evenly over the mixing area.
2) Spread the cement evenly over the fine aggregate and mix these materials by turning them with a shovel until the color is uniform.
3) Spread this mixture out evenly and spread the coarse aggregate on it and mix thoroughly again. All dry materials should be thoroughly mixed before water is added.
When work is finished for the day, be sure to rinse concrete from the mixing area and the tools to keep them from rusting and to prevent cement from caking on them. Smooth shiny tools and mixing boat surfaces make mixing surprisingly easier. The tools will also last much longer. Try to keep from getting wet concrete on your skin because it is caustic.
A workable mix should be smooth and plastic -neither so wet that it will run nor so stiff that it will crumble.
If the mix is too wet, add small amounts of sand and gravel, in the proper proportion, until the mix is workable.
If the mix is too stiff, add small amounts of water and cement, maintaining the proper water-cement ratio, until the mix is workable.
Note the amounts of materials added so that you will have the correct proportions for subsequent batches.
If a concrete mix is too stiff, it will be difficult to place in the forms. If it is not stiff enough, the mix probably does not have enough aggregate, thus making it an uneconomical use of cement.
5. Pouring Concrete into Form
To make strong concrete structures, it is important to place fresh concrete in the forms correctly.
The wet concrete mix should not be handled roughly when it is being carried and put in the forms. It is very easy, through joggling or throwing, to separate the fine aggregate from the coarse aggregate. Do not let the concrete drop freely for a distance greater than 90 to 120 cm. Concrete is strongest when the various sizes of aggregates and cement paste are well mixed.
Properly proportioned concrete will have to be worked into place in the form. Concrete that would on its own flow out to completely fill in a form would be too wet and therefore weak.
When pouring concrete structures that are over 120cm high, leave holes in the forms at intervals of less than 120cm through which concrete can be poured and which can later be covered to permit pouring above that level. Alternatively, a slide could be used through which concrete could flow down to the bottom of the form without separating.
Any "u"-shaped trough wide enough to facilitate pouring concrete into it, narrow enough to fit inside the form, and long enough so that the concrete can slide down the chute without separating will work.
As the concrete is being placed it should be compacted so that no air holes, which would leave weak spots in the concrete, are left. This can be done by tamping the concrete with some long thin tool or vibrating the concrete in one of several ways. Tamping can be accomplished with a thin (2 cm) iron rod, a wooden pole or a shovel.
On large commercial jobs concrete is compacted with a special vibrator usually powered by an air compressor which is submerged in the concrete immediately after it is poured. The concrete will be compacted to some extent as it is moved into its final position in the form. However, special attention must be paid to the edges of the pour to make sure that the concrete has completely filled in the form up to the edges. If the forms are strong enough they can be struck with a hammer on the outside to vibrate the concrete just enough to allow it to settle completely in against the forms. Too much tamping can force most of the large aggregate toward the bottom of the pour, thus reducing the overall strength of the concrete.
6. Finishing
Once the concrete is poured into the forms, its surface should be worked to an even finish. The smoothness of the finish will depend on what the surface will be used for. Where more concrete or mortar will later be placed on this pour, the area should be left relatively rough to facilitate bonding. Where the surface will later be walked on, as for example the cover of a well on which a pump will be mounted, it should be somewhat rough to prevent people from slipping on the concrete when its surface is wet. This somewhat rough texture can be achieved by finishing with a wooden float or by also lightly brushing the surface to give it a texture. A very smooth finish can be made with a metal trowel. Overfinishing (repeated finishing) can lead to powdering and erosion of the surface.
7. Curing Concrete
After the forms are filled, the concrete must be cured until it reaches the required strength. Curing involves keeping the concrete damp so that the chemical reaction that causes the concrete to harden will continue for as long as is necessary to achieve the desired strength. Once the concrete is allowed to dry the chemical hardening action will gradually taper off and cease.
The early stage of curing is extremely critical. Special steps should be taken to keep the concrete wet. Once the concrete dries it will stop hardening; after this happens it cannot be re-wetted in the field to re-start the hardening process.
Covering the exposed concrete surfaces is usually easier than continuously sprinkling or frequently dousing the concrete with water which would otherwise be necessary to prevent the concrete surface from becoming dry to the touch. Protective covers often used include canvas, empty cement bags, burlap, plastic, palm leaves, straw and wet sand. The covering should also be kept wet so that it will not absorb water from the concrete.
Concrete is strong enough for light loads after 7 days. In most cases, forms can be removed from standing structures like bridges and walls after 4 or 5 days, but if they are left in place they will help to keep the concrete from drying out. Where concrete structures are being cast on the ground, the forms can be removed as soon as the concrete sets enough to hold its own shape (3 to 6 hours) if there is no load on the structure and measures are taken to ensure proper curing.
The concrete's final strength will result in part from how long it is moist cured. As can be seen from the graph, concrete will eventually reach about 60% of its design strength if not moist cured at all, 80% if moist cured for 3 days, and almost 100% if moist cured for 7 days. If concrete is kept moist it will continue to harden indefinitely.
You will also notice from the graph that even though the concrete may be cured for 7 days, at that point it will only have gained about 60% of the strength it will ultimately have and that it will be another 3 weeks before it reaches 90% of its ultimate strength. Practically,this means that when pouring a concrete ring which will later be put in the well even after curing has stopped, the ring should be left alone for at least another week (and preferably longer) before it is installed in the well. It will during that time harden to reach about 75% of its final strength.
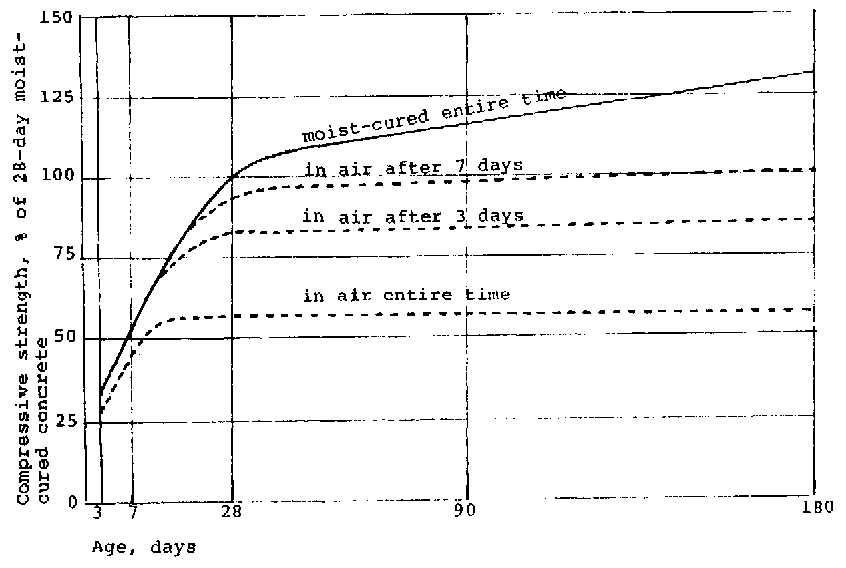
GRAPH: STRENGTH OF CONCRETE AFTER DAYS OF MOIST-CURING