| Construction of Ferro-Cement Reservoirs |
| Construction of Ferro-Cement Reservoirs |
Choose the tank capacity according to Chapter 2.4. Determine the location of the proposed tank taking all facts into consideration to achieve maximum catchment capability.
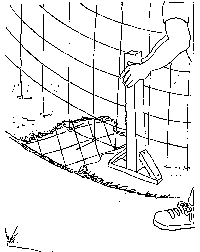
Prepare the ground. Remove all garbage and scraps from the area where you intend to work, as well as loose stones, bricks, and smaller rocks. Check whether the chosen area is level. If you don't have a straight timber board to extend the spirit level, make yourself a simple level instrument as shown in Fig. 5.1. Take three timber boards, straight and if possible edge-shot. Fit the boards together in a rectangular triangle. This means the two short sides have to be equally long(example: a = 1.42m, b = 2.00m). Mark the centre, exactly half of the long side of the triangle. Fix a plumb-line in the centre of the right angle. If you turn this up with the long side on the ground, the plumb must be on your centre mark. If this is the case, the ground is level.
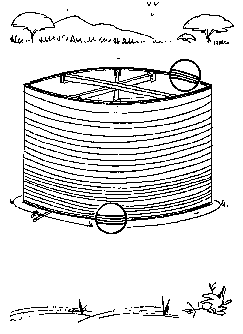
The height of the wall depends on the size of the reinforcement mesh. If this exceeds 1.80 m, the wall should not be higher than 1.95 m.
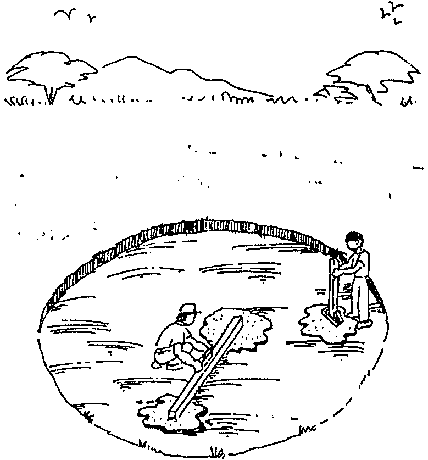
On the levelled ground mark the foundation slab circle by dividing the size given in Table 6 by two. To mark out the circle use a string and two sticks as shown in Fig. 5.2.

Within the circle remove all topsoil (vegetable soil). If the depth of this layer is more than 100 mm, you have to refill with hardcore. Note no foundation should be made on topsoil. Refilling is also required if only part of the marked-out area has a deeper layer of topsoil. The refill must be compacted by pile-driving. It also helps to fill water on top of the compacted refill overnight and piledrive the next day. The same is required if the soil is very sandy. See also Chapter 5.2.
Note: The structure of the tank can crack if it is built on unstable ground. Any structure is as strong as its foundation and the ground founded on.

If the most suitable place chosen is on sloping ground, you first have to level this area. Dig out an area which is between 1.00 and 1.50 m larger than the diameter of the foundation slab. Make sure the area is really on level ground. Before digging the tank foundation, save the sloping ground from sliding (see Fig. 5.3).
This can be done by stepping the slope behind the proposed tank. The raiser can be made out of wooden poles rammed into the ground and horizontally saved by either round poles or boards fixed to the rammed poles. The wood should be treated. The cheapest way is to dip it in old engine oil and dry it in the sun before use. The steps should not be filled up with soil but with solid material like small rocks, bricks and similar objects. This is the place where leftover material like cement mortar should be poured in later. The soil above the steps should be saved by planting bushes. Proceed with the foundation as described. If the ground is rocky, remove the soil between the different rocks as much as possible, together with loose rocks. Fill up the gaps between the rocks with lean-mixed concrete, cover the area with empty cement bags and water them for at least three days, keeping the bags constantly wet.

 2. Preparation of reinforcement
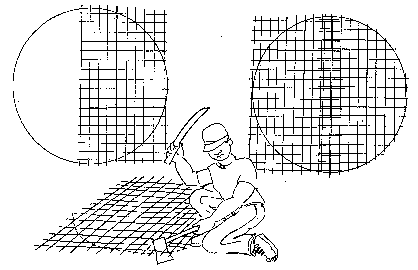
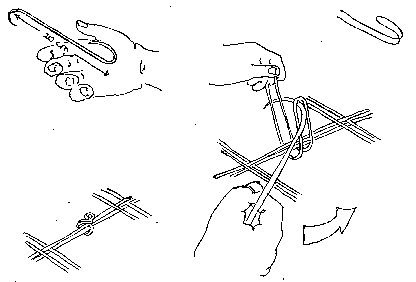
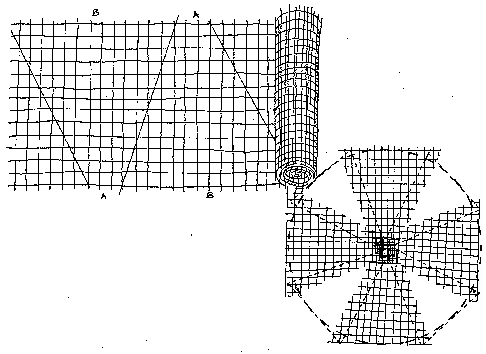
On a flat area near the proposed tank, mark another circle with the radius of the foundation, then cut off pieces of reinforcement mesh as shown in Fig. 5.4, laying them out on the circle as shown. Trim off the comers lying outside the circle and save the pieces. Reinforcement mesh can easily be cut in a number of ways. The most efficient is to place a hard stone or large hammer or mattock beneath the reinforcement wire and then cut it using an old chisel and hammer or a panga. Cut another piece of reinforcement mesh from the roll and lay it over the remaining part of the circle. Make sure the overlap between the two pieces is at least one full square. Again trim and save the pieces outside the circle. Tie the two pieces together with short pieces of binding wire, Fig. 5.5. If there is still one final portion of the circle not yet covered with reinforcement mesh, this should be filled by tying the remaining corner pieces (cut earlier). Again make sure all overlaps are one full square as a minimum. The floor reinforcement is now complete.
For other technical solutions for reinforcing the foundation slab on unstable ground, see Chapter 5.2.
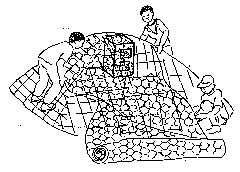
Mix a part of cement with one part of sand and two parts of gravel (aggregate dia. 20). Check the material as described in Chapter 3 and follow the advice given there. Mix the entire amount dry, that means without water, until the colour is uniform and you can trace the cement on each shovel of material. Now add water carefully to make the mixture workable. This means the entire mixture should become moist. If your mixture flows off the shovel or even separates into material and water, your concrete is far too wet. This will result in the cement penetrating the ground together with the water. At the same time your mixture contains less cement than required. In general it can be said that concrete which is easy to work with is too wet. Working with concrete requires strength and good care. Clean a wheelbarrow of all the leftovers of formerly used concrete and transport the ready con" crete to the tank floor area. On the well" levelled 100-mm-deep area, fill in a layer of 50 mm. Level it as shown in Fig. 5.6 and compact it. Remember if the concrete does not need any compaction it is too wet.
When the whole excavated foundation pit (floor) is covered with a well-compacted layer of 50 mm concrete, place the prepared reinforcement onto it. Mix the same amount of concrete as for the first layer. When you prepare the second layer keep a ring of 400 mm from the edge of the circle open, without concrete. Compact the concrete as you did for the first layer, see Fig. 5.7.

Take your prefabricated draining pipe (tap unit), consisting of two elbows, one tee, three pieces of 3/4 inch pipe, and the tap. Stuff some paper into the open end of the pipe to keep cement out and fix this part at that side of the floor where you want to tap water. Tie the pipe to the reinforcement to make sure it is fixed in position (see Fig. 5.8).

4. Preparing the wall reinforcement
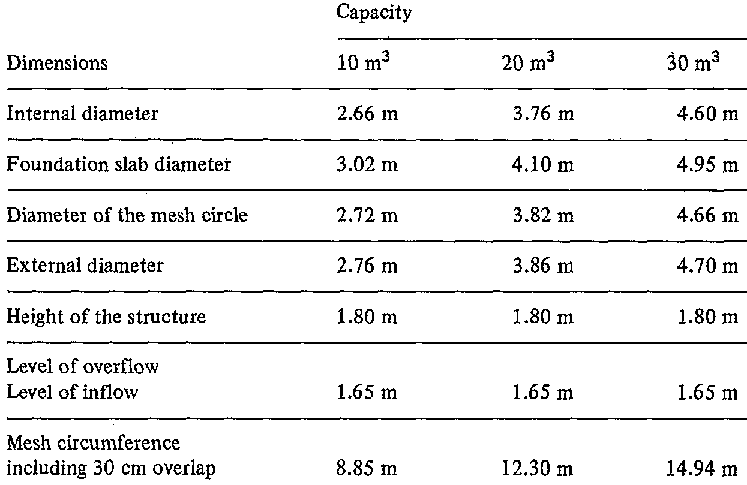
Find the length of reinforcement mesh in Table 7 under BRC mesh. Cut the right amount of material from your roll and form into a cylinder with an overlap of two squares' minimum 300 mm. Tie the overlap together with binding wire as done with floor reinforcement (see Fig. 5.9).
At the bottom of the cylinder made out of reinforcement mesh, bend the vertical wire segments horizontally. Bend them alternately inwards and outwards, forming right angles. Move the cylinder onto the floor of the proposed tank and tie it to the floor reinforcement. Make sure the vertical mesh forms a cylinder in good circular shape. This is achieved if the vertical reinforcement is at the same distance to the external floor circle (Fig. 5.9).
Now use the last remaining concrete, filling in the space underneath the wall inside and outside the wall reinforcement. Stamp the concrete down carefully and firmly. After this work is finished, cover the floor and the edge outside with plastic, see Fig. 5.10, and keep it covered overnight. Do not work on the wall reinforcement. Next morning remove the cover and splash the concrete all over with water. This- must be repeated every three hours throughout the day and throughout the entire job, at least four times a day. Remember the strength of the concrete depends on good watering during the construction period. Evaporation of the moisture contained in the concrete should be avoided since it is needed for the setting process. The water you splash on the concrete will evaporate and at the same time keep the concrete moist.
5. Preparation of the tank roof reinforcement
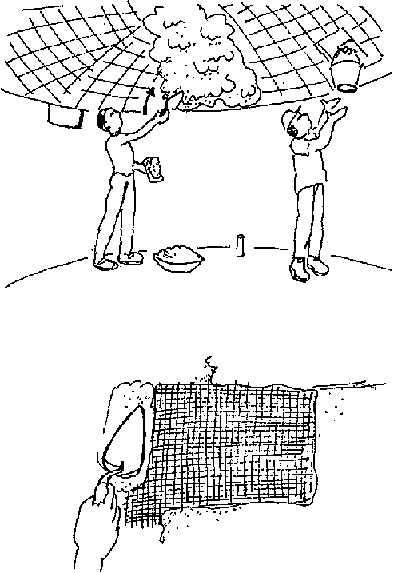
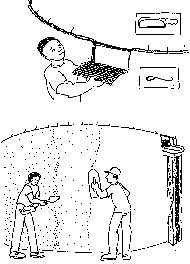
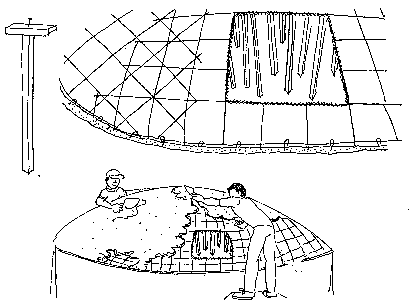
Mark a circle in your preparation area with the radius of the tank reinforcement. Put an upright cement block in the centre about 450 mm high. There are different ways of cutting the reinforcement mesh. The roof has to be a dome shape, so the cement block marks the highest point. Make sure an overlap of at least two squares, about 300 mm, is given and tie the reinforcement well together. Whether this has been achieved can be proved by lifting up the dome. It should be well stabilized in one piece. Fig. 5.11 shows one way of cutting the reinforcement mesh to save material. After all triangles extending the circle are cut off, cover the dome of rein" forcement mesh with chicken wire and tie it well to the mesh. Overlapping of the chicken wire is important. 200 mm is required, Fig. 5.12.
6. Further procedure on the tank wall
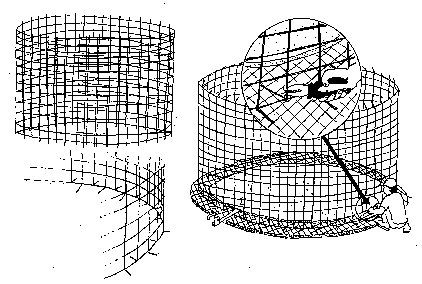
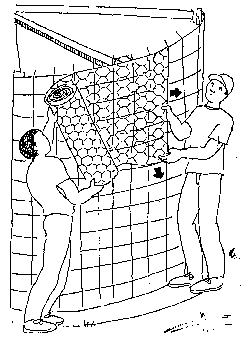
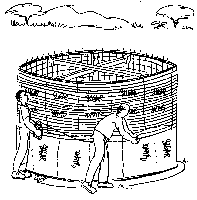
First prepare some spreaders out of wood and fix them in the upper third part between the reinforcement mesh. This will prevent vibration and bending during the further work on the wall. The next step is to wrap the outside of the wall reinforcement mesh with one layer of chicken wire, from the uppermost horizontal wire to the concrete floor. Take the roll of chicken wire and push the top long edge over the free vertical mesh. While continuing to encircle the cylinder, keep pulling the chicken wire tight in both vertical and horizontal directions, Fig. 5.13. Try to do this job with three people, one carrying the roll and pulling the wire, one fixing it with prepared short pieces of binding wire on the mesh, and the third assisting him in pulling the chicken wire tightly into position. Overlap the two ends of the chicken wire by 200 mm and fasten it. The chicken wire has to cover the entire wall reinforcement. Depending on the size of the roll of wire and the height of the tank wall reinforcement, it might require three or more layers. It is imperative that each layer overlaps the other by at least 200 mm.
After the chicken wire wrapping is completed and all sags and bulges are tightened up, take a roll of 16-gauge binding wire and wrap it four times around the top horizontal. This helps to support the roof. Then proceed to spiral the binding wire down every 100 mm for the next 600 mm of wall height, pulling it very tight. After you have completed wrapping the next 600 mm downwards, reduce the intervals between wraps to 80 mm for the 600 mm or more, but make sure the bottom 700 mm have an interval of only 50 mm. At the very bottom do the same as at the top, and wrap the wire round four times. It is most important that the wrapping of reinforcement with binding wire be done by pulling it with force and fixing the ends very tightly. If your roll of wire ends before the wall reinforcement is wrapped, tie the end around a vertical reinforcement wire of the mesh, using pliers, Fig. 5.14.
Now the reinforcement of the wall is ready. It must be lined with cloth from the outside to hold the plaster which will be smeared on the reinforcement from the inside. The material you choose for this will be determined by availability. Clean sacks can be cut in straight pieces and sewn together. If you can get sugar sacks made of nylon, this will be best but jute sacks or sisal material are also suitable. The nylon sugar sacks have proved to be very good. Fix the cloth temporarily at the reinforcement, overlapping by about 50 mm. Then take a roll of sisal string and wrap the cloth from top to bottom at intervals of 50 mm in the same way you tied the gauge wire, but using a uniform interval all over, Fig. 5.15.
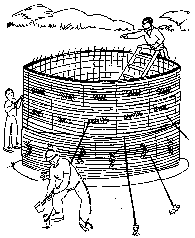
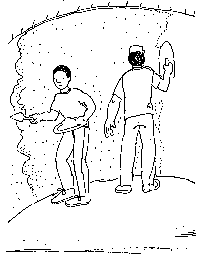
After the tank is entirely wrapped, make sure there is no gap where the reinforcement is visible. Prepare a scaffold to bridge the wall without touching it. Remember all the plaster has to be transported via this scaffold and during all this procedure the wall will be protected from vibrations. Inside there should be enough space between the scaffold and the wall to allow one man to plaster it. In case material for stable scaffolding is not available, fix two ladders together at the top as shown in Fig. 5.16. Outside they should be spread to prevent transmitting vibrations to the wall. Remove the stabilization spreading from inside. Now it may be necessary to adjust the wall to make it stand straight and in a good circle. The foreman climbs the ladder or scaffold and inspects the shape. Where it is not in good cylindrical form, adjustments are made by fastening lengths of binding wire to the reinforcement mesh. Pull the wire with just the right strength to remove any sags or bulges (see Fig. 5.16). The next step is the preparation and mixing of the plaster, see Chapter 3.
7. Plastering the tank from the inside
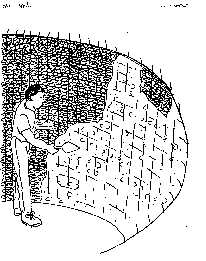
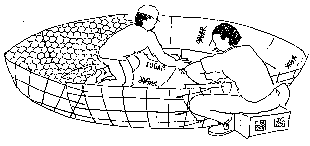
Before you start plastering, remember that the entire first coat of the tank must be plastered in one day. It is not possible to keep the unfinished plaster overnight. Where the one-day-old plaster is joined with the fresh plaster, leaking will occur. Make sure you have enough labour for mixing the plaster and carrying it to the plasterers. If necessary have two plasterers and start on two opposite sides of the tank wall. Push or smear the plaster onto the wires from the inside of the tank. Starting at the bottom, no plaster should leak through the outside cover cloth. Plaster in this way until you reach the top horizontal reinforcement wire. However, leave two squares empty at the top underneath the future roof for construction of the overflow, Fig. 5.17. After the plastering is finished, hang plastic sheets from the top to the bottom to cover the inside plaster. The plastic should overlap and be protected against blowing away by the wind. This can be achieved by fixing sisal strings at the bent formerly vertical wires of the reinforcement mesh, and weighting them with bricks or stones at the end above the floor. If the outside cover material is nylon, no further action need be taken. In the case of sisal, just splash water on it until you leave the site in the evening. This material must be kept wet to prevent the plaster from drying out. Don't forget to keep splashing water on the floor; the floor concrete should never become dry.
Only remove the plastic cover the day after you have plastered the inside of the tank. Start the second coat by throwing plaster evenly. The plaster can be a slightly wetter mixture than you used the day before, but it should not be shiny. Remember that the wall thickness when finished is only 50 mm, 30 mm of which are on the inside. Fill up the sags and level them with the bulges. Finish with a wooden float. Work with two plasterers and finish the job in one operation, see Fig. 5.18. After you have finished, cover the inside again with plastic like you did the day before.
Now remove the cloth from the outside and start plastering as for the inside, but not more than 10 mm thick. Fill the sags and level them with the bulges, Fig. 5.19. Do not float. Allow the plaster to set (about 1-2 hours). After this job is finished, which can be done simultaneously with the inside plaster levelling, Fig. 5.18, cover the wall outside as well as inside again with plastic and keep covered for at least one night. Make sure the plastic cannot be blown away. Secure it with sisal string and stones as indicated above.
The following day remove the plastic from the outside first. Throw on a light coat of plaster about 10 mm thick. Then smooth it with a wooden float until the entire outside is a smooth plumb wall. During outside plastering, prepare the overflow. Choose the place carefully. Under no circumstances should the overflow be at the same side as the tap. It is advisable to locate the overflow at a side where a slope (even a slight one) directs the flow-off away from the tank Make sure the water does not flow towards the house. With a hacksaw, cut the horizontal wires of the reinforcement mesh. The size of the opening should be slightly larger than the downpipe filling the tank. Bend down the piece of wall and wrap with several pieces of chicken wire. Place a flat board under the overflow and use one or two posts to support it. Plaster the top and smooth it. With the plaster form a gutter-shape, round or squared, whichever is easier. Do not cut through the top wires. This reinforcement is needed to keep the circle together, Fig. 5.20.
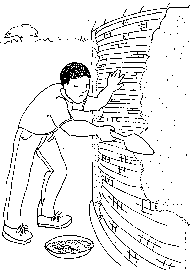
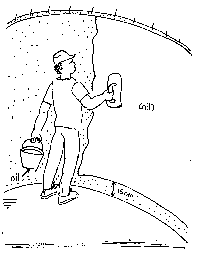
Remove the plastic foil from the inside wall and prepare the nil. If possible, the nil coat should be applied on the wooden - float-finished plaster from inside on the same day you plaster. If this is not possible, the wall must be splashed with water before applying the nil. Mix pure cement with water until you have a thick soupy consistency. This is achieved by nearly equal parts of cement and water. Stir until smooth and free of lumps. This is done most easily by adding cement to the water, in small portions, while stirring constantly, not the other way around. The mixture is called nil. Use a steel rectangular trowel and smooth it very evenly onto the new plaster. If the nil is still too thin, add more cement. Leave a 100 mm strip around the bottom of the wall free of nil. These 100 mm should be marked first to make sure you always meet the right height, Fig. 5.21. After the nil is finalized, cover the wall again with plastic, clean the concrete floor of all leftover mortar, and splash with water to keep it wet. Next day, prepare the same 1:3 mixture as specified for plastering the floor. There should be no dust or loose material left on the concrete floor. The plaster is to slope towards the outflow. You should start on the opposite side with a thickness of about 40 mm and slope down towards the outflow, reducing the thickness to not less than 15 mm, Fig. 5.22. After you have finished the float, finish the plaster with a wooden float. Give the plaster a few hours before you start the next job. For this you need a clean, round glass bottle of about 100 mm in diameter. Cut a few straight timber boards for use as walkways on the still fresh floor plaster. Use a ladder to get onto the floor and the timber boards to step on. Start at that part of the floor which you plastered first. Prepare a very well mixed cement mortar of 1:3 with a minimum of water. This plaster is to be thrown into the corner between the wall and the floor up to the mark of the nil coat at the wall. Do this a few metres at a time. Then use the glass bottle to smooth it and at the same time to shape a round concave arch, Fig. 5.23.
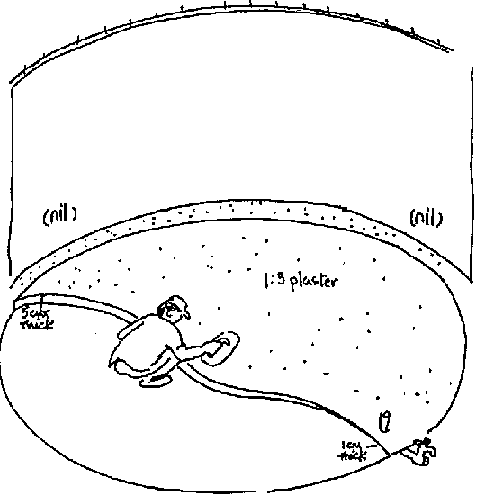
After you have shaped the corner remove the rest of the plaster carefully from the floor. Working in steps of about 2 m, move round the tank until you reach the starting point. From here you start again, this time with the nil coat. If the plaster is still too wet, wait for a while. This is an important operation and has to be done very carefully, since this part of the tank sometimes leaks. After the corner all around the tank is neatly shaped and covered with nil coat, pour water onto the floor slab. The nil coat for the floor is not to be done before the roof is finished.
8. Preparing the roof reinforcement
Turn the prepared reinforcement of the roof over and start covering it from the inside with cloth. You must sew the cloth (sisal, jute or nylon, as for the wall) to the reinforcement. It is imperative that the cloth remains in the same shape as the dome when you turn the roof back over into the normal position, Fig. 5.24. Move the roof onto the tank and put it in position, then tie it in this position using the former vertical ends of the reinforcement mesh, as well as with binding wire using pliers. After the roof reinforcement is secured onto the wall, cut out a 450/450-mm manhole using a hacksaw. Trim off all excess wires from the roof reinforcement. Examine from inside the tank. Where cloth forms a sag, sew it back to the reinforcement. Support and prop up the roof from inside with poles, starting in the centre. Now mark the place (or places) where the downpipe from the roof will be fitted into the tank. This remains an opening. Start plastering and use the same mixture as you used for the wall, keeping it slightly wet. If the mixture falls through the wire it is too wet. After the roof is plastered with the first coat, cover the entire tank with plastic.
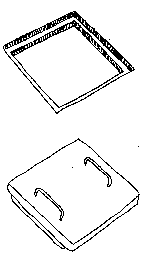
Next day place the second coat on the roof, smooth it with a wooden float. Prepare the manhole cover using the same size and shape as the opening. Cut a piece of reinforcement mesh slightly smaller than the manhole cover. Shape a mould in the ground or shutter with wood to form handles as shown in Fig. 5.26. Make sure the manhole cover does not become more than 30 mm thick. You can put a piece of chicken wire on top of the reinforcement mesh and fix the end of the handles on the bottom side of the reinforcement. Put the reinforcement into the mould and pour 1 :3 concrete in it, lifting the reinforcement up slightly.
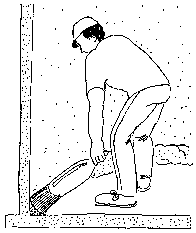
After two days you can remove the support poles from inside the tank and start plastering the dome from the inside. This plaster is mainly to cover the sags and the reinforcement and is not supposed to be entirely smooth. But it is important that all reinforcement still visible is covered by at least 10 mm plaster. Remember water in the tank will evaporate and condense inside the roof. The condensation creates corrosion of the reinforcement if it is not properly covered with cement mortar. While plastering cut a piece of galvanized gauze wire overlapping all sides of the overflow opening by 30 mm. Fix it in position with binding wire from inside, then plaster on top of the overlap, keeping the overflow opening uncovered, Fig. 5.27. If you need a scaffold inside the tank to reach the dome for plastering, make sure it does not damage the floor plaster. Always put straight timber boarding underneath the scaffold. After the roof plaster is finished, remove everything from inside the tank and clean the floor, using a broom -if available a wire broom. It is very important to clean the floor as well as possible. If there are marks or holes in the floor plaster, patch them with a 1: 3 mixture. Next prepare a mixture like nil, but add one part fine sand (two parts cement, one part fine sand) and water. The consistency should be slightly stiffer than the nil coat you used for the wall. Plaster this mixture on the floor inside the tank using a rectangular steel trowel. After you have finished the last coat, set the floor under water. However, use the water carefully Do not pour a bucket of water on the floor from the manhole. The water will spoil the smooth surface. If you have a hose, put the end on the bottom of the floor and open the tap. If a hose is not available, take a timber board covered at one end with some cloth, and place this end carefully on the floor through the manhole. The upper end must lean on the edge of the manhole. Then take a bucket of water and pour it along the board slowly, so that it runs down to the bottom. Repeat this until the floor is covered with water. After the manhole cover has been inserted, the reservoir is ready. Downpipes should be connected but, before the crew leaves the site, water must be filled into the reservoir up to a level of at least 100 mm.