| Back |
Lichen collection, preservation and identification methods for beginners
| Introduction | |
| Grouping Lichens | |
| Differentianting Lichens from Other Groups of Plants | |
| Collection and Preservation | |
| Identification of Lichens | |
| Morphology | |
| Anatomy | |
| Chemistry | |
| Conclusion | |
| Activity |
| Introduction |
Lichen is a combination of two organisms, an alga and a fungus, living together in symbiotic association. The algal component in the lichen is called phycobiont or photobiont while fungus as mycobiont. The phycobiont and the mycobiont loose their original identity during the association and the resulting entity (lichen) behave as a single organism, both morphologically and physiologically. Hence the lichen is called as a composite organism. In lichen thallus (body) the mycobiont predominates with 90% of the thallus volume and provides shape, structure and colour to the lichen with partial contribution from algae. Whatever visible from out side in a lichen thallus is fungal part, that holds algal cell inside. Hence the lichens are placed in the Kingdom Mycota (Fungi). The fungi present in lichens are called as lichenized fungi. Among the 20,000 lichen species known in the world 95% belongs to the Ascomycetes group of fungi while Bacidiomycetes and Deuteriomycetes groups are represented by only 3% and 2% of species respectively.
Lichens can grow in diverse climatic conditions and on diverse substrates. The lichens that are growing on tree trunk and bark are called corticolous lichens, twig inhabiting ones are ramicolous, on wood - legnicolous, on rocks and boulders saxicolous (epilithic), on moss - muscicolous, on soil - terricolous and on evergreen leaves foliicolous (epiphyllous). In general any lichen growing on other plant is called as epiphytic . The lichens can grow on underwater rocks, but not freely in water or on ice. The lichens are widely distributed in almost all the phytogeographical regions of the world. Sufficient moisture, light and altitude, unpolluted air and undisturbed, perennial substratum often favour the growth and abundance of lichens.
| Grouping lichens: |
By their appearance the lichens can be grouped into three main categories of growth forms,
 |
• Crustose lichens: The thallus in crustose lichen is closely attached to the substratum without leaving any free margin. The thallus usually lacks lower cortex and rhizines (root like structure). Such lichens are collected along with their substratum for the detailed study.
• Foliose lichens: They are also called as leafy lichens. The thallus in this case is loosely attached to the substratum at least at the margin. Such lichens are collected by scraping them from the substratum.
• Fruticose lichens: Here the lichen thallus is attached to the substratum at one point and remaining major portion is either growing erect or hanging. The lichen usually appears as small shrub or bush and easy to collect with hand. |
 |
 |
There are few intermediate categories of growth forms such as,
• Leprose lichens: The leprose lichen is powdery or granular and does not form smooth thallus. • Placodioid lichens: In this case the lichen thallus is closely attached to the substratum at centre and lobate or free at the margin, but lack rhizines. • Squamulose lichens: Here the lichen thallus is in the form of minute lobes, having dorsiventral differentiation. The rhizines may be present or absent. This is a form intermediate between crustose and foliose. • Dimorphic lichens: In case of dimorphic lichens single thallus has the characters of both foliose/ squamulose and fruticose lichens. The squamules are the primary thallus, which bears erect body of fruticose lichen, the secondary thallus. |
 |
|
 |
The above-mentioned growth forms of lichens can be arranged according to their imaginary evolution; Leprose (pioneer) → Crustose → Placodioid → Squamulose → Foliose → Dimorphic → Fruticose (latest). The leprose, crustose, few placodioid and squamulose lichens are generally called as microlichens, because of their smaller size and require microscopic studies to identify. The foliose, dimorphic and fruticose lichens on the other hand are called as macrolichens . The macrolichens have comparatively larger thallus and a hand-lens, dissection or stereozoom microscope is sufficient to identify them.
The crustose, foliose, squamulose, placodioid and sometimes, dimorphic forms of lichens usually grow in a circular and centripetal manner. The rough and uneven shapes of the substratum may change the shapes of the lichen colony. The leprose lichens form irregular patches of thallus on the substratum. The fruticose lichens of smaller size usually grow erect while larger ones hang from the substratum with their growing point located at the tips.
| Differentiating lichens from other groups of plants |
The non-lichenized fungi, algae, moss, liverworts (bryophytes) are the plants, which grow on rocks, bark and on soil and can be confused for lichens to the beginners. However, lichens can easily be differentiated from these plants in the field. The lichens are never greener as algae, liverworts and mosses. Foliose lichens in the moist places or in wet condition may look greener, but have thick, leathery thallus while liverworts have non-leathery and slimy thallus. The dimorphic forms of lichens such as Cladonia may confuse with the leaf liverworts and mosses. However, leaf liverworts and mosses have dense small leaf like structures throughout the central axis of the plant, while in case of dimorphic lichens the squamules of semicircular shape usually present at the base of the central axis or sparse throughout. Algal mat are usually found in water-flooded habitat and slimy. The beginners may confuse the dried algal mat on rocks and bark for lichens. By spraying some water on these mat one can make out whether it is algal mat or lichen.
The non-lichenized fungi are the most confusing ones with crustose lichens in the field. Such fungus usually forms patches with loosely woven hyphae, which will be evident under hand lens. The lichens on the other hand form smooth and circular patches. The fungi are usually whitish in colour and lichens are greyish, off white, yellowish, yellowish-green or sometimes bright yellow or yellow orange in colour. The lichen thallus usually bears cup like structures called apothecia (Fig. 8), or bulged, globular or immersed pitcher like structures called perithecia (Fig. 9) as sexual reproductive organs. The finger-like projections called isidia (Fig. 10) or granular, powder-like structures called soredia (Fig. 11) are common vegetative organs. Some crustose lichens belonging to family Graphidaceae bear worm like structures, which are nothing but the modified apothecia, and are called as lirellate apothecia (Fig. 12). While collecting lichens it is necessary to look for such structures with the help of hand lens. When a lichen thallus does not have any such structures, it is difficult to differentiate it from fungus. |
 |
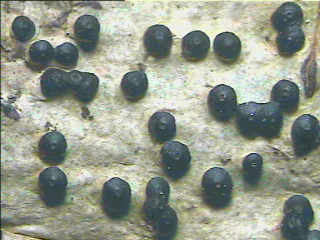 |
Upper row - Fig 8, 9 |
In any case, it is experienced that a beginner normally collects fungus and other plants in place of lichens. Such specimens are identified by taking a thin section of the thallus and studying under microscope. If the section contains both fungal tissue and algal cells, the specimen is lichen otherwise it is something else. In India basidiolichens (looking like mushroom) are rare or absent.
| Collection and preservation: |
Both the micro and macrolichens are visible to naked eye in the field. However, a hand lens, preferably of 10x magnification, is necessary to examine the fine structure of the thallus while collecting. A sharp, flat edged chisel (1 to 2 inch wide edge) and a hammer (1 kg weight) are the tools required for collecting lichens from the bark. A pointed or stout flat edged chisel can be used to collect lichens growing on rocks. Polythene packets (smaller (6 x 12 inch) and bigger sized), rubber bands, labeling stickers, a field book, notebook, pen, pencil, plant press, knife, secateur (twig cutter), hand lens, old news papers or blotters, (nylon) ropes, collection bags, herbarium packets are the other necessary items required during a lichen collection trip. An altimeter, Global Positioning System (GPS), camera and few other instruments can be carried as per the objectives of the study (Fig. 13). The field book is different from the notebook in having printed columns for entering required data, such as date, locality, altitude, collector's name and remarks. Every page of field book has serial number. The numbers are also printed several times, one below the other on the free (right) side of the filed book. These numbers are for placing along with the specimen in the field ( Fig. 14). |
|
The lichens are usually collected along with their substratum irrespectively of their growth form. Only the lichens that are very loosely attached to substratum are scraped out and collected. The corticolous lichens growing on tree trunk at reachable height (up to 2 3 m from ground) are usually collected and canopy lichens can be found fallen on ground. Special tree climbing methods can be adopted for studying the canopy lichens. Superficial bark should be removed with the help of chisel or knife in order to avoid damage to the trees. The ramicolous lichens are collected by cutting twig with secateur. In case of saxicolous lichens smaller pieces of the rocks should be collected in order to avoid over weight. The lichens on the edges or crevices of rock are collected by breaking the rock. Sufficient amount of specimens (at least 2 thallus or patch of 5-10 cm) should be collected, as the material will be consumed for chemical analysis (TLC) and microscopic study. The bulk collection also helps to designate it as various types (Holotypes, Isotype, Partype) in case it is new taxa. Further, it will also be convenient to distribute it to other herbaria as exsiccates or voucher specimens. However, unnecessary or repeated collection of same material should be avoided in order to conserve this group of plants. For beginner different lichen specimens can look same or specimens of same species may look different. Till one gains experience, samples looking different on careful observation can be collected. The collected lichen samples are transferred to the polythene packets, labeled and closed with the help of rubber bands. Several such packets are then transferred to larger polythene or collection bags. Or one can also keep the collected material in newspaper or blotter packets. It will be better if the different specimens are kept in different packets to avoid mixture. Otherwise, all the collections from a single tree can be kept together, or even collections from several same species of tree in a study area can also be put together in bigger polythene bag. The lichen specimens should not be kept in polythene packets for longer duration as it gets spoiled due to fungal attack when wet or changes in colour as it dries. While collecting the lichens the field data required should be noted in the field book and its respective number is cut and put in the packet along with the specimen. After returning from field all the specimens should be transferred to newspaper or blotter packets along with their labels for drying. The lichen specimens on wet barks should be kept in plant press and tied tightly. Otherwise the bark gets curled up as it dries, makes uncomfortable to preserve in herbarium packets and also gives shabby look. Much dried and curled specimens can be stretched using water and by spreading on blotters. The specimens can be dried under sun. If the specimen-processing place is moist, damp or if it is winter or rainy season, the materials can be dried with the help of heater or hot-air oven. If insects are seen in a collection they should be killed either by drying the specimens openly in hot sun or by placing sealed specimen polythene in deep freezer (- 20°C) for three days.
The lichen herbarium packets should be made up of thick, white or brown hand made acid free paper . The paper sheet of dimension 13.5x11.5 inches is folded lengthwise twice and then side ways to produce the packets of dimension 7x5 inches with upper flap of 3.5 inches to stick the label (Fig. 15). The herbarium label should contain the information of name and family of the lichen (which can be written after the identification), detailed locality and altitude from where it has been collected, date of collection, a reference number, collectors name and notes on its substratum and any other interesting observation. After the identification name of the person who identified (determined) the specimen can also be mentioned. The label should be written legibly with black, waterproof, permanent ink pen and not with ballpoint or gel pen. Alternatively A4 sized paper can also be used for making herbarium packets. If it is used, the dimensions of the packet change slightly. Using A4 papers has the advantage of saving time, avoiding messy gum, ink and shabby look due to bad handwriting by printing the details on the paper. A label template can be designed in the word processor for this purpose. If all the information regarding a species is available in computer, it is even possible to programme PC to print large number of label within a short period of time. The black laser print should be taken and not inkjet prints. |
|
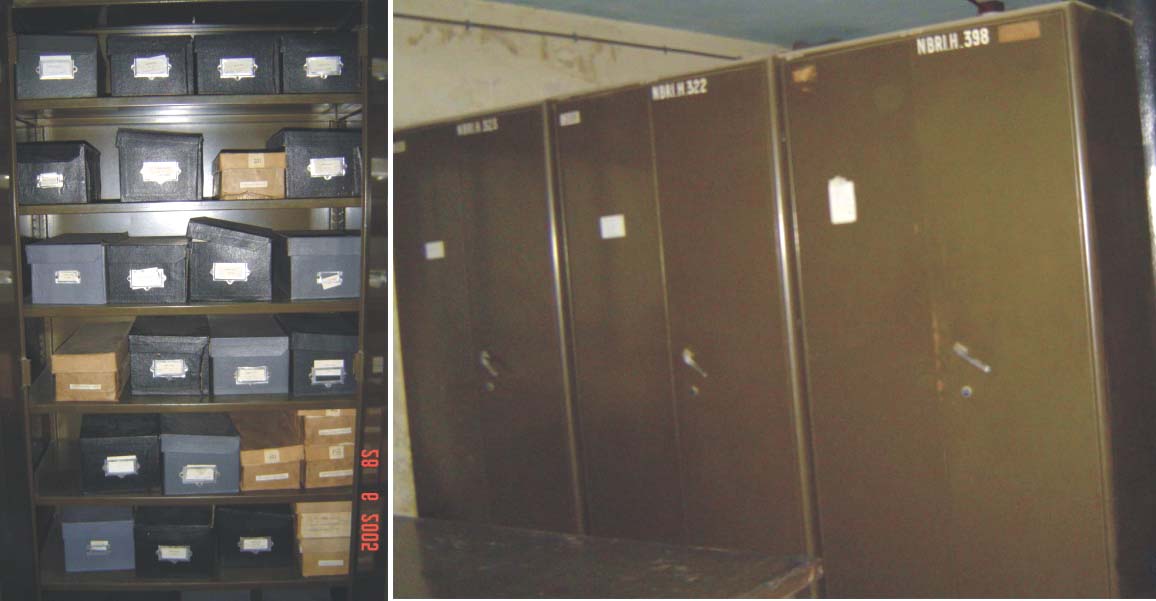
No poisoning methods are available for lichen preservation. The sufficiently dried lichen specimen should be pasted on thick, hard paperboard of dimension 6.5x4.5 inches (little less than the total packet size) and then placed inside the herbarium packet. The board also should have the same reference number as on the label. In case of terricolous lichens gum (Quick Fix, Fevicol, paint) should be applied all around the soil cluster in good amount (without spoiling the lichen), so that the soil does not get powdered. Later on such specimens can be pasted on the board. Small or delicate samples can be kept within a paper packet pasted to the board, or in small boxes. A piece of tissue paper is kept over the lichen specimen pasted on the board while keeping it within the herbarium packet. A herbarium packet should have only the specimen belonging to single species and mixtures should be avoided. If the material is in large amount they can be distributed in two or more packets to avoid spoiling of specimen due to crushing or shabby look of the packet. However, all these packets should have same number, one packet with good specimen can be treated as original while others are marked as duplicate. Several herbarium packets are then kept upright in drawers or cupboard / hardboard boxes of dimensions approximately 8x5x12 inches (like shoe box, Fig. 16). The boxes are then placed in almirahs (Fig. 17). |
|
 |
|
The storage place of herbarium should be dry to prevent fungus growth on lichens. Booklice are the common insects which quietly damage packets and lichen specimen in short time during storage. However, booklice can be kept away by placing naphthalene balls in herbarium boxes and in almirah. The lichen specimens within the boxes as well as in almirah can be arranged in alphabetical order. As in flowering plants, no particular classification system is followed for lichen specimen arrangement.
| Identification of lichens |
The collected lichen specimens are initially segregated according to their growth form. Within the growth forms the specimens can be further grouped according to the type of their fruiting bodies (apothecia, perithecia, or sterile).
Before starting the examination of specimen for identification, one should have a tool or pencil box containing few items needed for handling the specimens. The simple but necessary items needed are razor or snapper blades, plastic-handled needles, pointed and flat-tipped forceps, injection syringes (2 ml capacity) or capillary tubes or glass rods, pencil, sharpener, eraser, small transparent scale, round brush of 0 1 size, Quick Fix, permanent ink pen, etc (Fig. 18). The syringes are used for keeping and applying chemical reagents during identification. One syringe will always have distilled water in it. The syringes are kept capped while not in use. |
Lichens are identified by studying the morphology, anatomy and chemistry of the specimen. The micro and macrolichen keys of Awasthi (1988, 1991) are the important literature referred for identification of lichens. The beginner should have a glossary of technical terms in lichenology while identifying the lichens. Illustrated glossary or identifications manuals are rare for Indian lichens. A botany student or one with mycological background can follow the terminology and key. All the observations made on a specimen can be written on a piece of paper (description slip) and kept inside the herbarium packet to avoid repeated observation or section cutting. The description slip should contain the specimen number.
The morphological and anatomical characters to be observed in lichen specimens differ from one group of lichen to the other. However, some common characters to be noted are given below.
| Morphology |
The morphological characters of a lichen specimen is studied under dissection or stereomicroscope. Type of thallus (leprose, crustose, foliose, squamulose, dimorphic, fruticose), its shape (irregular, circular) and size is noted.
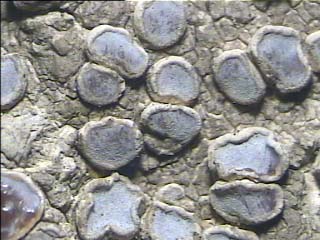
Upper surface : The colour of the thallus, texture (smooth, rough, warty), presence of finger like projections (isidia), granular powder in groups (soredia), fine powder (pruina), black dots (pycnidia, Fig. 19) and whitish decorticated areas (pseudocyphellae, Fig. 20) are to be noted in case of crustose and foliose lichens. The branching pattern, length and breadth of marginal lobes, presence of hair like structures (cilia, Fig. 21) in case of foliose lichens has to be noted. The morphoology of fruiting bodies have to be studies separately. In case of apothecia, shape (rounded or stretched or lirellate apothecia), size, the mode of attachment (stalked or not), colour and texture of the apothecial margin and disc, presence or absence of powder (pruina, Fig. 22) on the disc, shape of the disc (convex or concave) are necessary characters to be observed. In case of lirellate apothecia the branching pattern and colour of slit can be noted. Sometimes apothecial disc become loose, powdery or hazy and such cups are usually held by long stalk. Such apothecia are called as mazaedium (Fig. 23). The colour of the mazaedium and length of the stalk can be noted. In case of perithecia, its colour, shape, size, the position of the opening (apical or lateral), whether single or grouped are to be noted. Some crustose lichen does not form definite fruiting body. However, fruiting body structures group together and visible as bulged or flat structures with various shapes usually black, brown or grey coloured. Such structures are called unorganized ascocarp (Fig. 24) or fruiting body. |
||
 |
||
 |
Lower surface: The lower surface of only foliose lichens can be seen, as it is absent in crustose lichens while fruticose lichens do not show dorsiventral differentiation. The colour of lower surface, presence of any pores, presence or absence of rihizines (root like structures, Fig. 25 (given above)), their colour, distribution, branching, abundance is to be noted.
| Anatomy: |
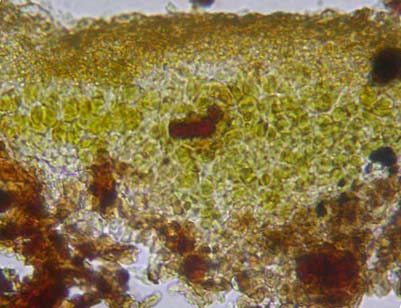
The anatomy of lichen thallus and fruiting bodies is examined under compound microscope with magnification 4 - 40x. The anatomy of the thallus is occasionally studied to see the thickness of various layers (upper cortex, algal layer, medulla, lower cortex), type of algae and their distribution (stratified heteromerous or uniform homeomerous) and to study the arrangement of fungal hyphae (vertical or horizontal) within the thallus (Fig. 26 (given above)) . The section of thallus can be cut with razor blade by keeping the fragment of thallus in potato or papaya pith. Microtome sections are very helpful but it is a time-consuming process. Just to check the type of algae present in the thallus one need not cut a section. By the colour of the thallus one can make out the type of alga (at least group) present. Lichen with blackish, bluish, slate grey thallus usually has blue green alga, while greyish, yellowish, brownish, greenish thallus has green alga. However, it is better to confirm the type of alga present by following an easy procedure. The algal layer of the lichen thallus is exposed by scraping the upper cortex with razor or snapper blade. Alga (which appears green, dark green, blue green, black) is picked up with blade or needle, transferred to the slide and examined. Sometimes in the field while differentiating lichens from fungi one can check for alga (green or dark green pigments) by exposing the upper cortex with blade.
The anatomical characters of fruiting bodies (ascocarp) are very important identification aids, especially in case of crustose lichens. The type of spores (simple, septate), their shape, size, number of spores per a spore-sac (ascus), colour of ascocarp wall, presence or absence of crystals, algal cells in the wall, colour of different layers of ascocarps are to be noted (Fig. 27). |
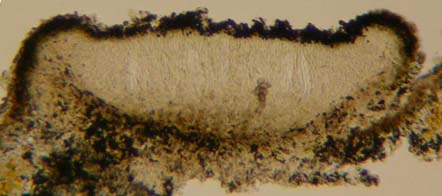 |
A thin, hand section of ascocarp is taken with the help of blade while it is still attached to the thallus or substratum and by viewing through dissection or stereomicroscope. The ascocarp is made wet with a drop of water before cutting the section (Fig. 28). Few thin sections are enough to observe the necessary character. (The sections of crustose lichen thallus are also cut in the same way). In case of unorganized ascocarp, section can be taken in similar way or ascocarp is scraped with the help of blade and transferred to slide for observation. In case of mazaedium the disc is scraped and slide is prepared to see the type of spores. |
|
 |
|
The sections of thallus and ascocarps are mounted with plain water to observe the major characters. The lactophenol, cotton blue and other stains can be used to colour different tissue as per requirement. Semi-permanent slides are prepared by adding a drop of glycerol-water mixture (1:1) to the slide and by sealing the cover slip with gum (Quick Fix). For measuring the size of various structures the microscopic should be micrometrically calibrated (find the procedure in any practical biology book).
| Chemistry: |
Lichens produce around 600 secondary metabolites and these metabolites are popularly known as lichen substances. Out of the 600 lichens substances around 550 are unique to the lichens and are not available in any other plant groups. Most of these lichen substances act as an important character for identification of lichens (chemotaxonomy). The lichen substances are identified by performing colour spot test or thin layer chromatography (TLC) or by high performance liquid chromatography (HPLC). Standardized methodology is available (Walker and James 1995) for performing lichen chemistry.
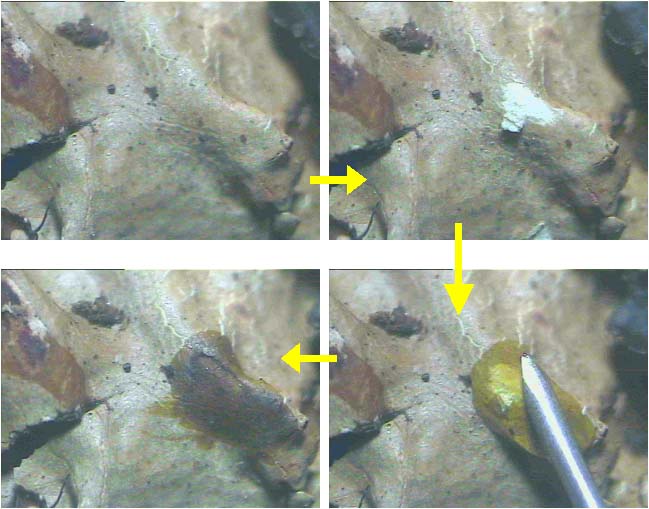
Colour spot test: Three chemical reagents commonly used for colour spot test are aqueous potassium hydroxide (K), bleaching powder or aqueous solution of calcium hypochlorite (C) and aqueous solution of paraphenyldiamine (Pd). K-test is performed either on upper surface of thallus (cortex) or on medulla by exposing it with blade, or on both. A drop of K solution is taken with the help of syringe, capillary tube or with glass rod and then placed on the cortex or medulla and colour reaction is noted. Similarly, C and Pd test are performed and colour changes are recorded. KC-test is performed by applying K solution first and then applying C solution over earlier K solution drop immediately. The colour of the cortex or medulla changes due to presence of particular lichen substances in lichen thallus (Fig. 29). |
 |
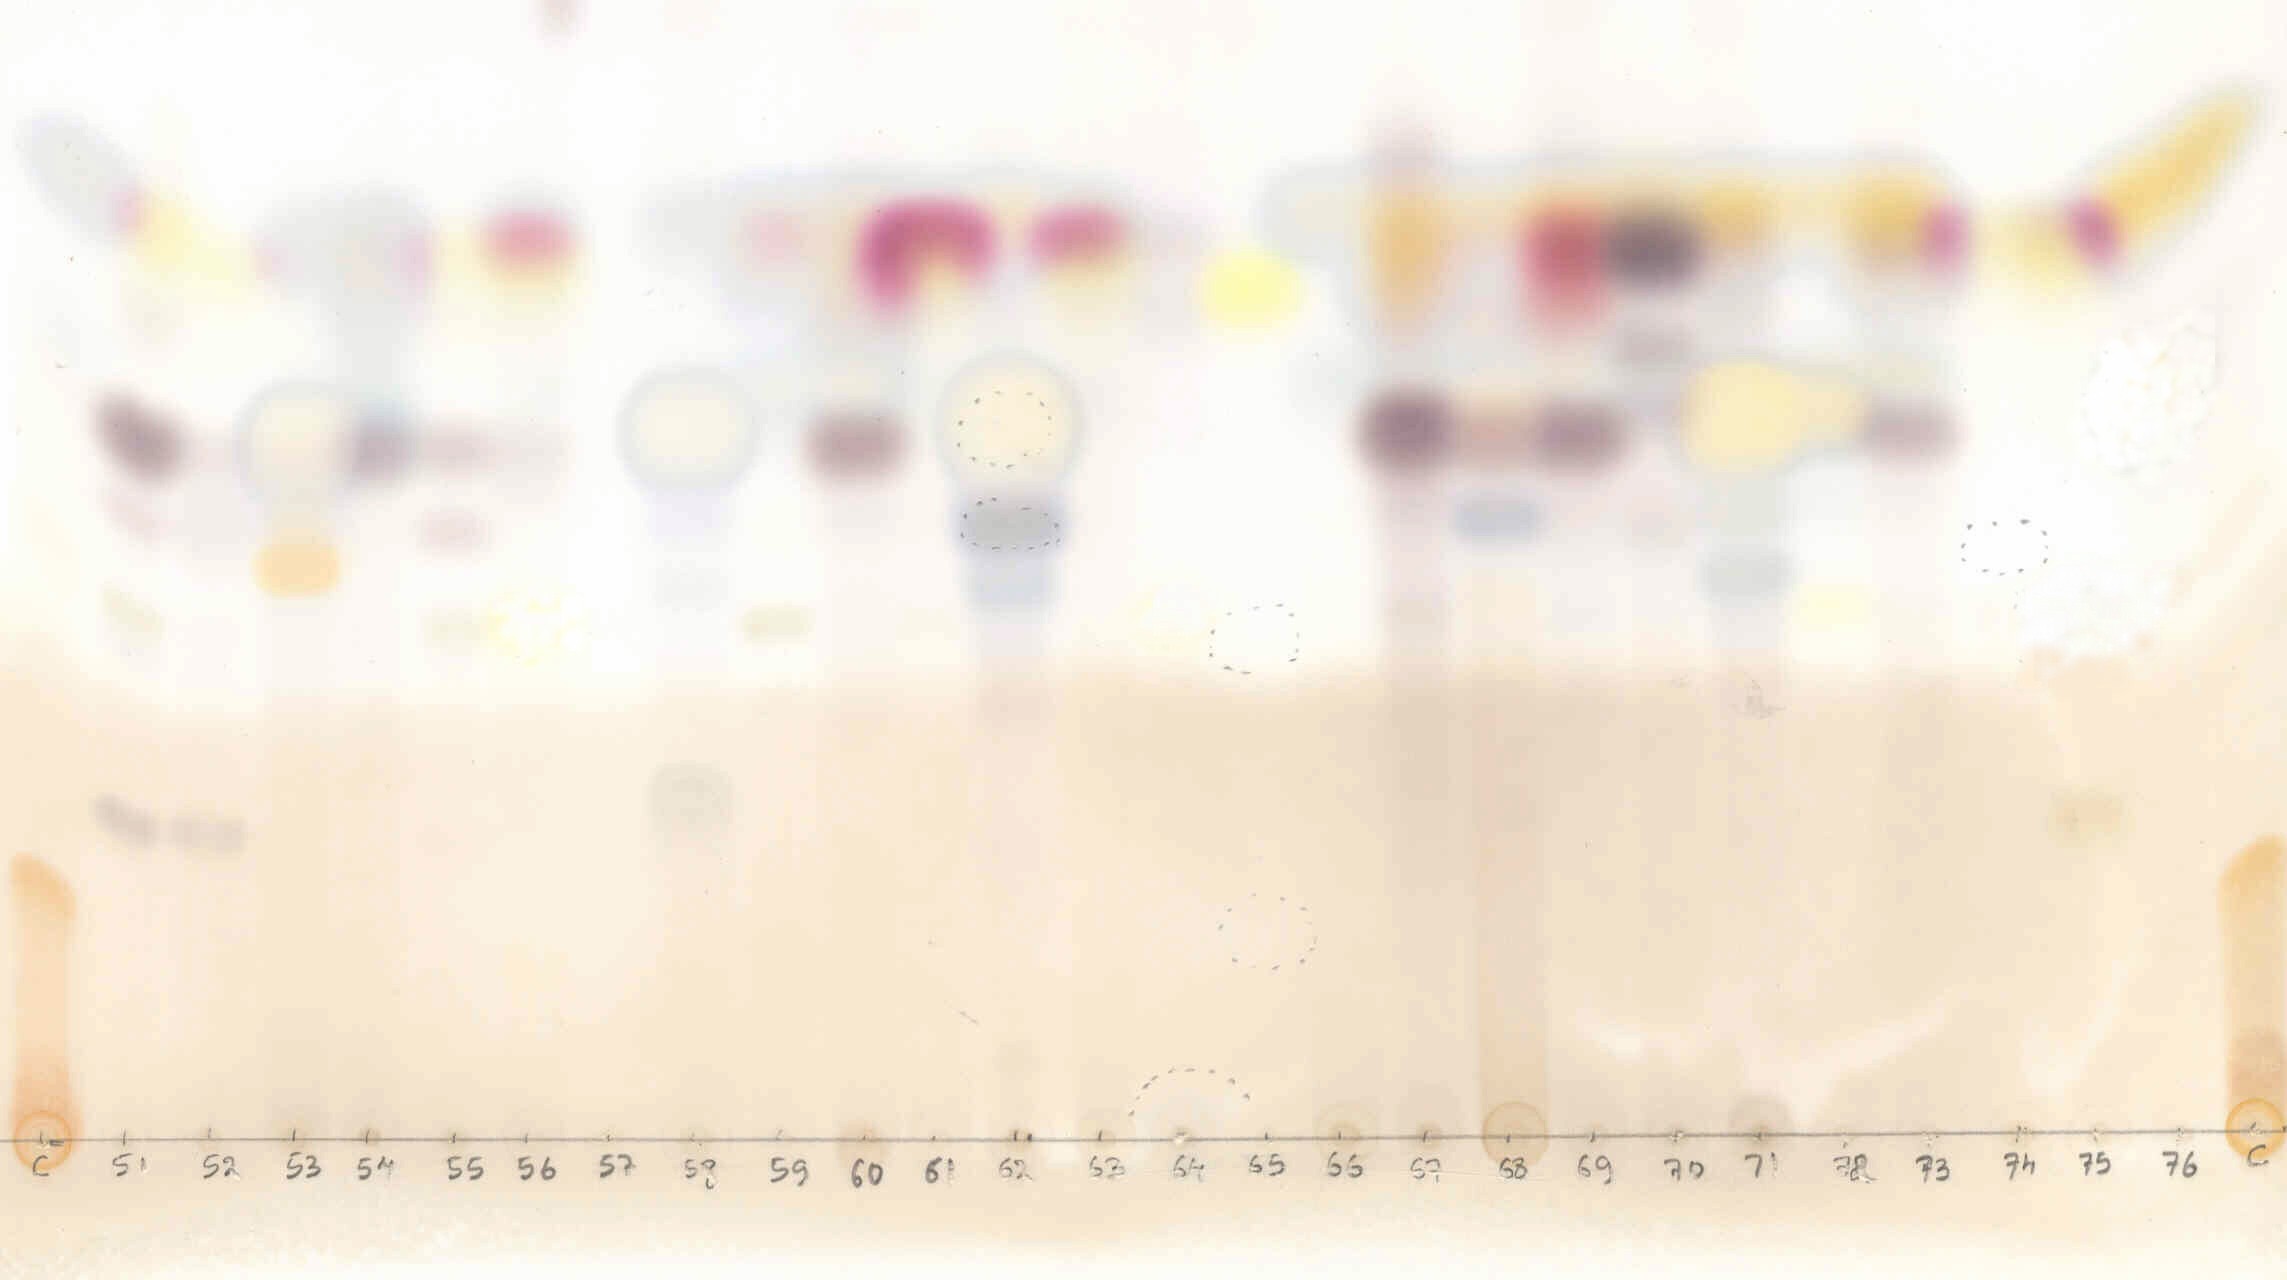
TLC: Sometimes, many lichen substances are undetectable in colour spot test or it may not give proper result. In such cases TLC have to be performed. In TLC various lichen substance presents in a lichen thallus get separated as spots on plate. The spots are identified as different lichen substances by noting its colour and measuring the distance moved by it, with the help of TLC manuals (Fig. 30). |
 |
HPLC: Now-a-days usage of HPLC with reversed-phase columns, gradient elution, benzoic and solorinic acids as standard has become a common practice in abroad to identify lichens substances, which are unidentifiable in TLC. A retention index (RI), calculated from the elution time of the appropriate peak with reference to the standards, is used in identification (Fiege et al 1993). RI values have been calculated for most of the lichen substances and are available. HPLC is quite an expensive method and also not possible to try on every collected specimen. Therefore, the materials to be chemically investigated are initially screened out with TLC and only few interesting or the specimens with complicated chemistry should be analyzed through HPLC.
Some lichens thallus emits florescence (yellowish, bluish) when observed under UV light due to the presence of lichen substance called lichexanthone, and it is an important taxonomical character for identification of species in few cases. Such lichens are examined by keeping them in a closed UV lamp chamber and exposing them to UV light of wavelengths 254 and 365 nm.
As per rule of International Code for Botanical Nomenclature (ICBN), after the identification of a species, a set of voucher specimens should be deposited in any recognized herbarium and it has to be mentioned in any publication arising out of the study. This will help other researchers to refer whenever needed.
Some important characters to be examined in a lichen thallus during identification are summarized in flow chart below (Fig.31).
| Concluding note: |
The identification is the primary step in any lichenological study. The lichens may appear as difficult plants to study but in reality they are an interesting and quite easy group. The lack of simplified, illustrated identification manuals is the main constrain faced by several interested Indian researchers. Such field-guides and handbooks are yet to be produced by Indian Lichenologists. For the time being, following are the most important literatures required for identification of Indian lichens,
• Awasthi, D.D. 1988. A key to the macro lichens of India and Nepal. J. Hattoi Bot. Lab. 65: 207-302.
• Awasthi, D.D. 1991. A key to the microlichens of India, Nepal and Sri Lanka. Biblioth. Lichnenol. 40, J. Cramer, Berlin, Stuttgart. Pp. 337.
• Walker, F.J. & James, P.W. 1980. A revised guide to microchemical technique for the identification of lichen products. Bull. Brit. Lich. Soc. 46: 13-29 (Suppliment).
• Fiege, G.B., Lumbsch, H.T., Huneck, S. & Elix, J.A. 1993. Identification of lichen substances by a standardized high-performance liquid chromatographic method. J. Chromatogr. 646: 417-427.
These literatures are quite voluminous and might not be available in all libraries. Consulting any laboratory engaged in lichenological research is the best method to get the required literature and guidance. The updated information for several groups of lichens is now available. The Lichenology Laboratory at National Botanical Research Institute, Lucknow, is ready to guide any one who is interested to take up lichens for their career or even as a hobby.
Legends for the figures:
Figure 1. Crustose lichen Letrouitia domingensis (Pers.) Haf. & Bellem.
| Activity: |
If you have gone through the article, try to answer the following questions. You can refer to the article in case of any doubt or to check whether your answers are correct or not.
1. Can you recognise the following?
. 
2. Can you make a list of the items in a tool box, which are needed in identifying a lichen?
3. Try to make a note of the anatomical and morphological features of lichens.
4. Where do you find lichens?